Category: Stories
January 1, 2013


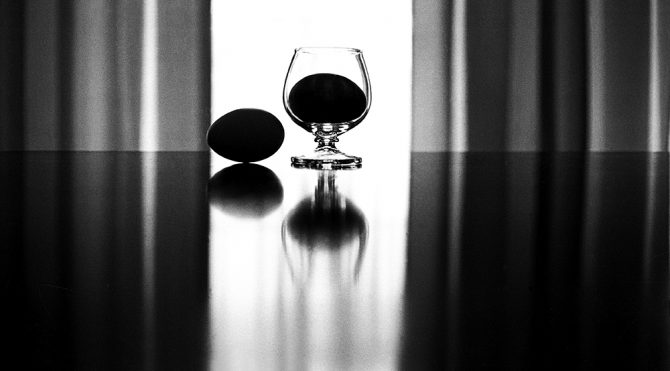
Egg in Glass – Age 14
What do you want to be when you grow up? What child has not been asked that question a hundred times, and who over the years hasn’t had a variety of answers? Fireman, policeman, teacher, nurse… Those answers were not prophecies or predictions, but merely answers that were reflective of this month’s favorite TV show or parental expectations. What we would actually become in life was more often due to luck or chance, rather than careful career planning.
I was fourteen years old and living in Rochester, NY. One day I was hiking in the woods when I came upon a crumbling and deserted home that my friend told me had once belonged to George Eastman. I knew George Eastman was connected to Kodak and this piqued my interest enough that I checked out his biography from the school library.
I started reading and could not put the book down. I was captivated by the wonder of photography and before I had finished the book, before I had taken a picture or before I had ever seen a print develop in the darkroom, I knew that I was destined to be a photographer. I know that using the word “destined” is a bit presumptuous and grandiose, especially for a 14 year old, but that is what I was meant to be.
I had been infatuated with various things before, just a year earlier I had fallen in love with architecture and I wanted to become an architect. But never before or since have I felt “destined” to become anything; it wasn’t just something that I wanted to be, it was something that I felt destined to be.
Why a photographer? I don’t know, but it was almost a Déjà vu moment, like I had been there before and had now come home. Ever since that moment almost 45 years ago, I have never doubted that this is who I am.
And so for the next 10 years I learned everything I could about photography. I am self taught and have never taken a class or workshop in my life. I’ve learned through studying, experimenting and through the friendship of three great men.
I started off by reading every single book I could find on photography; I studied the history of photography as well as the science. I studied about cameras, techniques, processes and about the different types of photography, from fine art to scientific. Because I didn’t know what direction I would eventually go, I studied everything about everything.
I studied the images created by the great Masters of Photography. I spent countless hours looking at every image I could find and tried to identify why certain images fascinated me and caused a shiver to go down my spine. These were a very particular type of image; dark and contrasy images with bright subjects. I found myself particularly drawn to images by Ansel Adams, Edward Weston and Wynn Bullock and later I would find my work going in this direction.
I set up a darkroom, first commandeering the family bathroom with a Sears’s enlarging kit and then taking over the basement and purchasing an enlarger and proper darkroom equipment. Everything was an experiment and an adventure, and those were some of the happiest days of my life; experimenting, failing, succeeding but always learning.
I had always been an impatient sort and learning this way, independently and hands on, allowed me to hyper-accelerate my learning and to go in any direction I felt inspired. I think it was at this point in my life that I began to form the habit of learning by doing and avoiding structured and formal education.
Another way that I learned was from the assistance of three men who touched my life and taught me some life lessons. Three great men, three great lessons.
The first was Mr. Casey who owned Casey’s Camera’s in Rochester, NY. I was a boy of 14 with very few dollars to spend and an enormous thirst to learn. Mr. Casey tolerated my many visits, the endless hours looking at his cameras and all the associated questions. He always showed patience and tolerance and magically a used camera was always within my price range. It was only recently, as I recounted those experiences, that I fully appreciated what he had done for me. I contacted Richard Casey, now 82 years of age, and thanked him for his simple acts of patience and kindness. His example has inspired me to return the same gift to others.
The second significant influence in my life was Joe Boyle, an old-school photographer who worked in Hollywood shooting stills for the studios. Joe hired me to work in a department store’s camera department and he then became a friend and mentor. Joe was king of the cheap and dirty solution; he could solve any problem with the most basic of materials and a lot of imagination. He truly was a follower of Rube Goldberg and the King of Kluge.
He once taught me how to remove telephone lines from an image long before the days of digital and Photoshop. We mounted a piece of glass about 12″ in front of the camera lens and then looking through the camera, drew over the telephone lines with Vaseline on the glass. The glass was out of focus and the Vaseline blurred out the telephone lines, a simple solution with simple materials. This was the great lesson I learned from Joe; to look for the simple solution and to improvise.
The third mentor in my life was John Holland, a photography teacher at Loara High School in Anaheim, CA. I relocated to Anaheim in my Junior year and naturally gravitated to the photography department. I had no interest in the basic photography classes that were offered and so John allowed me to have an open-study photography period, where I basically just wandered the campus and photographed. Unlike so many other teachers and photographic approaches that I was aware of, John encouraged me to focus on the creative over the technical. This was such a different approach than I had been pursuing, that I thrived creatively and started the early transition from photographer to artist. This was the important life lesson John taught me, that the creative is more important than the technical and that I should find my creative vision.
Here are some of the images that I created during those early years:

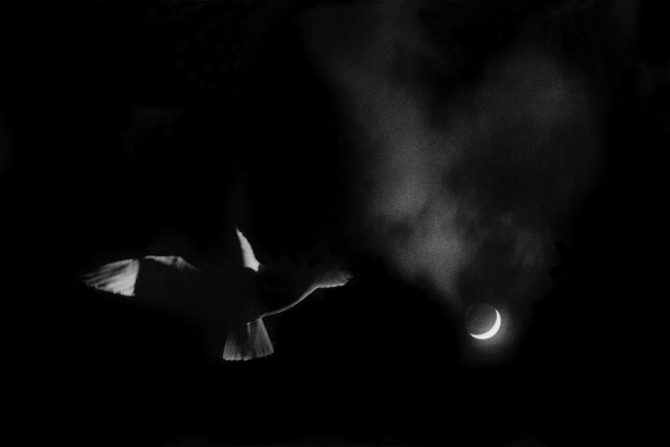
Gull and Moon – Anaheim, CA
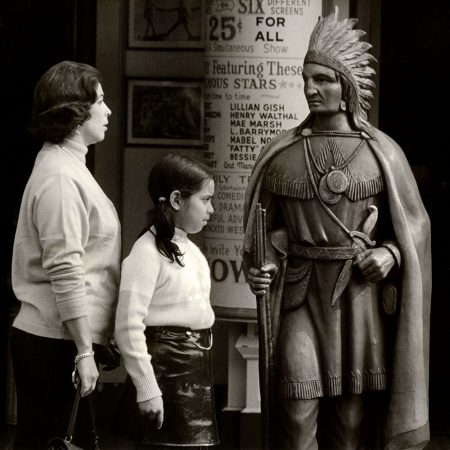
Wooden Indian – Anaheim, CA
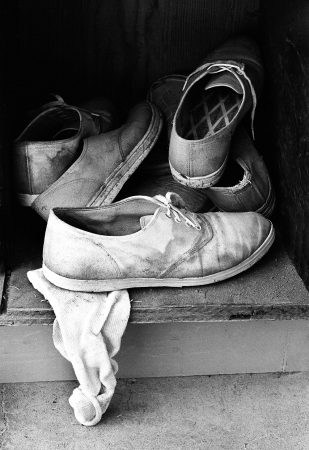
Old Shoes – Anaheim, CA
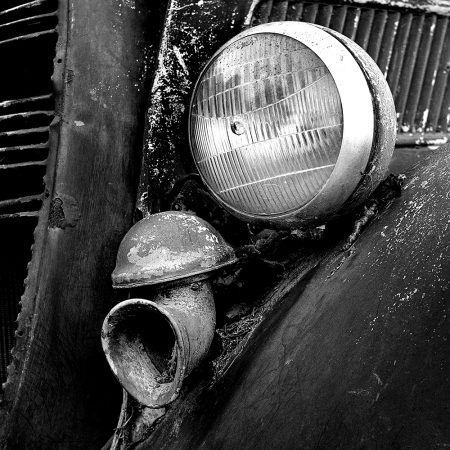
Headlight – Anaheim, CA
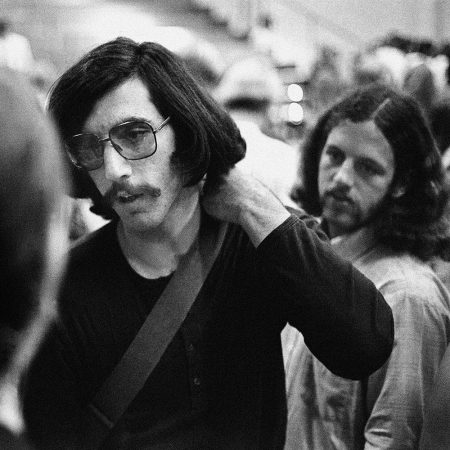
Two Hippies – Anaheim, CA
High School was coming to an end and I needed to decide what I wanted to do for a living. I had assumed that I would pursue photography at the Rochester Institute of Photography, which had always been my dream. But as the time drew near to make such decisions, I started to have doubts, not of my love for photography or my destiny, but of other things.
I began to question if a formal photographic education would stifle some of the qualities I had developed through self-instruction; my independence and a disregard for the rules. Not a willful or belligerent disregard for the rules mind you, but more of an ignorance of the rules and a lack of peer pressure that had served me well. Would a formal education constrain me and would I start to conform to herd mentality? I also worried that if I earned a living through photography I would lose my passion for it. Would I at the end of each day really have the time, enthusiasm and energy to pursue my personal work?
Ultimately I chose not to go to college for photography or to earn my living from it. I decided that the best approach was to separate money from art, which I hoped would give me the best of both worlds. I could choose a career that would provide me with the material things that I needed and my art could be pursued separately allowing me to retain my passion for it. What I could not appreciate at age 17 was how much time and energy family and career would require.
I obtained a degree in business and for the next 30 years I ran a business and raised five children. While I imagined that my photography would be pursued parallel to my career and family responsibilities, so little time remained that I didn’t pick up a camera during this period except to document family life.
But even though I had become a businessman and a family man and I never created a single piece of art with my camera, I still thought of myself as a photographer, I never once stopped believing that it was my destiny.
As the kids started leaving home and I had more time, I felt the time was right to pursue my destiny once again. This time digital was just coming into its own and so I had the wonderful opportunity to learn all over again. And even though the tools were completely different, the creative process was still the same. It was good to succumb to the passion again and to feel the satisfaction of creating something. Here are some of the first images I created upon my return:

Skeleton – Fort Collins, CO
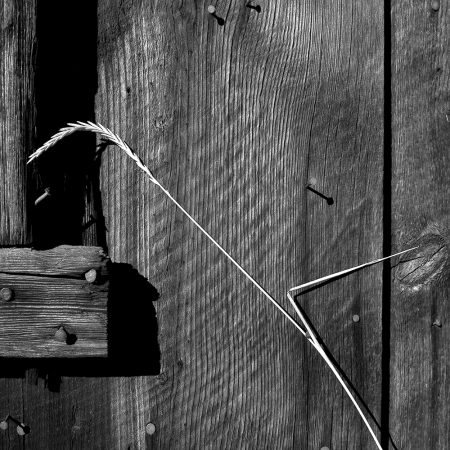
Bent Grass – Sulfur Hot Springs, CO
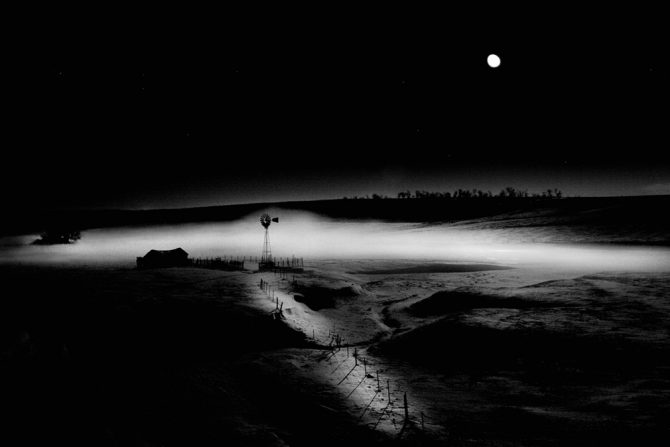
Windmill in Moonlight – Rural, NE
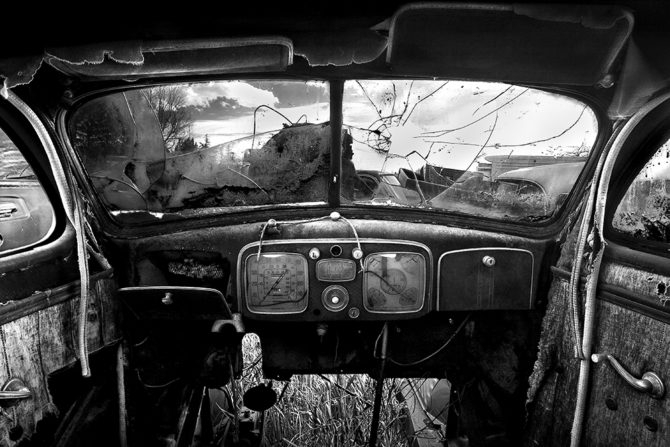
Old Car Interior – Laporte, CO
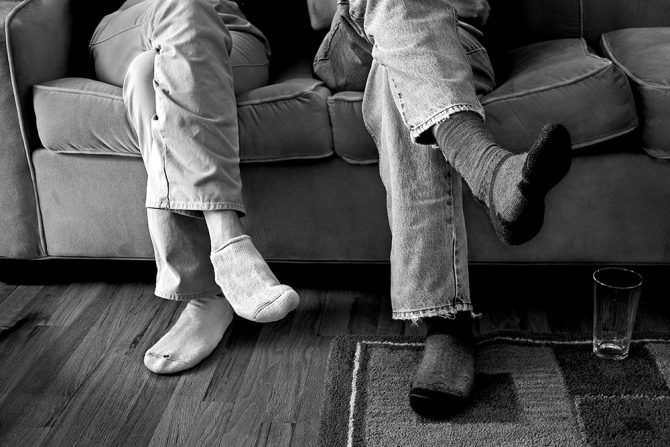
Socks – Colorado Springs, CO
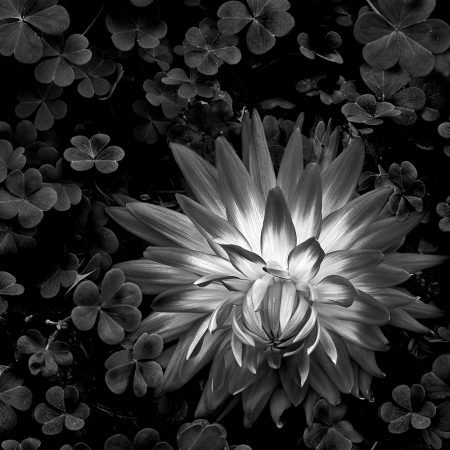
Flaming Dahlia – Fort Collins, CO
I quickly regained my technical skills and I found myself growing creatively. I was winning competitions, exhibiting, publishing and increasingly selling my work. There was an assumed path that a rising star should take which was: get into galleries, sell more work and sell it for more money. Some of the same old questions that haunted me when I was 17 started to haunt me again; did I really want money to become the focal point of my art? Was that the inevitable end? Why was I creating? Would this take the fun out of it? Was there another way?
It turns out that there was another way. I did not need to become a professional or take that path to be a photographer; in fact for me the opposite was true. What I discovered was that the old world definition of an amateur was what I was looking for: one who is self taught, who creates out of love and who does not earn their living from their work. That was what I wanted to be!
I did not want to create for money or for prizes or for recognition. I wanted to create for myself and not care what anyone else thought. After I made this discovery and changed my direction, I took down my traditional resume and replaced it with this one:
My art has appeared in many exhibitions, publications and has received numerous awards. And yet my resume does not list those accomplishments, why?
In the past I’ve considered those accolades as the evidence of my success, but I now think differently. My success is no longer measured by the length of my resume, but rather by how I feel about the art that I create. While I do enjoy exhibiting, seeing my work published and meeting people who appreciate my art, this is an extra benefit of creating, but this is not success itself.
I believe that the best success is achieved internally, not externally.
.
By seeking to please only myself, I am free to break the rules, flaunt convention and not care about achieving success on anyone’s terms but my own. In the process I have pleased myself, grown creatively and ironically have become even more successful…but on my terms.
Through all of my experiences I have come to the conclusion that money and art do not mix well, too many compromises are required. I am happy with the decision that I made at age 17 and I’ve become happier with my decision some 45 years later.
I always knew that I was destined to be a photographer and I now fully understand what that means.
Here are some of my favorite images:
The Angel Gabriel – Newport Beach, CA
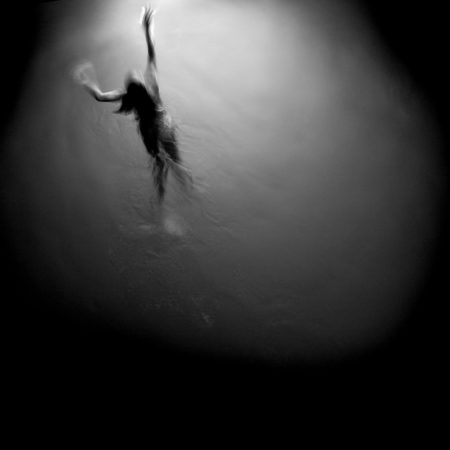
Swimming Towards the Light – Kihei, HI

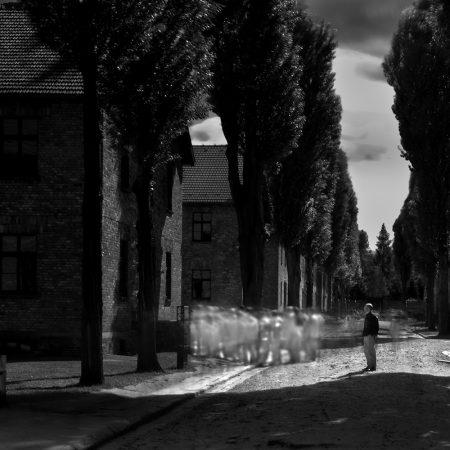
Auschwitz No. 14 – Auschwitz, Poland

Ceiling Lamp, Mourning Dove Ranch – Laporte, CO

Linnie No. 4 – Grand Junction, CO
Harbinger No. 1 – Utah Desert

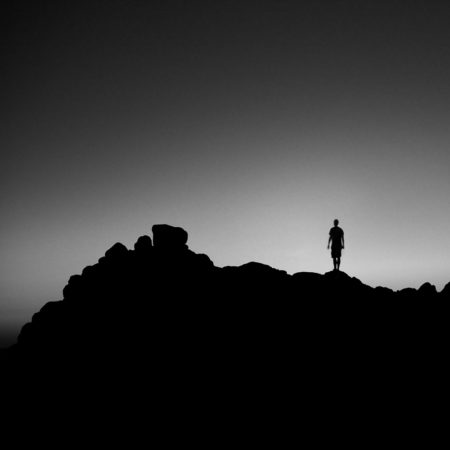
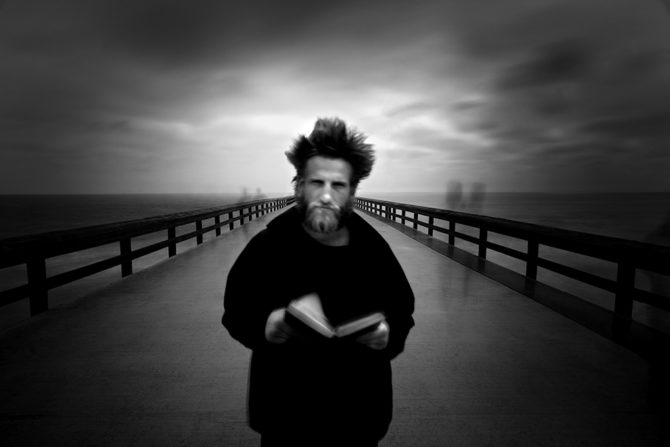
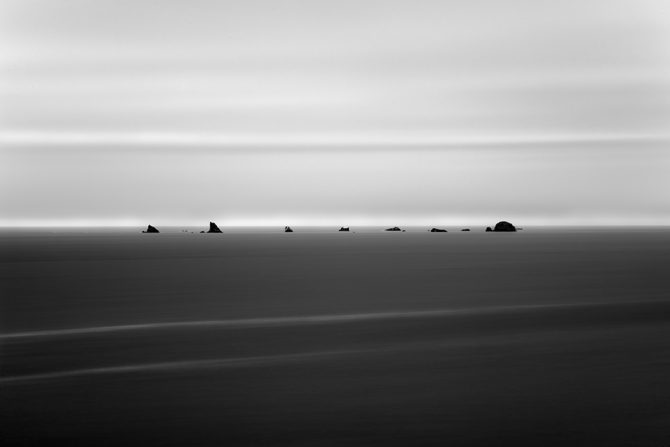
Lone Man No. 7 – Oregon Coast
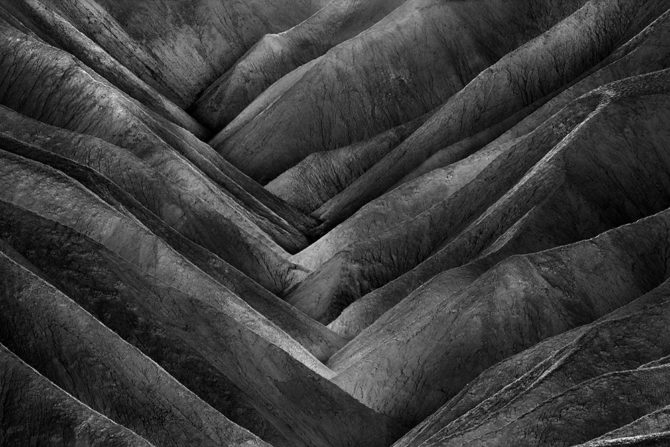
Time No. 2 – Death Valley, CA
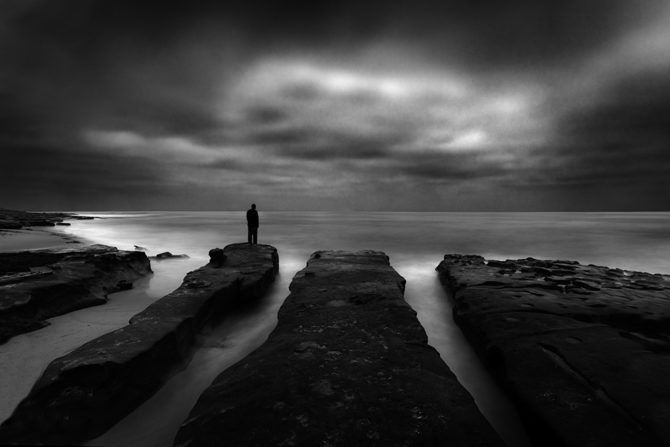
Lone Man No. 20 – LaJolla, CA

Monolith No. 10 – Bandon, OR
Monolith No. 27 – Oregon Coast
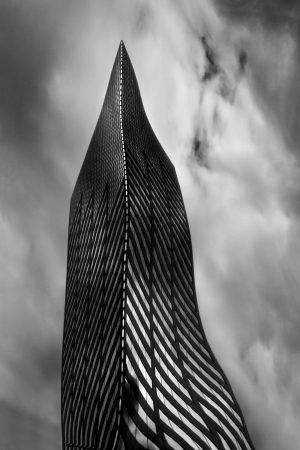
Fountainhead No. 70 – Portland, OR
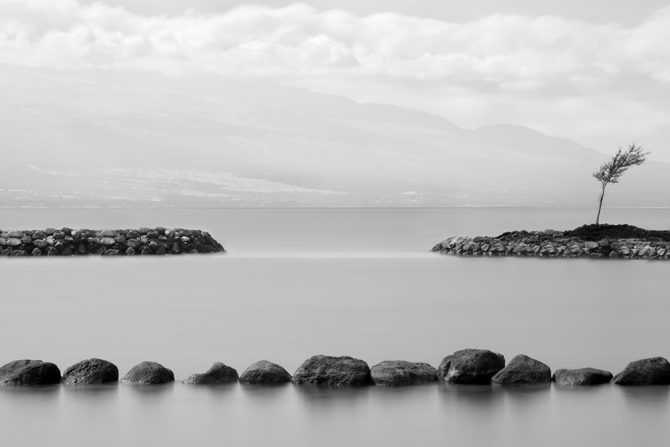
Stone Jetty No. 6 – Maalaea Bay, HI
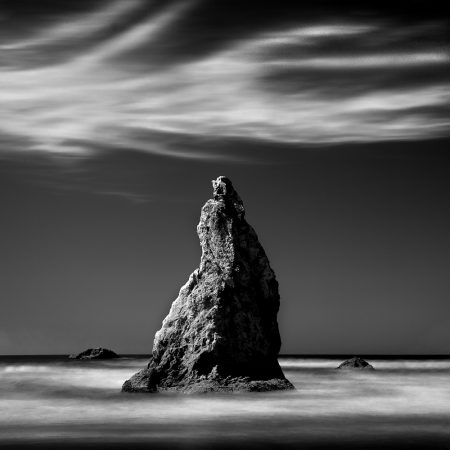
Monolith No. 42 – Bandon, OR
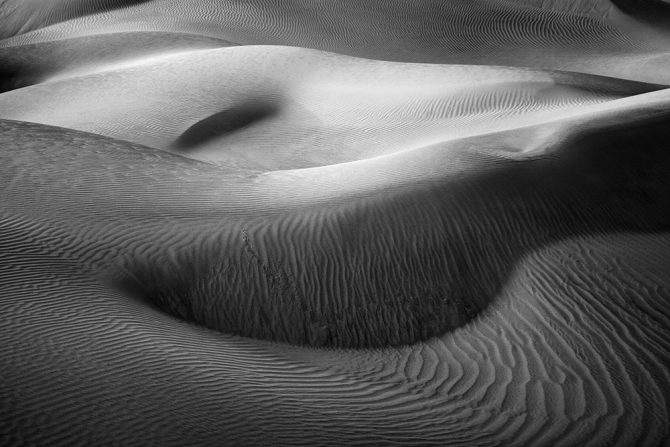
Dunes of Nude No. 43 – Death Valley, CA
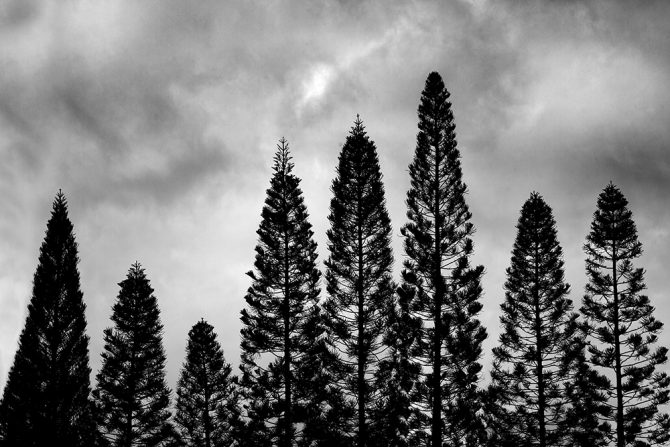
Eight Trees – Hilo, HI
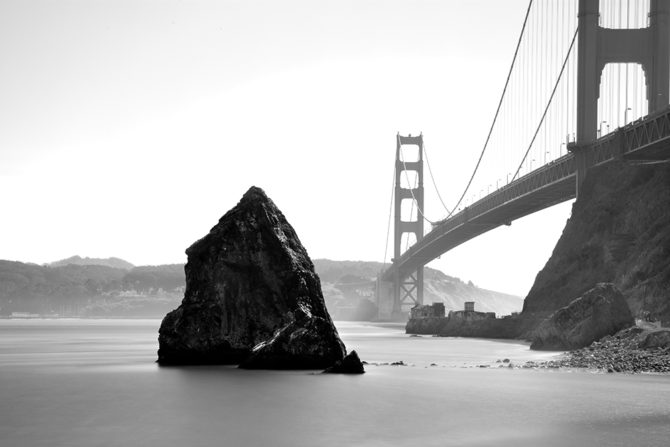
Monolith No. 50 – San Francisco, CA
December 3, 2012

Story Number One:
I was 16 years old and living in Anaheim California. I had this idea for an image, a gull flying against a clouded moon, but I couldn’t find a way to create the image with a single shot. So I decided to combine two images, not as a double exposure captured in-camera, but by combining two images in the darkroom. Composites are easily done in today’s digital world, but they were not easily done back in 1970. Back in the “old days” I would sandwich the two negatives together in the enlarger and project them as a single image.
The first image was taken at night in the local K-Mart parking lot. I took a series of shots with clouds floating past the moon. I had this idea (vision) in my head of what the final image would look like and so I placed the moon and clouds on the right and left room for the sea gull on the left. The shot of the sea gull was taken later during the daytime in my high school parking lot, I shot a series of gulls looking straight up. Working from memory of where I had placed the moon and cloud in the frame, I positioned the gull on the left.
After I processed the negatives, I had to find two images that would work together, not just in terms of composition but also exposure. Getting a good print with this method is a challenge since you have two negatives that may have different printing needs, but you must print them together as one.
I named the image “Gull and Moon” and while I loved the composition, I was never able to get the blacks that I envisioned, the print was very muddy.
Story Number Two:
I was new to Loara High School and had joined the Yearbook staff as a photographer. The new yearbook advisor was John Holland the photography teacher, he became and remained a friend and mentor until last year when he passed away. What was so very different about John was that he encouraged us to create fine art images for the yearbook, not just pictures of the football players, cheerleaders and cheesecake shots. This was fun (!) and we had a wonderful time creating artistic images for the yearbook including my “Shoes” (above) which was prominently featured.
Unfortunately neither John nor any of us really stopped to consider why people purchased yearbooks. It was not for fine art images but for the pictures of the football players, cheerleaders and cheesecake shots! When the yearbooks arrived and were being handed out there was a near riot as the football players angrily confronted the yearbook staff. I was a junior (and small for my age) and I remember slowly slinking out through the back of the crowd and hiding in the photography room. I made myself scarce for several days.
Story Number Three:
After high school and for 30 years after, I focused on family and career and neglected my photography. During those years we moved several times and with each move I threw out more and more old things, including much of my photography. When I returned to photography around 2004 I wanted to feature some of my earlier work on my website and I began searching for anything that might have survived.
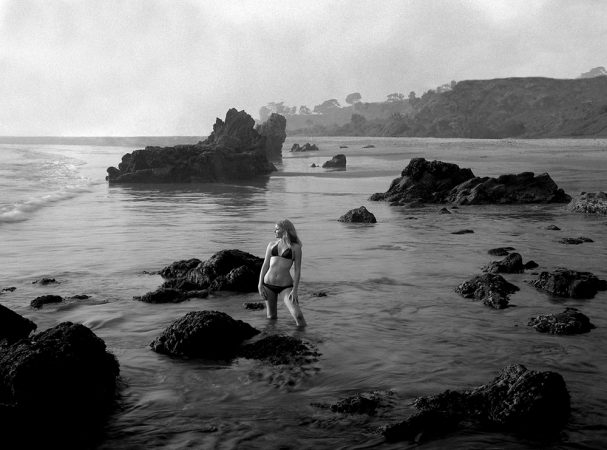
Most of my negatives were gone and only a few prints survived, in fact only 13 remained from all those years of work. Most of these images survived only because a single print was still around, and this was the case with “Mary at Corona.” I found a single 8 x 10, poorly printed and curled up print. This has always been a special image to me and I so set about the task of restoring it.
I scanned the image and worked on it in Photoshop. I was pleasantly surprised because not only was I able to restore the image, but I was able to bring it into compliance with my original vision, something I was never able to do in the darkroom! Just tonight I was comparing the original to the restored version and it reminded me of why I love digital.
If you are interested, you can see those restored images from my early years here: https://colethompsonphotography.com/portfolios/collections/1970s/
Recounting the story behind this image reminded me of the many lessons that I learned from this experience.
- Vision is the most important ingredient of a great image.
- Yearbooks are for documentary work, not fine art photography.
- Focus on the creative early on, it’s more important than the technical which can be learned quite easily.
- Don’t throw things away when you are young, you’ll regret it later.
- If you have an image that you cannot get just right, keep working on it.
May 6, 2012
A couple of years ago my family and I were vacationing in a small village on the coast of England and the only preparations I had made to photograph there was to bring along a white bed sheet.
The Story of the White Bed Sheet
I had recently photographed ghosts at Auschwitz-Birkenau and wondered if I could carry this theme over to other historical sites. The trip to England seemed perfect with all its history and castles so readily available. But this time I thought, instead of relying on the unsuspecting tourists to play the role of ghost, I would control my subjects a bit more by using my daughter Mason. And so we brought a white bed sheet to transform her into a ghost.
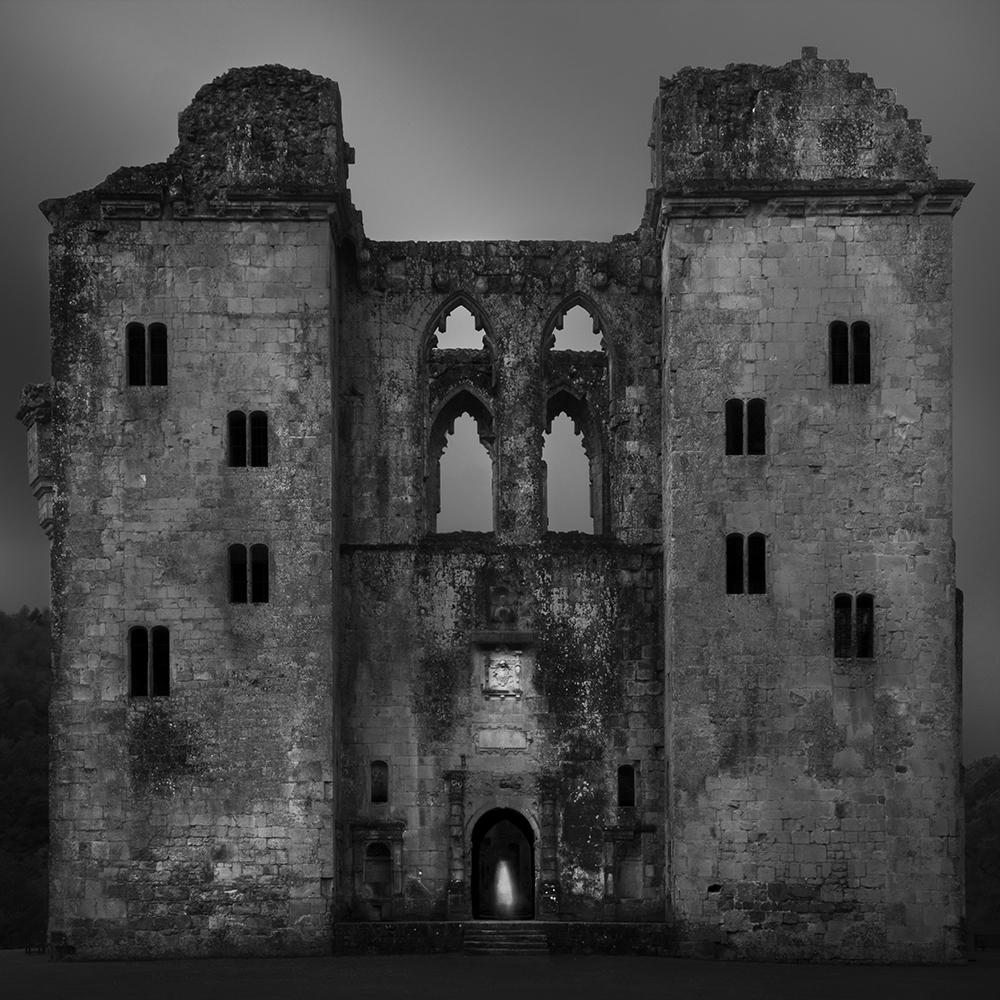
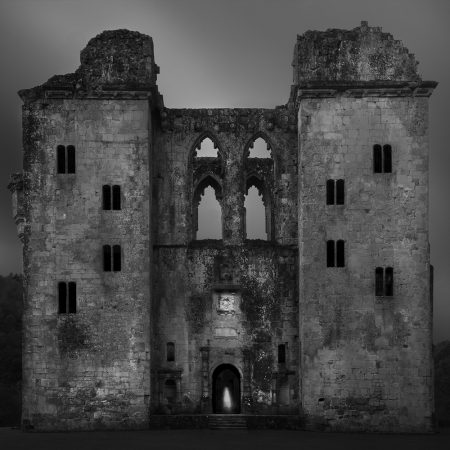
We photographed at many sites and sometimes the ghost was the prime focus of the image while other times it was only a small element of the image, as in “Old Wardour Castle” above.
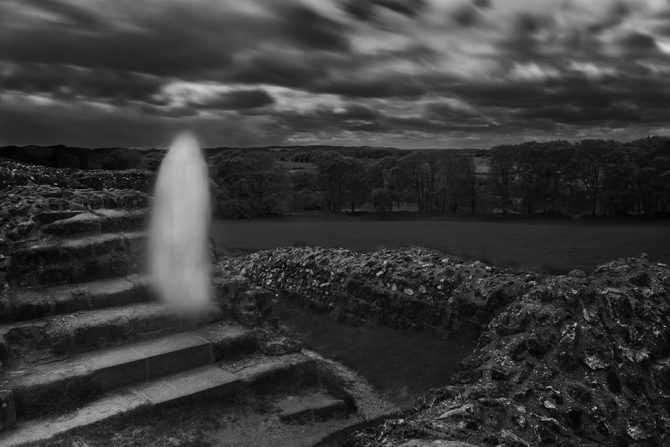
We experimented with different “ghosting” techniques and settled on the “30-second spin.” Mason would stand in one spot and spin for 30 seconds. Initially it was hard because she would get dizzy and start to drift, but she soon mastered it and became and excellent ghost.
Generally the castles were pretty deserted and only occasionally did we run into other tourists. Imagine this scene: your walking around an ancient castle when you come across someone in a white sheet spinning around! The parents were generally too reserved to act interested or to ask what we were doing, but their children would watch and giggle.
I didn’t really care for this series much and learned an important lesson from the experience. The ghost idea worked at Auschwitz-Birkenau because I felt inspired to do it and because it had purpose there, but at the castle it seemed merely a cheap gimmick. I was trying to capitalize on a “technique” and a past success rather than find new inspiration.
But alas it was not a wasted effort! I did get this one image that I really like, my daughter and I have a great memory and I learned an important lesson; don’t copy others, even if it’s yourself!
Cole
P.S. This article was published in my newsletter on 5/6/2012. Are you getting my newsletter? If not, you may sign up here.
April 6, 2012
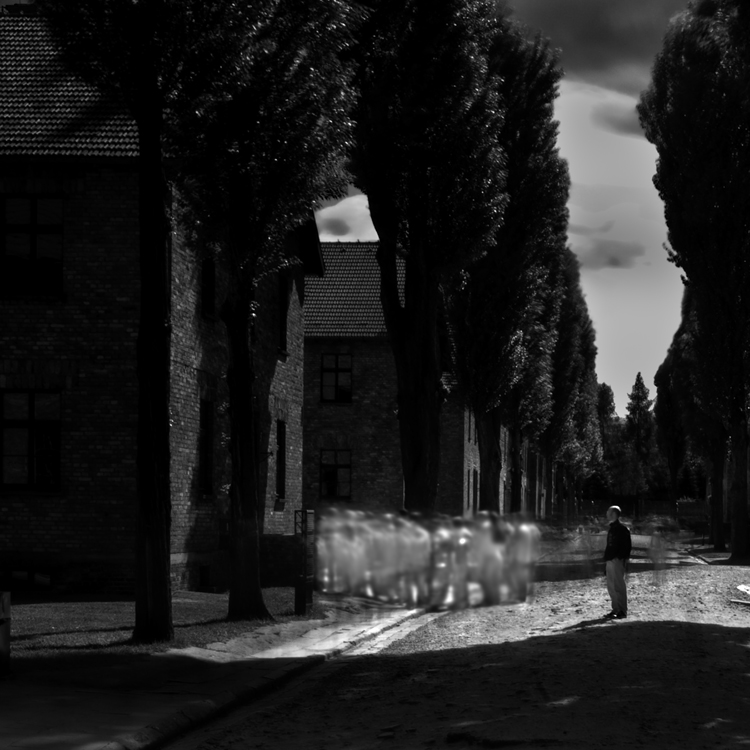

I would like to tell the story behind “The Ghosts of Auschwitz-Birkenau.”
My wife and I were visiting my son who was serving in the Peace Corps in Ukraine (providing balance to his two brothers who were serving in the Marines). Being part Polish, we decided to visit our homeland and took a train to Krakow. Upon arriving discussions began on what to see and of course Auschwitz-Birkenau was high on the list, but secretly I hoped we wouldn’t visit the camps because I did not want see a place of such sadness. However my wife wanted to go and so I agreed.
We took a bus tour that would spend about 1 hour at Auschwitz and 30 minutes at Birkenau. Even though I had my camera equipment with me, I had not planned on photographing the camps because it seemed that this might be disrespectful. The tour began indoors and we saw the meticulous records the German’s kept of their victims and then the piles of personal effects: glasses, shoes, hair and other items.
This was just too overwhelming and I felt like I was suffocating, so I signaled my family that I was going outdoors. Breathing in the open air I began to feel a bit better and slowly walked, looking down at my feet. The thought then came to me: how many had walked here before me, in these exact same footsteps and now were dead? How many had taken this same path and then had been murdered?
I began to wonder if the spirits of those who were dead still lingered, did they still inhabit this place? And then it suddenly struck me that I must photograph the spirits of those who had died here. I instinctively knew how I would do that, I would use long exposures of the other visitors at the camps, who would stand in proxy for the dead. The enormity of this task hit me as I realized that the bus was leaving in 45 minutes and so I ran from location to location, working incredibly fast.
Each location had its own challenges, I had to photograph people without their knowing it, because if they thought I was photographing they would politely move out of my way. I developed techniques to fool people into thinking I was not photographing, I would set up my equipment and then talk on the phone or look in my camera bag, and then trigger the camera with a remote shutter release.
I found that the closer I was to the scene, the harder it was to get the shot because people would see me and move out of my way, not knowing that I actually needed them in the picture! Auschwitz No. 9 was the most difficult image to get, it took many exposures to capture these ghosts.
Another challenge was that people had to keep moving to produce the ghosting effects. So many shots were ruined when someone in the group would stop and interrupt the ghosting effect. In one image, Auschwitz No. 4, a man in the group stopped to read a historical placard. This is the only image that I’ve included a “mortal” because it seemed to say “I am completely unaware of the ghosts around me.”
It’s no simple matter to get the right ghosting effects; so many factors affect the image such as the color of the clothing people are wearing, the speed in which they walk, the angle they are walking in relation to the camera and of course the length of the exposure. I had to learn all of this in very short order and I was so grateful to be using digital so that I could get immediate feedback. There was so much to learn in such a short time, but I knew I had to finish before the bus left as I would not have another chance.
In one sense I felt prepared for this moment, for this opportunity. I had been working with long exposures for several years and I understood the basics, however I had never worked with people before and certainly not with unsuspecting subjects. I had to learn quickly and work quickly.
I do feel that I was inspired, both in concept and execution. As I looked at each scene I knew in my mind exactly how the finished image would look. However if you were to see the original shots and compare them to the final images, you would be surprised to see the extensive Photoshop work it took to bring the “shot” into compliance with my vision.
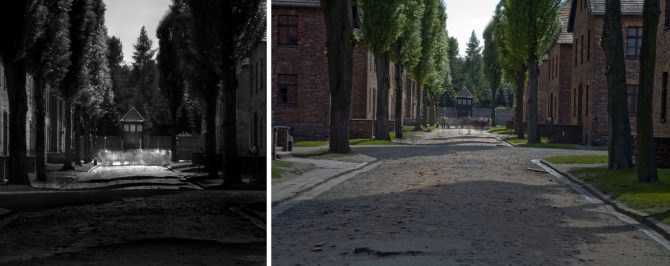
My processing included cropping the image to a square, darkening the scene for an almost nighttime look, increasing contrast, dodging up the ghosts and burning down distracting elements. You can see one “before and after” example above. Vision was the key to this series (remember my Rule of Thirds) and it was the constant that drove everything. You can view the entire Ghosts portfolio here.
Auschwitz-Birkenau is a depressing place, but I am glad that I went. I hope my images can portray the camps not just as a historical location, but as a place where real people lived and died.
Cole
P.S. I recently had the honor of meeting a group of Holocaust survivors who attended the opening of this exhibition in Dallas. I saw a very elderly woman in a wheel chair looking at my images and I introduced myself by saying: “Hi, my name is Cole Thompson and these are my images.” She responded by pointing at the wall and exclaiming: “These are my images!”
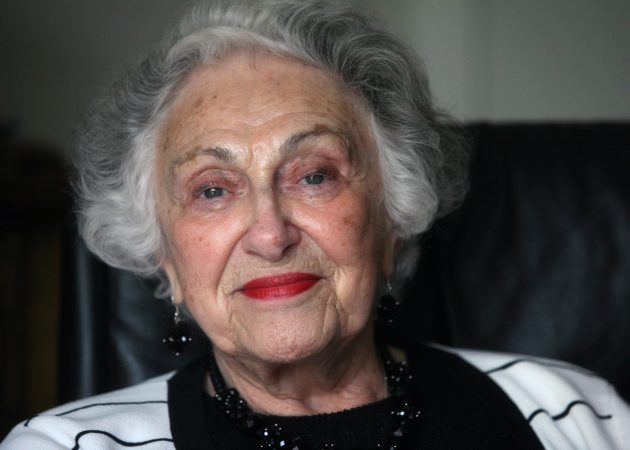
Her name was Edith Molnar and she had been interned at Auschwitz and recognized these locations. That was a humbling moment, to appreciate that you were talking to someone who had lived through these horrors, she was “living history.” Edith passed away several weeks later.
Cole
March 15, 2012
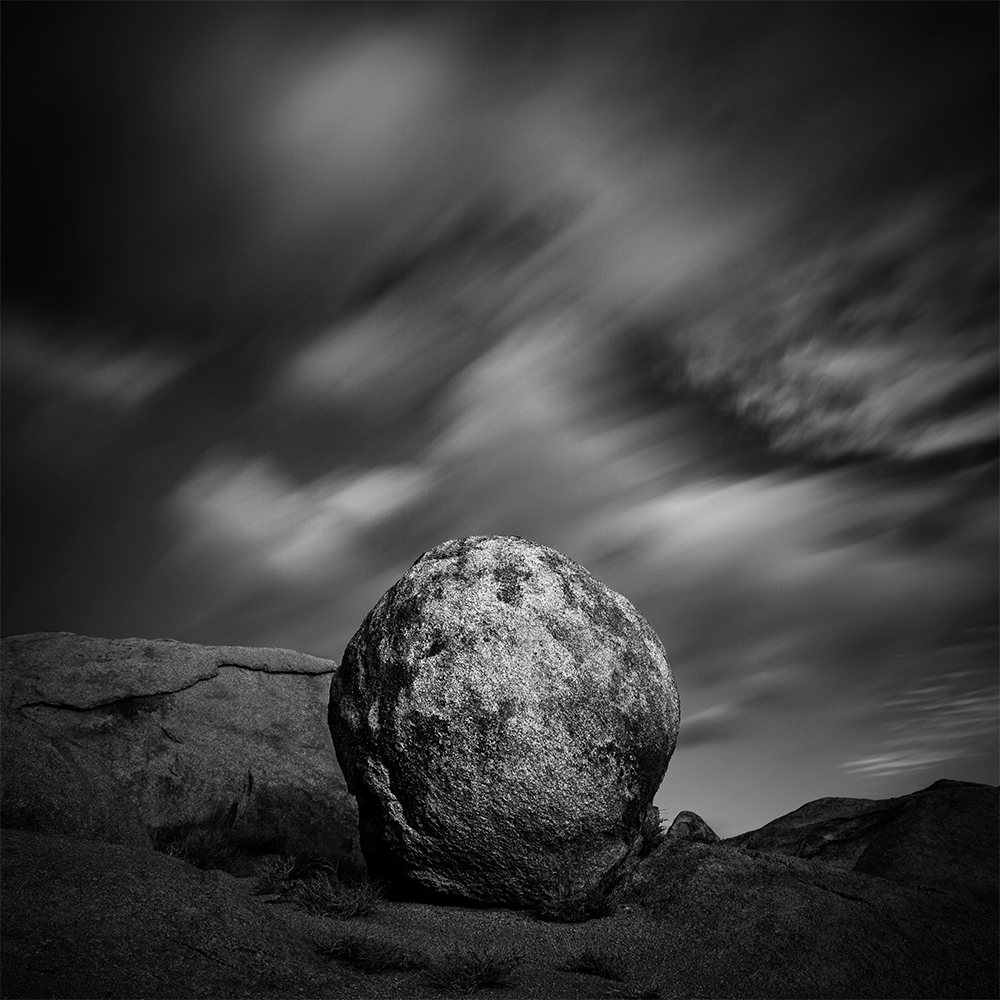


I recently spent time in Joshua Tree National Park in California, it was the first time I had visited there since 1987 when my wife I went camping. Coincidently our trip occurred right after U2 had introduced their new album “Joshua Tree” and I remember listening to it non-stop as we sunned ourselves on the large round boulders at the park. The music and that location were positively and indelibly embedded in my memory and each time I hear those songs I am transported back in time. So it was with great nostalgia and anticipation that I returned, hoping to find inspiration at this wonderful place.
As I headed to Joshua Tree I had no idea of how others had portrayed it, nor did I care, I only hoped that I could portray it through my vision. As many of you know, I practice something that I call “Photographic Celibacy.” What this means is that I do not study the work of other photographers in an effort to see as originally and freshly as possible.
I arrived and spent some time wandering and taking it all in. One of the first things you notice about Joshua Tree are the Joshua Trees themselves; a very large and treelike species of yucca. But what eventually caught my attention were those large round boulders, the same ones that I had sunned myself on 25 years earlier. They struck me in the same way the monoliths of the Oregon coast stuck me; ancient, unmovable and eternal. I imagined them sitting there, quietly observing the puny undertakings of man as he scurried about, full of self-importance. Perhaps these ancient stones were amused or perhaps they didn’t care at all.
I decided to create these images with long exposures; using from 30 seconds and up to 6 minute exposures. I wanted to give a sense of motion that would contrast with the stones and emphasize their permanence.
To achieve these long exposures, I used my Singh-Ray Vari-ND filter and my Singh-Ray Mor-Slo 5-stop ND filter, giving me 13 stops of ND but only allowing a 30 second exposure. Because the clouds were moving slowly that day, I needed longer exposure times to create the streaking effect that I wanted. To get longer exposure times I stacked a third 10 stop ND filter which gave me a total of 23 stops of Neutral Density.
To put this into perspective, if your correct exposure was 1/2000 of a second then 23 stops of ND would allow an exposure time of 32 minutes. For these images I was using a maximum of about 21 stops of ND to achieve 6 minute exposure times.
So why did I use a variable ND filter in this situation? First let me explain what a variable ND filter is, it operates much like a polarizer allowing you to adjust how much light enters the camera; turn it one way and you get more light and turn it the other way for less light.
The advantages of the Vari-ND in this situation are twofold: first I can “open up” the filter making it brighter and easier to compose through the viewfinder (at 23 stops it’s almost impossible to see anything). Secondly, it makes setting the correct exposure easier because I can simply turn the Vari-ND filter to get the right exposure.
While stacking three filters together allows long exposure times, it also presents some interesting challenges. Three filters give you a tremendous amount of vignetting at the corners, especially with shorter focal lengths. You can overcome this either by using a longer focal length or by going with a square format and simply discarding the corners. Because I was in close quarters when photographing many of these rocks, I could not go with a longer focal length, but the square format was perfect for this series. I think the square format is very elegant and find myself using it more and more.
When I photographed these stones I had a vision of what the final image would look like, but as is often the case, inspiration can also strike later in the creative process. While processing these images I chose to darken the images down, giving them an almost night time feel, and I also blurred most of the image except where I wanted the eye to focus on. It gives the images an almost tilt-shift look.
I enjoyed finding and creating these images. My trip to Joshua Tree was both a nostalgic and creative success.
View all of the “Ancient Stones” images.
March 2, 2012

 Flaming Dahlia
I found this Dahlia discarded on the ground in a greenhouse. Apparently not perfect enough to sell, it was certainly beautiful enough to create this image.
I took that Dahlia home and created these few images with it: https://colethompsonphotography.com/portfolios/series/the-dahlia/
Beauty is in the eye of the beholder.
Cole
January 3, 2012


When I finish a series, I’m generally done with it and don’t add to it. It’ s nothing philosophical, I simply lose interest.
But the other day I was eating in my favorite Mexican Restaurant, the Rio Grande, and noticed this wonderful ceiling lamp. And like many ceiling lamps, it’s true beauty was only visible when viewed from directly below.
So I added a new image to the Ceiling Lamp series. Click here to view the entire series.
Cole
November 18, 2011


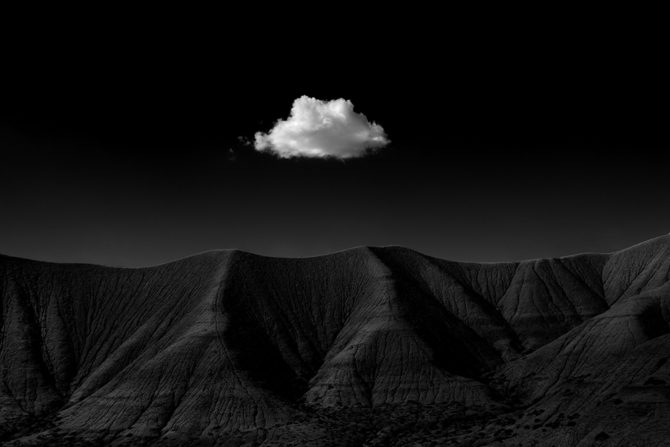
I’d like to tell you the story behind the image of Harbinger No. 1; how I came across it, how I created it and how it led to a ongoing portfolio.
My son Jem and I were traveling across Utah on a Father-and-Son road trip, it was summertime and it was 105 degrees in the Utah desert. Driving along I70 just across the border from Colorado we came upon these “mud hills” which caught my eye. They were so void of life that they made me think that this is what the moon must look like.
We stopped and I photographed for a while, but was unsatisfied. While the images were “interesting” they just didn’t feel complete and they certainly were not great. So we packed up and descended down the hill, eager to get back into the air conditioned truck.
But as were returning I saw this lone cloud moving very fast across the landscape. Based on its trajectory I knew that in just a minute it would be perfectly positioned over this dark symmetric hill that I had been photographing and would give my image the focal point that it needed. I ran up the hill as quickly as I could and hoped that I could get at least one shot, all the time thinking about the Ansel Adams story and how he rushed to get just one shot of Moonrise, Hernandez.
I quickly set up my tripod and camera, focused, adjusted my exposure and was lucky enough to get off two shots. I chose the above image of because it was centered above the hills and as many of you have noticed, I love centered and symmetric images. I was so fortunate to have this one perfectly shaped cloud come by and oblige me that day.
I like to name my images with the first word that comes to mind and this image immediately screamed “Harbinger” at me, and the dictionary’s definition became my artist statement:
Harbinger: \?här-b?n-j?r\ noun
1. one that goes ahead and makes known the approach of another; herald.
2. anything that foreshadows a future event; omen; sign.
People most often ask me about the processing of this image and I think that’s because many assume the key to a great image is in the processing. While there is no doubt that processing is important, it’s certainly no more important than the shot or your vision. If you focus on just the processing at the expense of vision or the shot, you may end up with a technically perfect but mediocre image. As an artist I try to focus on all three areas.
Vision
My vision for this image occurred at the moment I saw that cloud moving into position and I knew exactly how I wanted this image to look. It was going to be dark and that cloud was going to jump out at you! Sometimes that burst of vision can come later when I’m processing the image, but I don’t think it’s too important when the vision occurs as long as it does occur. Vision is what drives us to force the shot into compliance with our vision.
The Shot
When I composed this image I purposely centered the cloud and put the horizon in the center of the frame. Why? Because that’s just how the image felt to me. Next, I wanted a dark and graduated sky and so I used a polarizing filter which gave me both. On images i intend to be dark like this, I’ll often underexpose the image by 1 stop and then in processing I’ll dodge up the highlights.
Processing
When I converted this image to B&W I decreased the blue color channels to darken the sky, but I couldn’t go as far as I wanted because too much noise was being introduced. So to further darken the sky I burned it down with a very large and soft edged brush that was set at 1%. I work slowly to darken the sky to a pure black at the top and a very light gray at the hill’s edge. I dodged the cloud up so that it had a true white, but I was careful not to overdo it and lose highlight detail. This black sky and almost white cloud created this wonderful contrast that I love.
Next I burned the hills down so that visually they did not compete with the cloud for attention. And lastly I dodged up the very small edge of the ridge line to separate the hills from the sky. The final result is a dark image with a very bright subject, which is my preferred style.
When I created this first Harbinger image I really hoped that I could create an entire portfolio of similar images, but I never dreamed that I’d be lucky enough to find other such opportunities. I thought, how often will I see a single cloud over an interesting setting like this? But strangely enough I have found a few more and slowly my Harbinger portfolio is growing. Click here to see the entire portfolio.
Like all of my portfolios, this idea occurred spontaneously. I find that it’s easy to be creative when you are excited about a concept that inspires you!
Cole
November 11, 2011
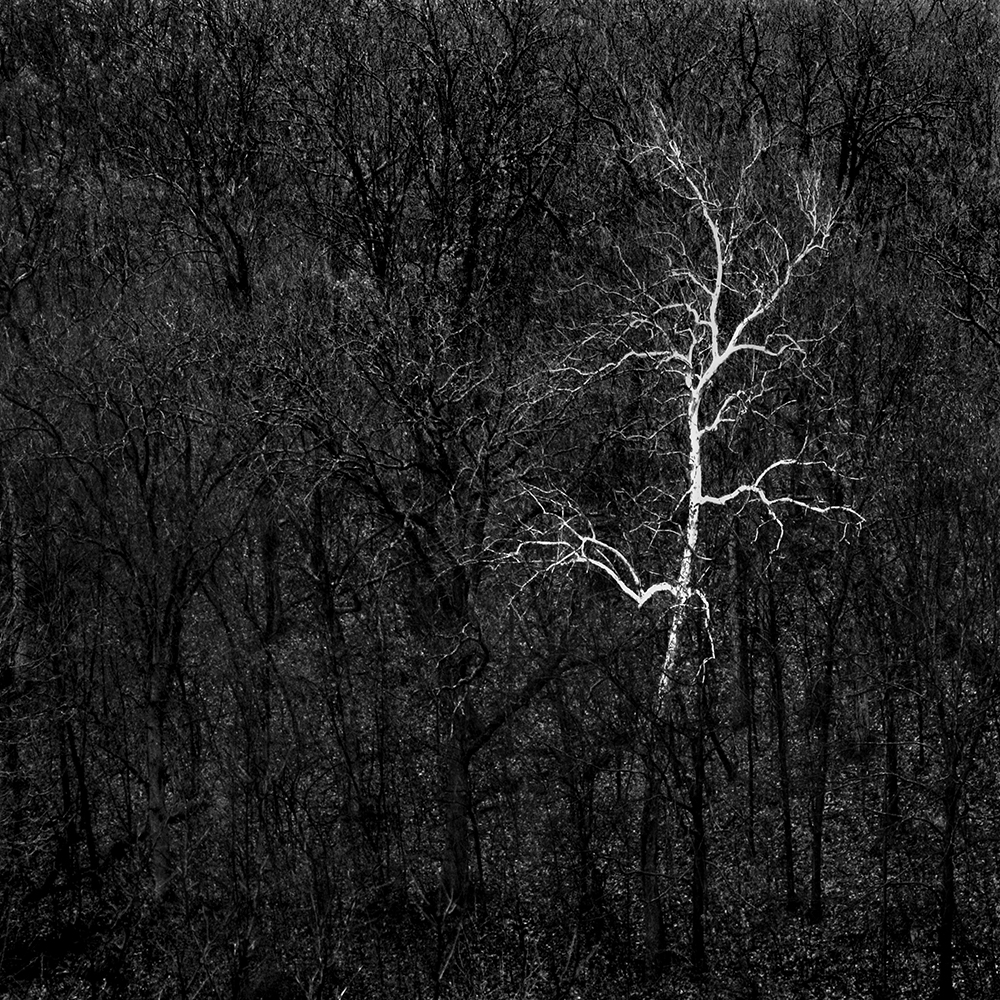

It was autumn and I was driving on I-70 just outside of Kansas City when it started to rain. The hills were covered in a dense forest of bare trees and as they soaked in the water, they turned black…except for this one lone white tree. Instantly I could see the potential for this image and I knew that I had to have it!
But I had already gone too far and so I had to travel several miles further until I could exit and turn around. Then I drove back past the lone tree a second time (but this time on the wrong side of the freeway) and traveled several miles further until I could exit and turn around again. I did this several times until I could find a spot where I could safely stop and hike to the right vantage point.
Then in the rain and wearing business clothes, I traipsed down a hill and sloshed through a muddy bog just to find just the right location. I’m not saying my trek was as tough as the pioneers had it crossing the plains, but it certainly would have been much easier to stay in my car, turn up the heat and act as though I hadn’t seen that damned lone tree!
However it was worth it, I like how the image turned out and this was just another in a long line of experiences that taught me to ALWAYS STOP when I see a great image. (See http://www.photographyblackwhite.com/photographs-create-images/) Yes, it would have been easier to keep going and yes, sometimes I do convince myself that I’ll come back later and get the shot. But my experiences have taught me that there’s rarely a second chance.
Always stop.
Cole
P.S. If I’d have seen this tree in the summertime, there’s no way I’d have stopped unless I had 100% DEET on my shoes, socks and pants. There’s a whole nother story about “chiggers” that I’ll have to tell sometime. I think I’ll title it “Chiggers: The Gift That Keeps On Giving” or “Why Pouring Gasoline On Your Legs And Lighting Them Might Sometimes Be A Good Idea!”
October 14, 2011
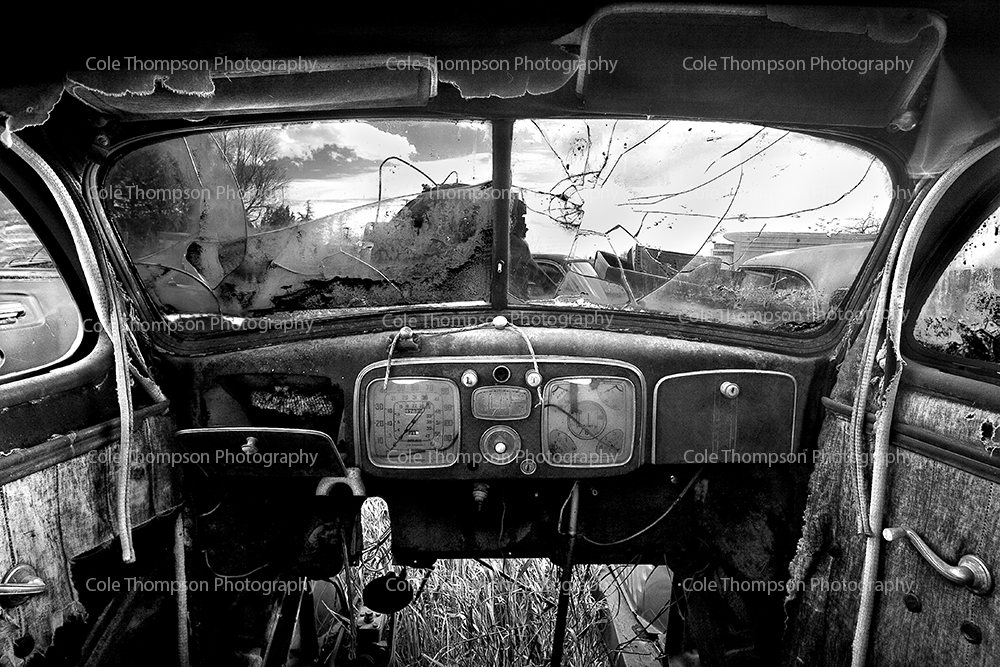
Old Car Interior is one of those images that is both complex and yet simple at the same time. This 1934 Chrysler interior was found just down the road in my friend’s backyard (I say “junkyard” but Frank gets mad at me). I was looking at the car’s dashboard and marveling at the incredible nostalgic detail, and thinking “if I could only capture it!” I had an idea of how I wanted this to look, but wasn’t sure if I could actually do it.
I’ve always believed that the rule of thirds was the key to a successful image, however not the traditional rule of thirds, but my own! It is:
- 1/3 the vision
- 1/3 the shot
- 1/3 the post processing
(you can read my post about the rule of thirds here: http://www.photographyblackwhite.com/rule-thirds/)
My first challenge was space, this was a very small interior and it was not practical to photograph from inside the car. Fortunately there was no back window and so I set up the tripod so that I could shoot through the back window. To capture the interior I used a 10-22mm zoom at 15mm on my 20d, making it a 24mm in full frame terms.
My next challenge was that it was quite dark inside the car and very bright outside. One exposure was clearly not going to span that wide dynamic range and so I decided on two exposures, one for the interior and one for the exterior. I chose not to use HDR as I personally find the look a bit unnatural. Using Photoshop I cut out the three windows from the exterior exposure and pasted them into the interior exposure, giving me a perfect exposure for the entire scene.
The processing was responsible for the uniqueness of this image. Using my pen and tablet I went over each piece of the interior to bring out the detail with what I call “local contrast enhancement.” This is a fancy way of saying that I would dodge and burn each piece to enhance the contrast in just that area. I prefer this localized approach rather than using a global contrast setting, which would affect all areas equally.
Part of my style is extreme contrast and so I would burn down the shadow areas to ensure great blacks, which further gives the impression of contrast and sharpness. In all I spent 50 hours to get this image right, which is the longest I’ve ever spent on an image.
The results surpassed my initial vision and has become one of my most published and requested images. I was by Frank’s today and visited “Old Car Interior” and was shocked to remember just how dull the interior actually looked compared to my final image. And something else that impressed me was the detail I was able to convey with 8 megapixels, demonstrating that it’s not always about megapixels!
Cole
Note: The matted 10 X 15 print of Old Car Interior sells for $400 but will be on sale for $275 until 11/1/2011. Just email me and please mention the discount.