May 24, 2012
An 11th Tip for Long Exposure Photography

Last year I wrote an article entitled “Ten Tips from Cole Thompson for Long Exposure Photography” which you can read below. However I recently discovered there’s a very important “11th Tip” that applies to long exposures over 30 seconds.
When I was shooting with very long exposures (1, 2, 4 and 8 minutes) I kept getting odd exposure results that I just couldn’t explain. Sometimes my exposure would be right on, but more often the image was drastically under or over exposed. I knew from Long Exposure Tip #3 that I needed to use an eye cup to stop stray light from entering the the eyepiece and affecting the metering, and I was very careful to do that. I’d also check and recheck my long exposure calculations, but they were correct. Nothing seemed to explain this odd behavior.
And then I accidently figured out what was going on. It turns out that my camera does something odd, something I didn’t expect it to do that was causing the problem, and so here is Tip #11.
Tip #11. When Shooting in Bulb Mode, Always Check Your Aperture
When I am shooting long exposures that go beyond 30 seconds, I meter in manual mode, extrapolate the settings for the longer time and then I switch to Bulb mode for the shot. Because I had set my aperture in manual mode and then switched to Bulb mode, I assumed that the aperture stayed the same…but that was a wrong assumption!
It turns out that the aperture setting does not transfer over from Manual to Bulb mode. Bulb mode holds the last aperture setting you were using when you last used Bulb mode.
So, after you meter in Manual mode and then switch to Bulb mode, always check your aperture!
Ten Tips from Cole Thompson for Lo-o-o-o-ong Exposure Photography
I have been doing long-exposure work for a number of years now, and I’ve explored many different techniques and methods. Here are 10 of my fundamental tips to make your long exposure experience easier and better:

(Auschwitz No. 14 – Photographed in Bright Daylight)
1. For extremely long exposures, have at least 13 stops of neutral density available.
I have been using the Singh-Ray Vari-ND Variable Density Filter for a number of years now, and it revolutionized the way I work by allowing me to rotate the filter to minimum density for composition and focus, then immediately dial in maximum density so I don’t miss the shot. However, if you want to obtain exposures of 30 seconds and longer in bright daylight, you may need more than the 8 stops of density offered by the Vari-ND. I stack a Singh-Ray Mor-Slo 5-stop ND filter onto my Vari-ND which gives me a range of 8 to 13 stops of added density. By the way, 13 stops of density transmits only about 0.01% of light — that’s one percent of one percent. This is generally enough to allow a 30-second exposure in bright daylight.
The shot above of “ghosts” at Auschwitz was made in bright daylight — having sufficient additional density allowed me to simulate nighttime, as well as blur and obscure the movement of the visitors for the ethereal effect I was shooting for.
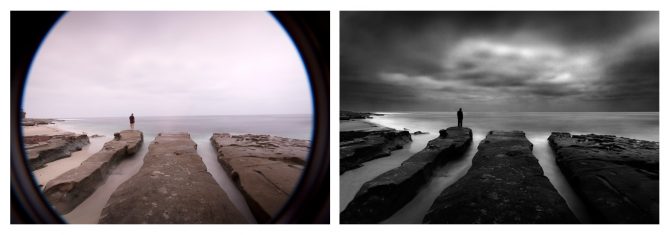
Lone Man No. 20 – Created with 3 Stacked Filters
2. Purchase the largest size filter you can afford.
I use the 82mm Vari-ND (the largest offered by Singh-Ray) which allows me to avoid vignetting when stacking filters and using very wide angle lenses. The 77mm will work in many situations, but will vignette in others. Use step-up rings on your lenses so that you can use the 77mm or 82mm filters on all of them.
The Lone Man image above was made with 3 stacked filters, and using larger filters helped prevent corner obstruction and vignetting. In situations where you are seeing some obstruction or vignetting on wide-angle shots, consider adjusting your composition to allow for cropping — square or panorama, or see if you can take a step or two back and use a slightly longer focal length.
3. Use an eye cup for your camera’s viewfinder.
To meter your long exposure you’ll be in manual mode and using the camera’s internal meter, but it can give a false reading because stray light leaks into the camera from the eye piece. This can cause your images to be underexposed. You can eliminate this problem by using an eye cup, which helps seal out stray light. Eliminating the light leaks will also help your eye adjust to the darkened image in the viewfinder when using the Vari-ND — even at minimum density, it’s blocking over 80% of the light entering the lens.
4. Use a sturdy tripod.
A good tripod is a must for serious landscape photography, but it’s even more important when doing long-exposure work. The enemies of a long exposure are vibration and camera movement, and so you’ll want to use the sturdiest tripod that you can find (or at least the sturdiest one you are willing to carry), as well as a tripod head that locks down for rock solid support. I find that the carbon fiber tripods soak up vibrations better than the metal ones. And of course, find the most solid footing possible when positioning your tripod so it doesn’t sink into the sand or wet ground or wobble during the exposure. Some tripods have a hook on the bottom of the center post to allow you to hang “ballast” such as your camera bag or weights for added stability.
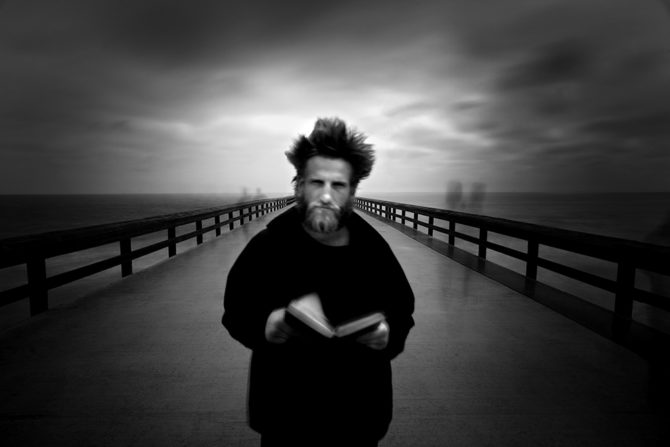
(The Angel Gabriel – Photographed with hundreds of people walking by)
5. Turn OFF your image stabilizer!
When shooting from a tripod, leaving your image stabilizer turned on can often work against you, especially if there is motion in the scene, such as moving water or wind in the leaves. The image stabilizer attempts to stabilize these movements, which results in blurring the overall image. I cannot tell you how many images I’ve ruined because I’ve forgotten to turn off the image stabilizer! Canon has just announced improvements to their image stabilizing, including a “tripod mode” that may help alleviate this problem, but that’s still a ways (and an upgrade) down the road.
My photo of “The Angel Gabriel” is filled with movement — the many tourists wandering by (most disappearing entirely), the clouds, the water, the pages of the book, and some slight blurring of the subject despite his effort to stay perfectly still. However, the railing and planks of the pier are tack sharp, which adds to the impact of the image, as the rails lead the viewer’s eye directly to the subject’s face. If I’d left image stabilizing ON for this shot, all the movement in the frame would have “confused” the IS and it would have blurred the parts of the image that I wanted to be sharp.
This image brings up one other side note: another benefit of long exposures is that it can make unwanted “intruders” disappear from your shot, as long as they keep moving. For instance, in one of my segments in the new Singh-Ray video, there are kayakers paddling through my shot of some rocks on the shore — a long exposure effectively eliminated them without requiring retouching.
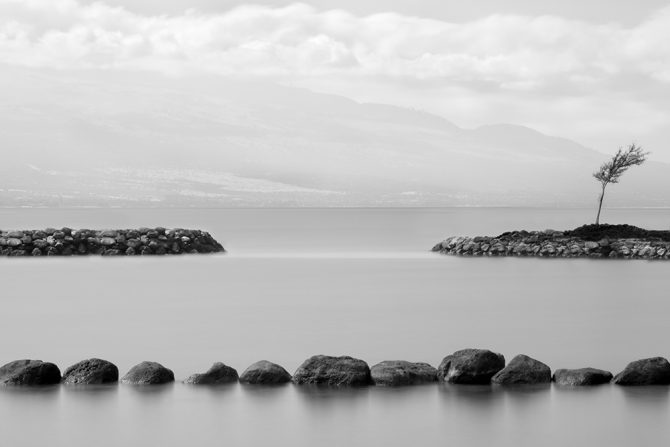
(Isolated No. 7 – Photographed at 30 seconds in bright sunlight)
6. Place your finger over the eyepiece to help the autofocus.
In very low light situations (eg: using a lot of ND filters) the autofocus may “hunt” and not let the camera fire. You can manually focus or you can simply place your finger over the eye piece, which stops stray light from entering the rear and allows the camera to find focus. You don’t need to hold your finger over the eyepiece for the entire exposure, just for a very brief moment to allow your autofocus to focus.
The open eyepiece can also allow light leaks in through the viewfinder, especially during a long exposure with the sun behind you. This isn’t a problem normally, because your head (and your eye cup) blocks stray light. But often when doing long exposures, you step back to avoid vibrating the camera, allowing light to enter. If you’re seeing odd glare or reflections in a shot done in this manner, try blocking the viewfinder for the next one, or use the viewfinder shutter if your camera has one.
7. Use a hood loupe and carefully check every image!
A hood loupe allows you to more closely inspect your images and avoid costly mistakes. It shields the LCD from light and glare, plus it magnifies the image, allowing you to be sure that your details are sharp and that you remembered to turn off the image stabilizer! There is nothing worse than coming home from a big trip only to find that your images were not right. Closely check each image and you can make corrections right on the spot. It’s much better to get the shot right in the field than it is to attempt to fix it back at your computer.
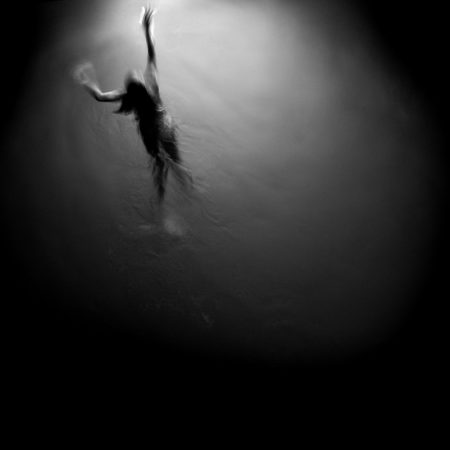
(Swimming Towards the Light – photographed with a one quarter second exposure)
8. Try different exposure times when photographing water.
For long exposures, the only rule on exposure times is that there is no rule on exposure times. When shooting water you’ll be amazed at how different a half second exposure can look compared to 2 seconds, and how completely differently 5, 15 or 30 seconds will look. So try different exposures until you find the one that you like for a given scene. With practice you’ll get a feel for what shutter speed would be a good place to start, but I still suggest experimenting while you’re at it.
The shot of the swimmer was made at a relatively fast shutter speed (for me) of 1/4 second, which allowed me to capture details in the surface of the water and have parts of the subject appear sharp, while still getting the motion blur of her arms and legs. Of the various exposure times I tried, I felt this was the best result in this situation.
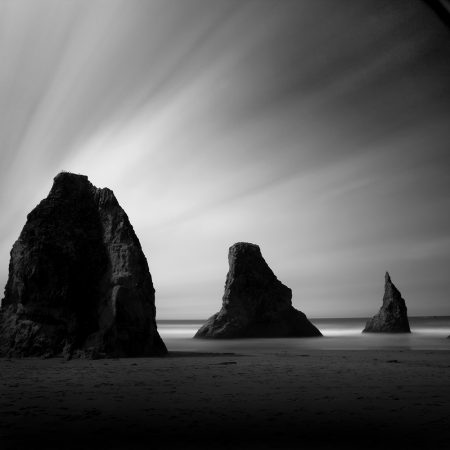
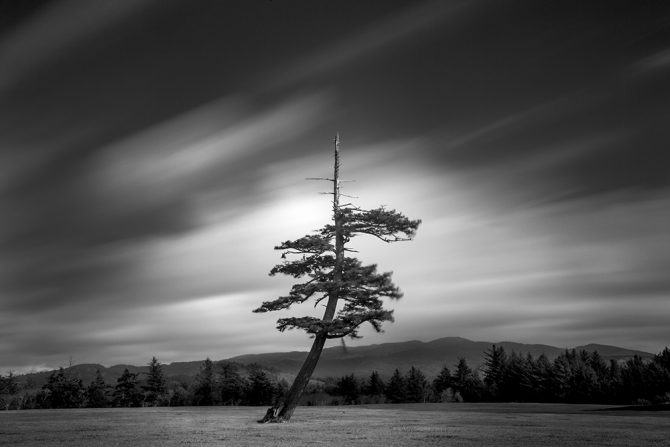
Monolith No. 10 – 120 Seconds
9. Skies often require a much longer exposure.
If you’re looking to create those long streaking clouds, start at 30 seconds and then try 60 and 120. Since most cameras will only meter to 30 seconds, you’ll have to do a little extrapolating to figure the correct exposure for 60 or 120. To do this, set your meter to one f-stop underexposed and then shoot for 60 seconds. For a 120 second exposure (as used on the image above), set your meter to two f-stops underexposed and expose for 120 seconds. Remember that for each f-stop you underexpose, you double your exposure time.
Once you’ve set your camera’s meter to underexpose the image, put it into “bulb” mode and use your watch to time your 60 or 120 second exposure. Bulb mode requires the shutter button to be held down for the entire exposure, so you’ll need a remote shutter release that can be locked “open” for the exposure.
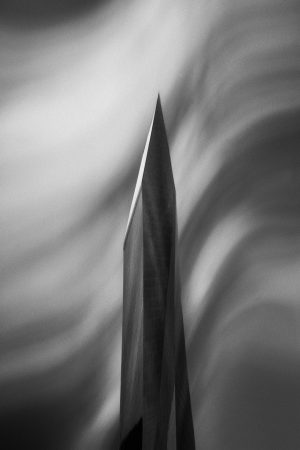
(The Fountainhead No. 93 – 30 second exposure in high winds)
10. There are no rules — experiment and try different things!
To create the image above from my “Fountainhead” series, I photographed the building reflected from a flexible ferrotype plate — a chrome-plated steel sheet with a near-perfect mirror surface. By just gently twisting and bending the plate, I achieved these otherworldly distortions, and I also feel they have an “organic” quality to them that would be difficult to achieve in Photoshop without hugely compromising the image quality. With this technique, I was able to achieve the effect in camera, so the pixel data doesn’t need to be unduly “stretched” or compromised.
And, once again, I was able to view the images in the field to see the effect and make sure I was getting what I wanted, rather than taking standard photos of buildings and hoping to find a creative way to manipulate them back at my computer. I suppose that would be another tip that always applies — take a little time to make the best possible image in camera on the scene, and you’ll always know you got the shot.
You can see other examples and read more about the Fountainhead series in my prior blog story.
So, there really are no “rules” for long exposure photography, and while long exposures are most often applied to water and skies, they can be used in many different and imaginative ways. So experiment, try new things, and get creative!
Hi Cole,
I guess you are using Canon gear? With Nikon this isn’t an issue, because you cannot switch to Bulb mode. Bulb is a setting of the shutter speed when you are in Manual mode, so the aperture doesn’t change.
Regards, Jeroen
Jeroen, you are right, I’m using Canon. I always wondered if Nikon behaved the same way. Thanks for answering that question!
Also not an issue with Pentax. Transfers shutter speed and aperture settings consistently between all modes, including Bulb. (Just confirmed with *istDS and K10D.)
I’m glad to hear this anomaly is not widespread. It’s an odd and illogical behavior on Canon’s part!
great post Cole it is very generous of you to share your technique….you rock.
Shooting a reflection on a plate you can warp is brilliant! Tremendous work. Going from complicated lighting setups to this long exposure stuff is a pretty big learning curve. Thanks for helping straighten it out a bit.
I bought a Schneider 11 stop variable ND filter and I am quickly finding their limitations. I flagged it, but was facing glaring 3 pm sunshine and got really varied results. It’s fun to play with though. I got all sorts of cross banding etc when fully stopped down. Here’s one I got, and this is straight from the camera (except removing 2 dust spots):
http://www.facebook.com/photo.php?fbid=10151983143020368&set=a.5439685367.9641.842550367&type=1&theater
Other tests were all during dusk and the results were more predictable. Still, anything facing any direct sun at any time of day in any amount loves to bring wacky flaring, but in the way that I’ve never seen before. It’s fun to learn something new, although $550 for a filter (including taxes in Canada) is a bit steep. ;-P
Hello Cole
I learned a lot of your article and make progress with LExp.
I have a MFT Olympus OM-D, which is great for LExp due to the live view option.
If you want you can have a look at my stream on Flickr ‘AlexFlanders’.
Still I deal with noise problems.
Do you have an idea how to avoid it?
Best Regards
Alex
Hey Cole, Question for you. How do you have a tack sharp human subject in a long exposure shot? Do you have them enter the frame late in to the exposure, or is there some other way? I can’t imagine someone holding perfectly still for long enough to have a perfect image.
Thanks!!
Beautiful! Thanks for the info!
I’m going to buy a Canon G1X. This camera does not have a bulb, but it does have 60 seconds exposure. Is this long enough for most outdoor and indoor long exposure and light painting shots? Switching to 200 ISO is sometimes maybe the solution…
Charles (Holland)