October 14, 2011
The Story Behind the Image: Old Car Interior
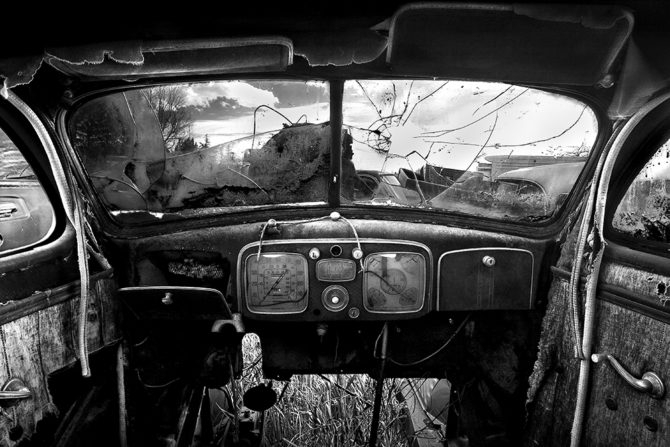
Old Car Interior is one of those images that is both complex and yet simple at the same time. This 1934 Chrysler interior was found just down the road in my friend’s backyard (I say “junkyard” but Frank gets mad at me). I was looking at the car’s dashboard and marveling at the incredible nostalgic detail, and thinking “if I could only capture it!” I had an idea of how I wanted this to look, but wasn’t sure if I could actually do it.
I’ve always believed that the rule of thirds was the key to a successful image, however not the traditional rule of thirds, but my own! It is:
- 1/3 the vision
- 1/3 the shot
- 1/3 the post processing
(you can read my post about the rule of thirds here: http://www.photographyblackwhite.com/rule-thirds/)
My first challenge was space, this was a very small interior and it was not practical to photograph from inside the car. Fortunately there was no back window and so I set up the tripod so that I could shoot through the back window. To capture the interior I used a 10-22mm zoom at 15mm on my 20d, making it a 24mm in full frame terms.
My next challenge was that it was quite dark inside the car and very bright outside. One exposure was clearly not going to span that wide dynamic range and so I decided on two exposures, one for the interior and one for the exterior. I chose not to use HDR as I personally find the look a bit unnatural. Using Photoshop I cut out the three windows from the exterior exposure and pasted them into the interior exposure, giving me a perfect exposure for the entire scene.
The processing was responsible for the uniqueness of this image. Using my pen and tablet I went over each piece of the interior to bring out the detail with what I call “local contrast enhancement.” This is a fancy way of saying that I would dodge and burn each piece to enhance the contrast in just that area. I prefer this localized approach rather than using a global contrast setting, which would affect all areas equally.
Part of my style is extreme contrast and so I would burn down the shadow areas to ensure great blacks, which further gives the impression of contrast and sharpness. In all I spent 50 hours to get this image right, which is the longest I’ve ever spent on an image.
The results surpassed my initial vision and has become one of my most published and requested images. I was by Frank’s today and visited “Old Car Interior” and was shocked to remember just how dull the interior actually looked compared to my final image. And something else that impressed me was the detail I was able to convey with 8 megapixels, demonstrating that it’s not always about megapixels!
Cole
Note: The matted 10 X 15 print of Old Car Interior sells for $400 but will be on sale for $275 until 11/1/2011. Just email me and please mention the discount.
Your posts on your process have not only taught me technique, but have also freed me to be more creative in my post processing. In the past, I have taken a more conservative approach as that is what I was originally taught. Since meeting you I have gone back to images I had already printed and achieved results that much more closely match my vision. Thanks!
2oD? That would be considered vintage in digital years. I too use the same approach, i.e. taking two exposures and manually “overlaying” them together. It’s more time consuming but I can get better results. (I don’t like the artificial look that HDR softwares usually render.) Hopefully, when I get good enough it’ll look like something you’ve done here. Very nice touch to it. Thanks.
I totally agree with your 1/3 Rule. You’ve got to see them in your mind, then you’ve got to make the image technically and finally you’ve got to fufill that vision when you post process. Each part of the process is equally important to produce a great image.
Your “Old Car” is a great iamge… I have a copy. Oddly, I used the same (two-frame, non-HDR) approach to make an image of the dashboard from inside an old truck in Rhyolite, NV (just east of Death Valley) a few years ago. But I was making a color image (the red patina of truck was too much for me).
But I also found that you can make a believeable image from an HDR start if you work with less “distance” between the 3+ exposures and do some post-processing to “make it real.”
…wonderful! …I always tell my friends about Cole’s rule of thirds. Thanks for sharing!
I like your rule of thirds. This shot shows how something broke and busted can be beautiful. Wonderful work. Thank you for sharing your techniques. I have so much to learn and appreciate when others are so giving.
Really love your shot and your own rule of thirds ! The best one i think…
Not that clean and clear technique..and I think HRD does much better.
Alburt, you make a good point, that there are many ways to create an image and that mine certainly is not the “right way!”
I try not to focus on the process but on the image and what it needs to fit into my vision. For this image HDR would not have produced the look I was after.
But if you were to photograph this same car, HDR might work for you. It is likely that you and I would create two completely different interpretations of this old car, because each of us has different visions.
And that’s a good thing!