Tag: Neutral Density
September 18, 2014
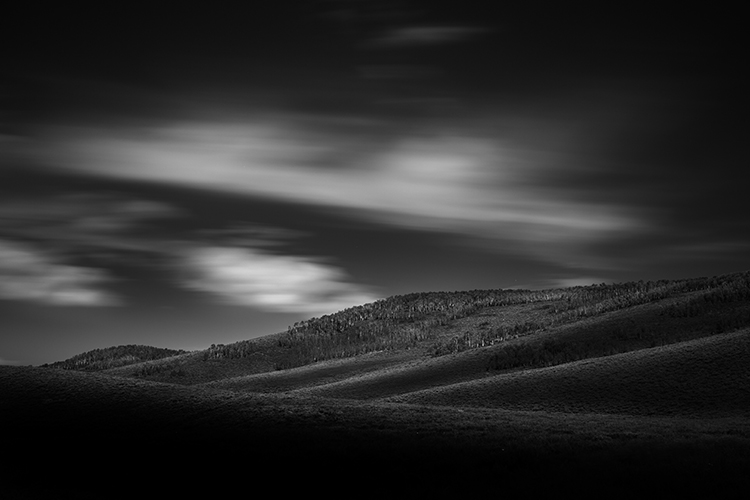
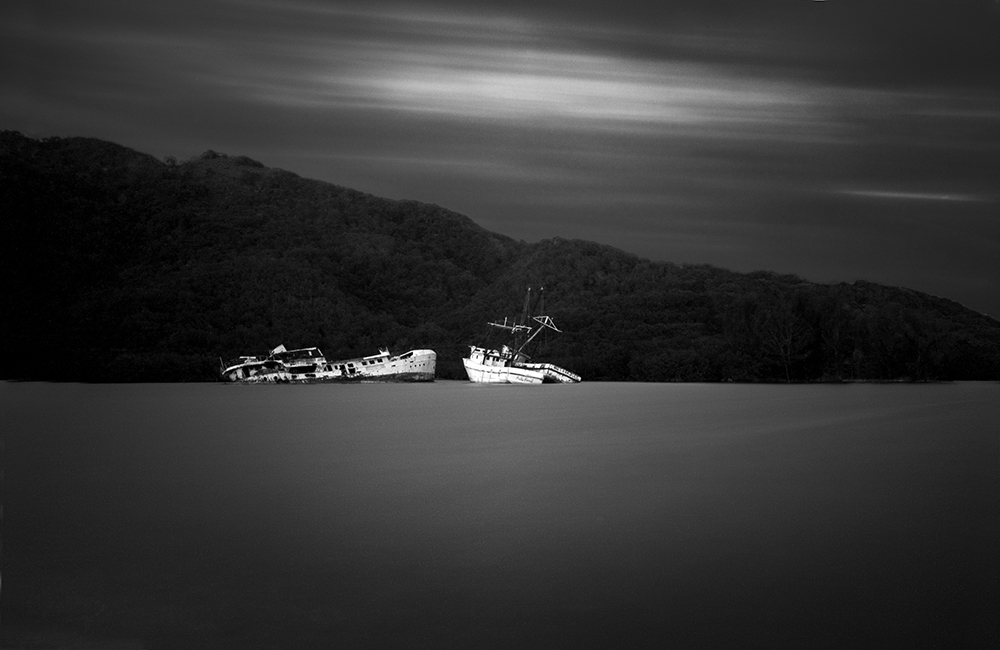
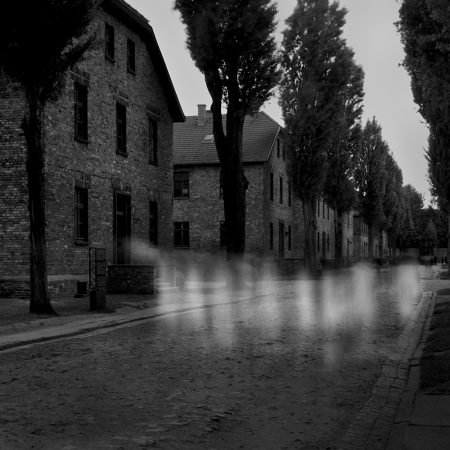
 Utah Hills, Created with the Singh-Ray 15 Stop Fixed ND Filter
After years of experimentation and trying various ND filter combinations, I have assembled what I believe to be the worlds perfect ND kit. It consists of the following:
5 stop fixed ND filter in 82mm
10 stop fixed ND filter in 82mm
15 stop fixed ND filter in 82mm
20 stop fixed ND filter in 82mm
Singh-Ray Vari-ND in 82mm
Step up rings on each of my lenses so they all can use 82mm filters
Those of you who are shooting long daytime exposures will appreciate what this means. I can now shoot with 5, 10, 15 or 20 stops of ND without stacking two filters together or vignetting!
I am in pig heaven. Seriously.
But my perfect kit would not be complete without a Singh-Ray Vari-ND filter. This is a variable filter that gives you between 3 and 8 stops of neutral density and it works just like a polarizer: turning it one way gives you more ND and turning it the other way gives you less.
It is critically important for me to have this variable filter because it allows me to photograph dynamic subjects (eg: people or other moving objects) quickly without removing the filter to compose the image.
With fixed filters the viewfinder is so dark that I cannot compose without removing the filter. And taking filters on and off takes precious time (which I may not have when photographing people) and sometimes I accidently change the zoom or focus settings, which ruins the shot.
With the Vari-ND I can dial the filter open, compose, and then close the filter down to shoot. I can do this very quickly which is critical.
The Vari-ND filter is the one piece of equipment that allowed me to photograph the ghosts at Auschwitz-Birkenau.
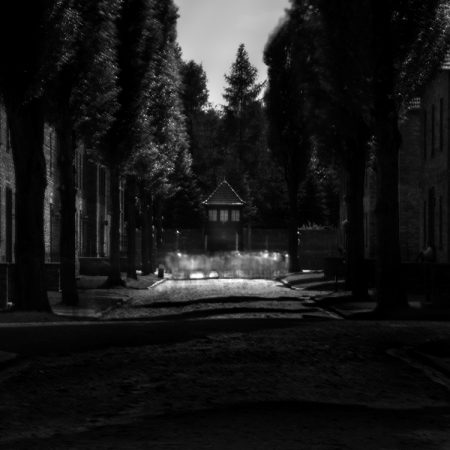
If had I visited the camps armed only with my fixed ND filters, I could not have created these images.
Now some of you looking at this list of filters might be thinking: everyone has heard of a 5 and 10 stop…but a 15 and 20???
Yes! Singh-Ray offers a 5, 10 and 15 stop filter and then they built a 20 stop filter for me (which I think they’ll be offering to the public before long).
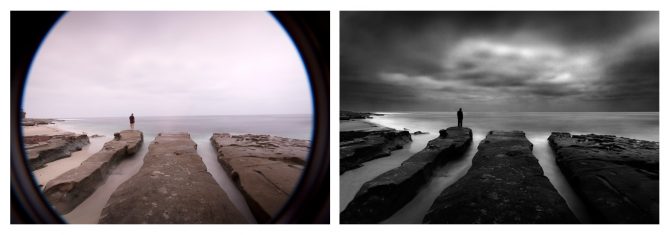
Why would I want a 20 stop filter? Because it allows me to get an 8 and 16 minute exposure in bright daylight, and now I don’t have to stack to get it! Stacking creates some serious vignetting when shooting wide, here’s a before-and-after of a two stacked filter shot to illustrate:
Being able to go from 5 to 20 stops without stacking is a huge deal for me.
I hope this doesn’t sound like a commercial for Singh-Ray because it’s not, but it is an honest plug. I’ve long depended on Singh-Ray’s filters, they are top quality and the customer service is unbeatable.
So if you’re wondering what ND filters to buy, here is the perfect combination of filters to aspire to.
Cole
P.S. Just to balance out all this technical talk, here is a favorite story of mine that puts equipment into perspective:
“A photographer went to a socialite party in New York. As he entered the front door, the host said ‘I love your pictures – they’re wonderful; you must have a fantastic camera.’ He said nothing until dinner was finished, then: ‘That was a wonderful dinner; you must have a terrific Stove.’” Sam HaskinsAugust 3, 2014
 Monolith No. 27
Here are two new short video tutorials that have been released by my friend Greg McKean over at Master Photo Workshops. These are a part of a larger comprehensive DVD tutorial we are putting together on how to shoot long exposures.
Shooting a 30 Second Exposure with the Singh-Ray Vari-ND and Mor-Slo 5 Stop ND Filter:
https://www.youtube.com/watch?v=rbepMMhVc7w
Fixed Vs. Variable Filters
https://www.youtube.com/watch?v=BQE2kxONJds
The other DVD we were working on, which is about how I create in black and white on location in Death Valley, is nearing completion.
Cole
July 9, 2013
Tech Report: Cole Thompson explains how to determine correct exposures for long exposure images
An acknowledged master of long-exposure photography, Cole Thompson shares his techniques for finding his “correct” exposure, and extrapolating that to dramatically longer exposure times.

| Balance – Split, Croatia – 2013 (2 minute exposure) |
Getting the correct exposure when using one or more neutral density filters can be challenging. I use up to 18 stops of ND with exposures ranging from 30 seconds to 8 minutes. At first finding the correct exposure was very frustrating and my images were often underexposed and I’d have to resort to guessing at the correct exposure, which often meant I missed the shot.

| Miss Danielle – Guanaja, Honduras – 2010 (4 minute exposure) |
It took a while to figure everything out, but now I have a very simple system for setting the correct exposure and it usually works right the first time. Most of it is straightforward, but there are a couple of “secrets” that could make your long exposures a bit easier.

| Lake Erie – Cleveland, Ohio – 2013 (1 minute exposure) |
I use a Canon 5D digital camera for most of my work. While I could use a film camera, getting the right exposure would take much longer because film doesn’t have the immediate feedback that’s provided by a digital camera. I mention that I use Canon because one of my “secrets” applies only to Canon cameras.
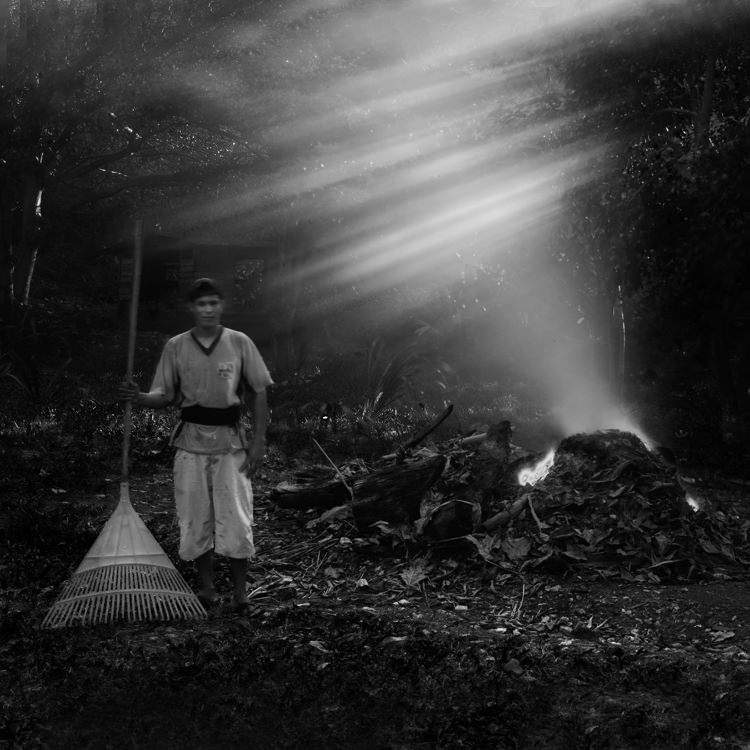
| Honduran with Plastic Rake – Guanaja, Honduras – 2010 (30 second exposure) |
Let me give you an idea of how much 18 stops of neutral density is. If my correct exposure for a scene on a sunny day is 1/500 at f8, then using 18 stops of ND would allow me to shoot a 4 minute exposure with that same sunny scene! That is a lot of light reduction and that means only a tiny fraction of the light is making it through the filters and onto the sensor.
But even with this small amount of light, the camera’s meter is up to the task! I have never needed to use a handheld light meter or long-exposure calculator.
To start off I set my ISO to 50 (typically the lowest ISO available on a digital camera) and set my shutter speed to 30 seconds (typically the longest exposure setting on a digital camera) and then take a meter reading of the scene.
And now for my first and most important secret:
 Secret number 1: To get a correct exposure reading at these low light levels I must completely seal off the viewfinder so that no light enters the camera from the rear.
At these low light levels even the smallest amount of light entering the camera from the viewfinder will give an incorrect exposure reading. How do I seal off the eyepiece? I use an eyecup, such as this one offered by the Hoodman Corporation (see photo).
When using the eyecup I take extreme care to seal my eye completely so that no light enters the viewfinder, otherwise my image will be underexposed.
Once the eyecup is sealed, I simply match my exposure needles for a “correct” exposure and I’m all set for a perfect 30 second exposure.
Now what if I want to use a longer exposure, say 1 minute? How can I calculate my exposure for 1 minute when my camera will only meter to 30 seconds? Simple!
I do everything the same as I did for the 30 second exposure, but now I set the exposure needles to under-expose by 1 f-stop so that my meter looks like this:

Now I switch my camera to Bulb mode and I expose for 60 seconds.
What did I just do here? By using the exposure compensation scale, I underexposed by 1 stop when I metered and then I made up for it by doubling my exposure time.
What is Bulb mode? In Bulb mode the shutter stays open as long as you hold down the shutter. It’s not practical for me to hold the shutter button for one minute because it would shake the camera, so I use a remote switch that allows me to lock the shutter button down for the duration of my exposure. You can use your camera’s official “branded” shutter lock, but there are “off brand” ones available at a fraction of the cost that do the job just fine.

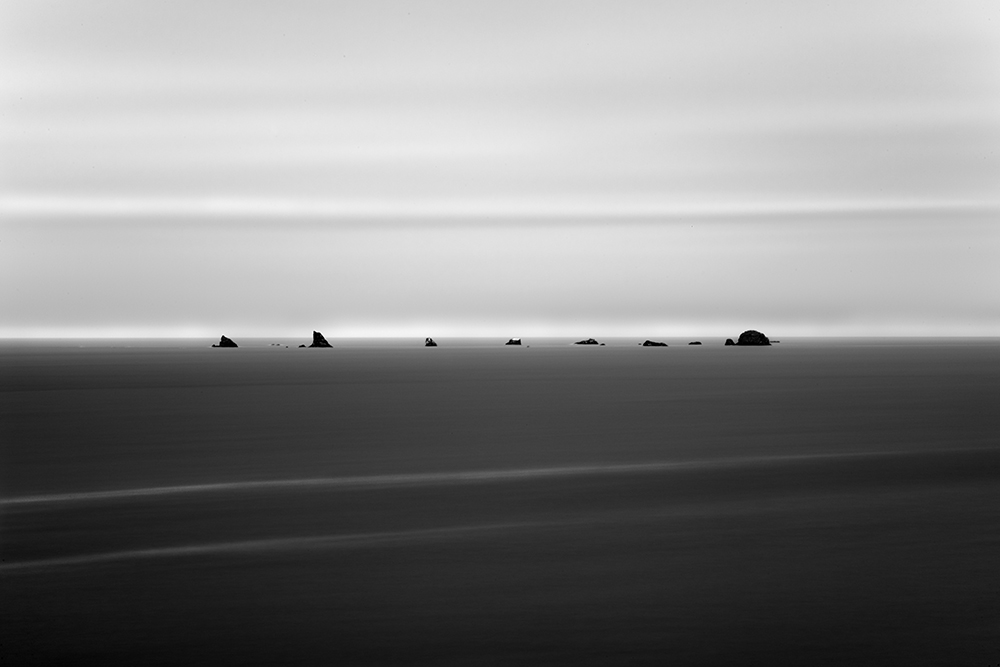
| Monolith No. 27 – Oregon Coast – 2010 (5 minute exposure) |
Now for secret number 2 for Canon users: When I first used this approach, the images would sometimes turn out okay and sometimes they’d be very dark. I couldn’t figure out what was causing my calculation to be so far off. Was it some sort of reciprocity failure, a phenomenon we experienced in the old days of film that required extra exposure time beyond what the meter said? Or was it something else?
My research found nothing on reciprocity failure for digital cameras. And then one day I accidentally discovered why my longer exposures were not working out the way they were supposed to. This is due to a quirky feature of Canon cameras.
When I metered and set my aperture to f8 in Manual mode, I expected the aperture to still be at f8 when I switched to Bulb mode. It was not. It was set at f22 and that explained why my images were grossly underexposed. The aperture setting does not carry over from Manual mode into Bulb mode; you must manually set it each time.
So secret #2 is to be sure that I reset my aperture once I switch to Bulb mode, every time!
So how do I determine the correct exposure for a 2 minute exposure? I do everything the same again, except I set my meter to underexpose by two stops. My meter now looks like this:

I then switch to Bulb, re-set my aperture and expose for 2 minutes.
And for a 4 minute exposure I set my meter to underexpose by 3 stops so that my meter now looks like this:

I switch to Bulb mode, change my aperture and expose for 4 minutes.
What I am doing with this approach is to underexpose when metering, and then I compensate by increasing my exposure time. For every 1 stop I underexpose, I double my exposure time.
Here are the settings to remember:
| Meter for a 30 second exposure, and then adjust as follows: | |
| Meter for correct exposure | 30 second exposure |
| -1 stop underexposed | 1 minute exposure |
| -2 stop underexposed | 2 minute exposure |
| -3 stop underexposed | 4 minute exposure |
At first this system seemed complex, but once I used it a few times it was very easy to remember.

| Ancient Stones No. 2 – Joshua Tree, CA – 2012 (5.5 minute exposure) |
When I’m going to use a very long exposure (over 30 seconds) I’ll start off by first exposing at 30 seconds to check the exposure and composition. If everything looks good, then I’ll expose at the longer exposure time. This saves a lot of wasted time when I’m doing a four minute exposure and then I discover that something wasn’t right!

| Wedding Day – La Jolla, CA – 2013 (20 second exposure) |
When I’m using a 30-second exposure, the camera times the exposure for me. But my camera doesn’t time for over 30 seconds and I must time these exposures myself. At first I used my wristwatch, but I frequently forgot where I started from and I wasted the exposure. So now I use my iPhone timer because I always have it with me, and because I cannot ignore that obnoxious Marimba alarm! There are also various smartphone apps that can help time your exposure, some are free, others cost a couple dollars.

| Stonehenge – England – 2009 (90 second exposure) |
To create my long exposures images I use a Singh-Ray Vari-ND filter and stack a second 5-stop or 10-stop Mor-Slo fixed ND filter on top of that. There are two reasons why I use the Vari-ND.
First, I can open up the Vari-ND filter for easier composing. At 18 stops it’s almost impossible to see anything even after my eyes have adjusted. With the Vari-ND I can allow more light to enter the viewfinder so that I can compose the image, and then I stop down for the exposure.
The second Vari-ND advantage is that I can use the variable feature of the filter to adjust my exposure instead of using the aperture. This allows me to set my aperture to where I want it, to control my depth of field.
Both of these advantages are significant and I always use a Vari-ND when shooting long exposures.

| Little Corona – Corona del Mar, CA – 2010 (3 minute exposure) |
Conclusion: Setting the correct exposure for long exposure photography is pretty easy, it’s all based on accurately metering at 30 seconds and extrapolating from there. Using an eyecup is a must to seal out any extraneous light and the Vari-ND makes composing easy and offers me more control over the scene.
Use the links below to check out Cole’s website, blog, and social media for more information and news updates.
March 22, 2012
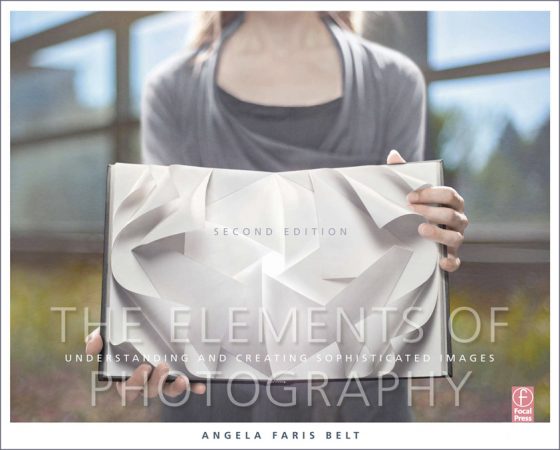
My friend Angela Faris Belt has just published the second edition of her book The Elements of Photography – Understanding and Creating Sophisticated Images. What I like about the book is that it addresses both the technical as well as the creative components of photographic art. Too often as photographers we focus on the technical at the expense of the creative; probably because it’s much easier to master the technical. Here is the publisher’s description of the book:
Photography is a complex craft. Some excel at the technical side of image-making, focusing perfectly on the subject, releasing the shutter at just the right moment and making exposures with the precise amount of light. Others are artists and storytellers, capturing a fleeting moment in time which inspires a viewer to gaze upon an image and ponder its meaning.
The best photographers are masters of both.
In the book Angela features 40 artist’s work including my portfolio “The Ghosts of Auschwitz-Birkenau.” Here is what she had to say about the series:
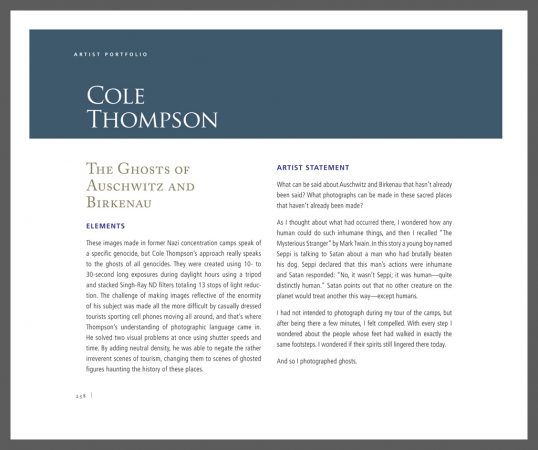
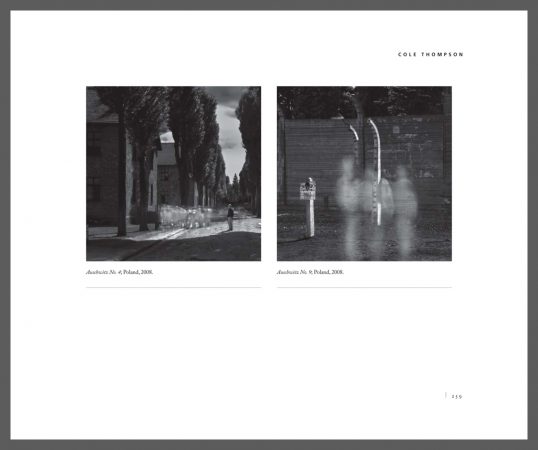
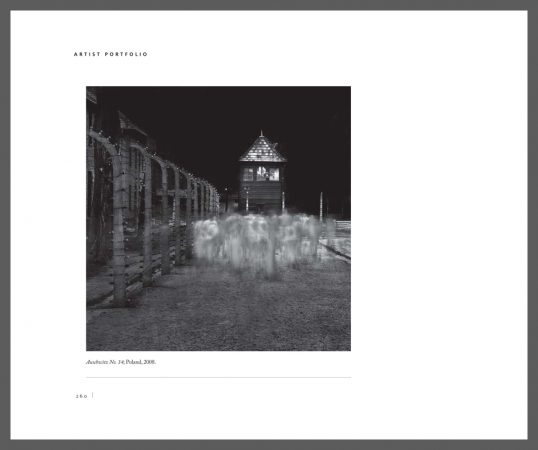
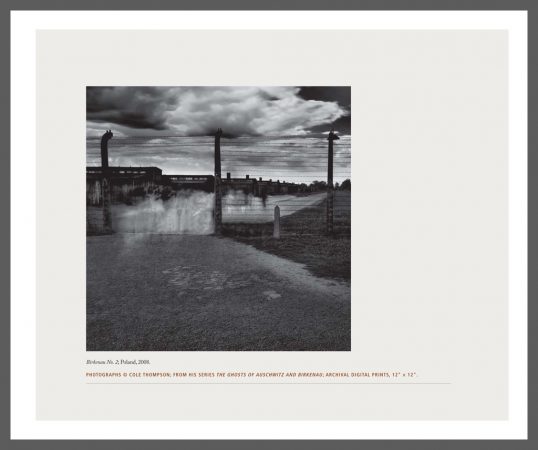
These images made in former Nazi concentration camps speak of a specific genocide, but Cole Thompson’s approach really speaks to the ghosts of all genocides. They were created using 10 to 30-second long exposures during daylight hours using a tripod and stacked Singh-Ray ND filters totalling 13 stops of light reduction. The challenge of making images reflective of the enormity of his subject was made all the more difficult by casually dressed tourists sporting cell phone moving all around, and that’s where Thompson’s understanding of photographic language came in. He solved two visual problems at once using shutter speeds and time. By adding neutral density, he was able to negate the rather irreverent scenes of tourism, changing them to scenes of ghosted figures haunting the history of these places.
I’m honored to be featured in Angela’s book and appreciate her analysis. You can read more about the book and take a peek inside at Amazon.com
Cole
June 23, 2009

You’ve heard me rave about the Singh-Ray Vari-ND filter, the one that I use for many of my images? My work and a short article was recently featured on their blog.
Click Here to Read the Singh-Ray Blog Entry
Cole