Tag: long exposure
October 23, 2010
This blog appeared on the Singh-Ray site on Tuesday, October 19, 2010
Cole Thompson explains how he uses long exposures to create his mystical black and white images

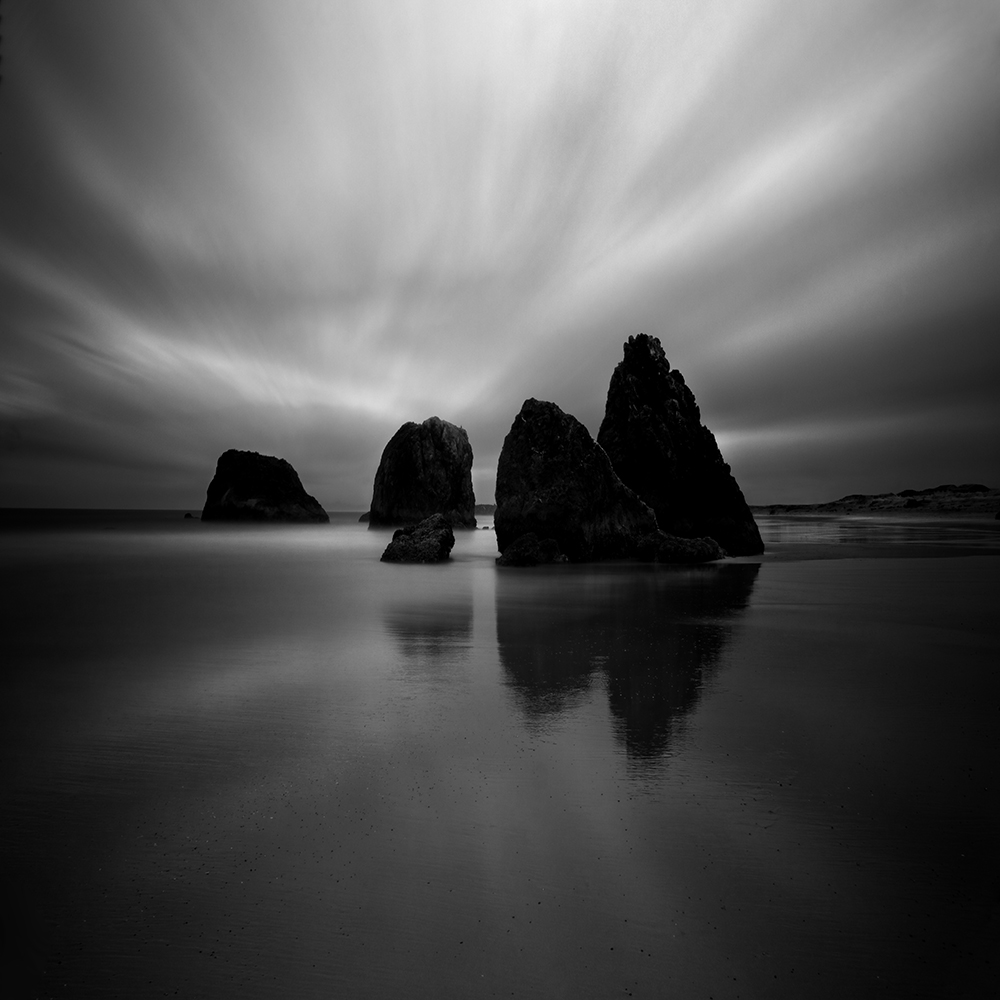
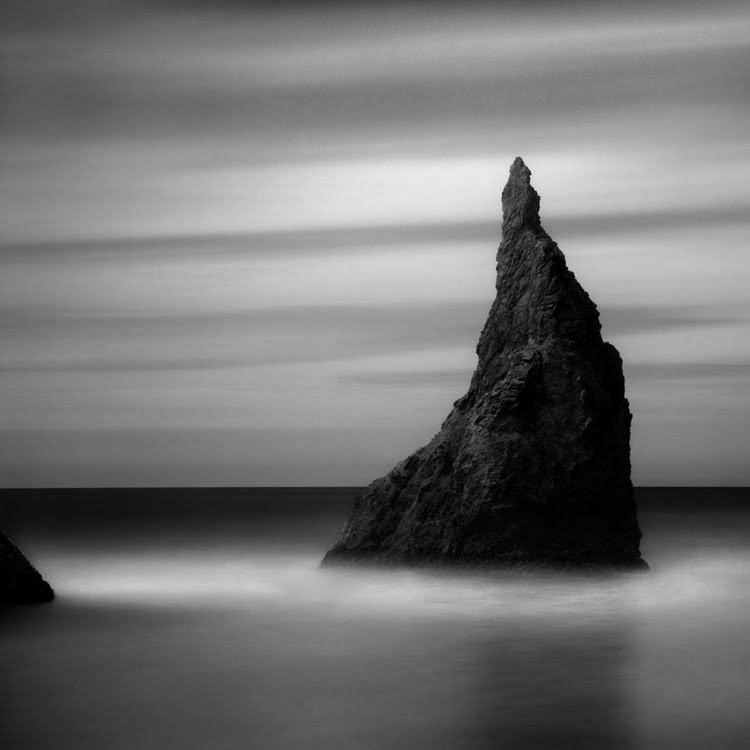
Fine-art photographer Cole Thompson creates his images and visual essays in dramatic black and white. His images involve the use of very long time exposures of 30 seconds to several minutes. “I have always been intrigued by monoliths, first by the statues on Easter Island, then by the monolith in the film 2001: A Space Odyssey and most recently by Stonehenge in England. In each case, seeing these monoliths prompts the question; Who built them and for what purpose? I’ve always loved visiting Bandon Beach in Oregon because of the natural monoliths strewn along the coastline. Randomly placed, it is as though the earth were God’s chessboard and the monoliths the pieces from an unfinished game. I’ve included several images of these Bandon Beach monoliths to illustrate my use of long exposures for my various monochrome print portfolios.

“I have often created my monolith images using long exposures of 30 seconds, but recently I found myself experimenting with daytime exposures of up to 5 minutes. In each case, whether 30 seconds or up to 5 minutes, the Singh-Ray Vari-ND filter was essential to creating these images. If you’ve ever tried such exposures with a fixed ND filter, you know the challenges. First, to compose you have to remove the filter because the filters are so dark you cannot see through the viewfinder. Second, when removing and replacing these filters you can accidentally change the focus or the focal length of your lens. Often you’re not even aware of these lens movements until later, when it’s too late.
“When I mount the Vari-ND filter on my lens, I dial it to the minimum (Min) setting. At this point the filter has already added about 2 f-stops of density which is just enough to darken the image in the viewfinder a bit, but I can still see clearly enough to compose and focus accurately. I then rotate the front ring to increase the density by as much as 6 additional f-stops. When I need even more density, I stack the Singh-Ray Mor-Slo 5-stop ND Filter in front of the the Vari-ND to achieve up to 13 stops of density. This allows me to use very long exposures, even in full daylight.

“Here are some of the things I’ve learned about using very long exposures. First a tripod is a must and a remote shutter release is desirable. While it’s true that slight camera movements do not seriously affect the very long exposure, it’s best to eliminate vibrations as a “best practice” and because camera movement can ruin an image with a 5 second exposure or less. I shoot at ISO 50 at F22, put my camera into RAW/monochrome mode and set the exposure mode to manual.

“The most frequent question I am asked is how I determine my exposure. I use the in-camera meter for exposures up to 30 seconds, and beyond that I find I must extrapolate because the digital SLR’s I use only meter up to 30 seconds. With my camera set to F22 and 30 seconds, I dial my Vari-ND’s density ring until my exposure is correct. To extrapolate for exposures longer than 30 seconds, I do the same thing but set the exposure to 2 f-stops below ideal and then quadruple the exposure in my head. If 30 seconds is what I’m metering for, then quadrupling brings me to a 120-second exposure.
“But strange as it seems, if I expose at 120 seconds, the image will be very underexposed. So I’ll generally expose at 300 seconds for a good exposure. I’m not sure why the 120 seconds doesn’t produce the correct exposure, but it could be due to some kind of digital equivalent to ‘reciprocity failure,’ which is a phenomenon experienced when shooting extra long exposures with film. The reason for such reciprocity failure with film is that the longer the exposure, the less effective the film is in recording the light and so the exposure length needs to be increased. In the case of my digital camera, when the meter says I need a 120 second exposure I extrapolate that reading and give it 300 seconds. It works for me.

Something else that is very important when using the in-camera meter is that I must completely isolate stray light from coming into the viewfinder and affecting the meter reading. To do this I use a Hoodman eye-cup which allows me to seal the viewfinder with my eye. This is essential for a correct exposure.
“Shooting long exposures at the beach creates a couple of additional challenges. Waves hitting the tripod legs will cause them to sink into the sand, ruining the exposure. I can either move out of the water line or build wide feet for my tripod that give it a larger footprint. The beach also has strong winds and a lens makes a great wind sail. I combat this by using a heavy tripod that allows me to hang a weight onto the center column to steady it. I also position myself between the wind and the camera and often turn my jacket up above my head and use it as a wind shield.
“Lastly, let me repeat that camera movement is the primary enemy of long exposures. Even the slightest movements can ruin the image. Sometimes it’s just not easy to detect this movement by checking the camera’s display. For this reason, I check every image with a hooded loupe which enables me to see the image clearly even outdoors.
I have found extra-long exposures to be especially appealing to me, perhaps because they help convey nature as timeless. I’ve come to a point where the technique has become part of the message in my work. Choosing the length of the long exposure will control how that movement looks in both water and sky. Exposures from 2-30 seconds can give a completely different look in water while the longer exposures measured in minutes are usually needed to produce dramatic skies.
There is no better tool than the Vari-ND to produce these types of images. As I’ve said before in my other Singh-Ray posts, this filter not only makes it easier for me to create these images, in many cases I could not have produced them without the Vari-ND.”
To learn more about Cole’s work check out his previous stories on this blog and pay a visit to his website.

Labels: Cole Thompson, Mor-Slo, Vari-ND
July 3, 2010
Focus on Singh-Ray Filters
Showcasing images made with Singh-Ray photographic filters
Colorado photographer Cole Thompson is dedicated to creating his fine-art images and essays in dramatic black and white. A major feature of his work is the use of very long time exposures of 30 to 90 seconds and longer. “I believe that long exposures and water are a natural match. Portraying water as fluid seems so much more natural to me. My Singh-Ray Vari-ND lets me easily explore exposures of varying durations by simply adjusting the density from about 2 stops up to 8 stops, or anywhere in between.

Dark Waters
1-second exposure
“My strong attraction to long exposures came about because of water. I was intrigued by the way moving water looked at different exposures; a 1-second image looked so completely different than a 10- or 30-second exposure. My very first long exposure of water was this 1-second image entitled Dark Waters created on the Blue River in Kansas City.

Lone Man No. 35
30-second exposure
“This led to my photographing water in all kinds of waters and often using a very long exposure to create a smooth, milky white look to the water as in Lone Man No. 35 created in the Honduras.

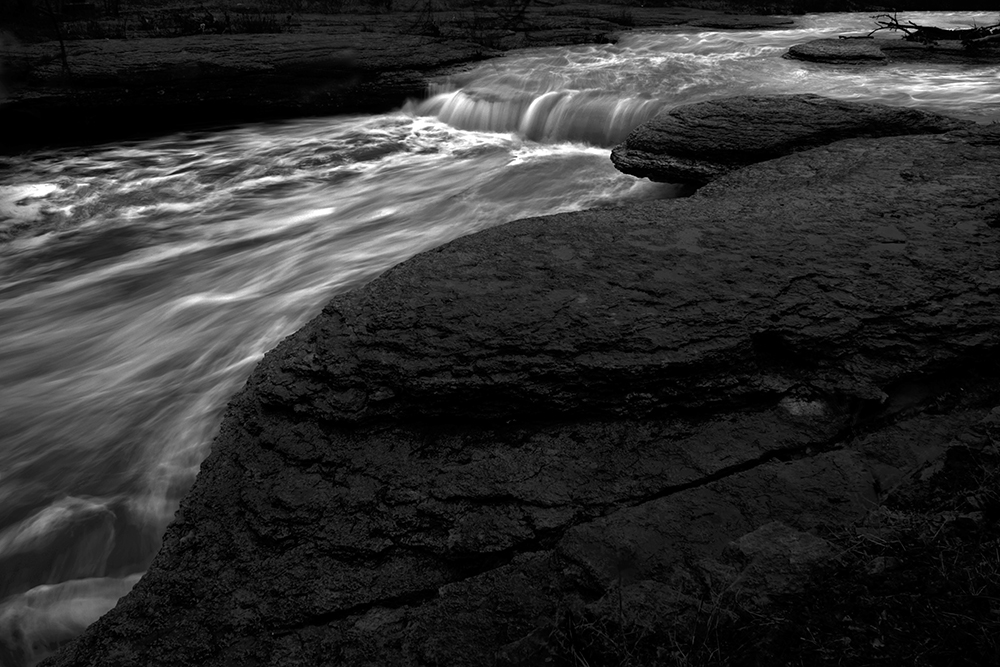
Poudre River Spillway
30-second exposure
“Each exposure length can create a completely different look. So I’ll photograph the same scene over and over from 1 to 30 seconds to get the right feel. Here is a very simple image of water flowing over a spillway on the Poudre River in Colorado.

Rocks and Mist
30-second exposure
“Another factor affecting how the water will look is the speed at which it is moving and the direction it is moving in relation to the camera. In Rocks and Mist created in La Jolla, the waves were rushing in and out giving the water an appearance of fog.

Rushing Waters
30-second exposure
“Likewise in Rushing Waters the water is often mistaken by viewers as a cloud flowing over a mountain rather than the reality; rushing waters flowing over a large rock near Washington D.C.

Fluid Water No. 6
10-second exposure
“Many of my images are created at 30 seconds, but sometimes a faster exposure allows for more definition in the water — such as in Fluid Water No. 6 which was a 10-second exposure created on the Poudre River.

Primordial Soup
30-second exposure
“The speed of the water and its direction of movement often affect the look of the ‘fluid water’ as in Primordial Soup created on the Oregon Coast. In the foreground there is a very slow-moving pool of water, while in the background the crashing waves of the beach are rendered soft and without definition.
“Getting long exposures during the day requires a great deal of neutral density. I use the Singh-Ray Vari-ND and then stack the Mor-Slo 5-stop ND filter on top of it, giving me about 13 stops of ND. This will allow me under most conditions to get a 30-second exposure in bright sunlight.
“I use the camera’s meter to determine exposure and am very careful to block stray light from entering the eyecup while metering. I usually start with a 1-second exposure and then work my way up: 5, 10, 50, 20, 25 and 30 seconds. You’ll be amazed at how different each shot can look.”
Another tip from Cole: “Turn off the long-exposure noise reduction and use the mirror lockup for exposures in the 1 to 5-second range — mirror lockup is not needed for longer exposures.”
To see more of Cole’s work and learn more about his creative techniques, you’ll want to check out his previous stories on this blog and visit his own website and blog.
May 23, 2009
Many people ask me to tell them the “secret” of my black and white conversion. Here is the secret: great black and white images are not made in the conversion process. You can buy the most expensive plug-in’s and execute the most complicated processes to convert your images, and it will not guarantee a great image. There are no shortcuts or simple procedures.
Okay, so what is the “secret?”
It’s that you must plan for a great black and white image starting with the selection of the scene and then all the way through the processing. I tell people that it’s 50% the shot and 50% the post-processing.
Taking the Shot:
My style relies on dark images with bright subjects. It’s this contrast that creates an image that can really jump out at you, so when I go out shooting, I’m looking for these types of scenes. While there will be many scenes that catch my eye, if it doesn’t have this potential, then I know the shot will not work for me.
Post-Processing:
When I create an image, I have a vision of what it’s going to look like, and generally the original shot doesn’t look anything like my vision of final image. That’s where the post-processing comes in; using very simple techniques I “create” the image. I do not use curves, profiles, layers, plug-ins or any sophisticated techniques. I simply adjust the brightness and contrast and then dodge and burn the image like a painter would paint a canvas.
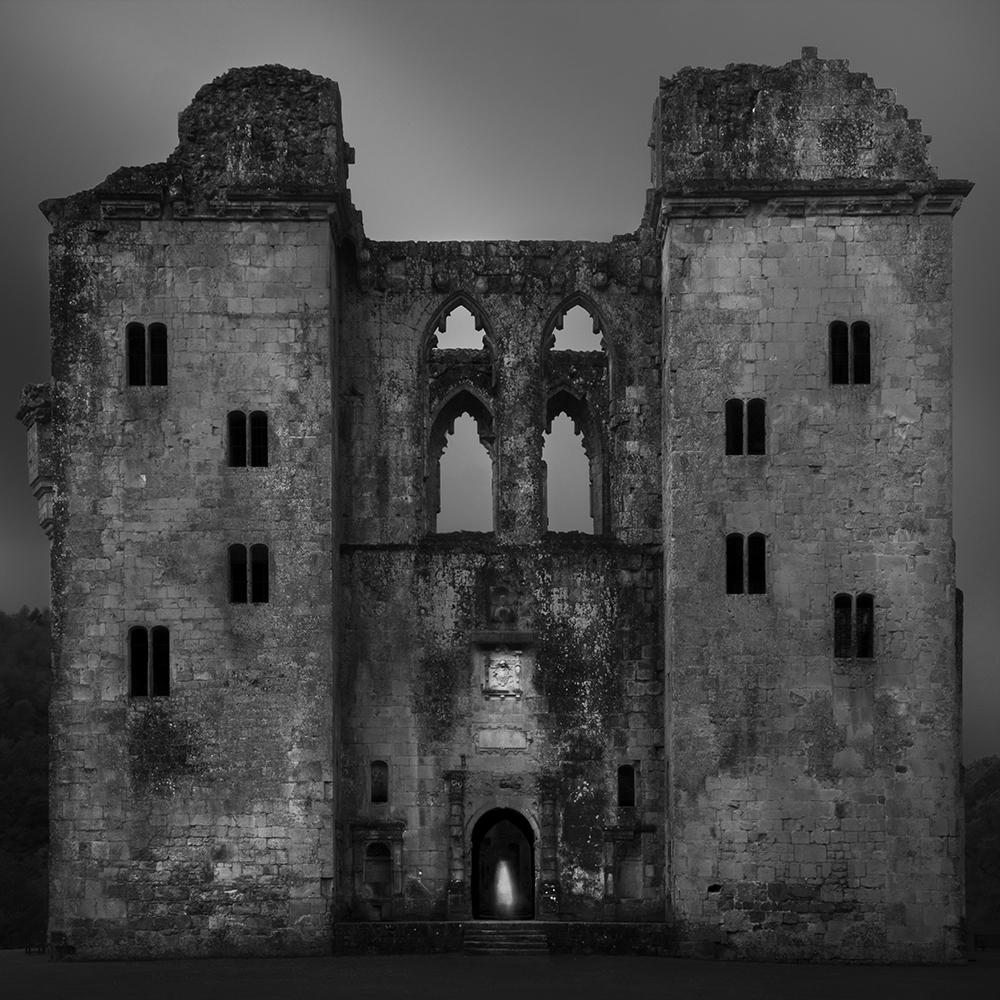
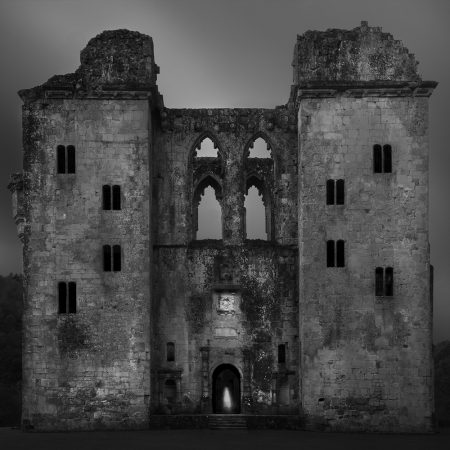
Above is one of my latest images from England; the Old Wardour Castle. While it appears to have been shot at night, it was a 30 second daytime exposure. The key is that I knew in advance what I wanted the image to look like and this vision was realized by underexposing the image and then extensively dodging and burning it to create a night-like scene.
So while the conversion process is important, it’s not really the key to a great black and white image. What’s most important is that you visualize the image in advance and then take control by creating the image along the way.
Cole
P.S. For those of you who are still interested in my conversion process, here it is: First, I shoot in b&w mode and RAW which produces a color image that I convert using the “channel mixer” method. In Photoshop you choose Image/Adjustments/Channel Mixer. Check the “Monochrome” box and then adjust the Source Channel color sliders to see how adjusting each color changes the image (note: some prefer the “Black and White” converter over the “Channel Mixer” method as it offers slightly more control and is a bit easier to use). That’s it!
February 17, 2009

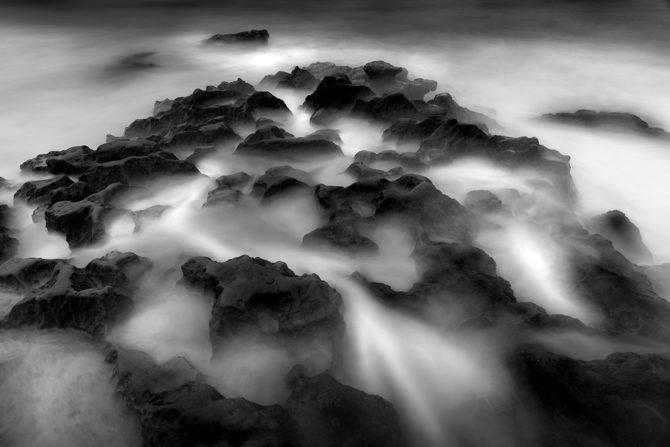
“Rocks and Mist” is another one of my long exposure shots. The image was captured late one night on the rocky shore of La Jolla Cove in San Diego. I was standing on the eroded lava rock about 10 feet from a precipice that fell off to the ocean. The waves would come up and go over my feet as I stood there for the 30 second exposure.
The effect of the waves going in an out over the 30 seconds gives the misty, foggy effect. The only illumination were the distant lights and stars. I was using a 16mm lens and so there is a distorted almost fish-eye effect, which is not really noticeable since the viewer does not know what the scene really looks like.
This was shot in 2005 and I recently returned to the same spot and was very surprised at how small this rocky area really is. The wide angle lens added much to the look and feel of the image.
Water and long exposures are a great combination. A very long exposure can smooth out water for a very simple and clean look. Sometimes a shorter exposure can give form and shape to the water and then there is the misty look as in the above image. Using a digital camera allows you to experiment and get right before you leave. I love digital!
Cole