Tag: long exposure
October 30, 2016
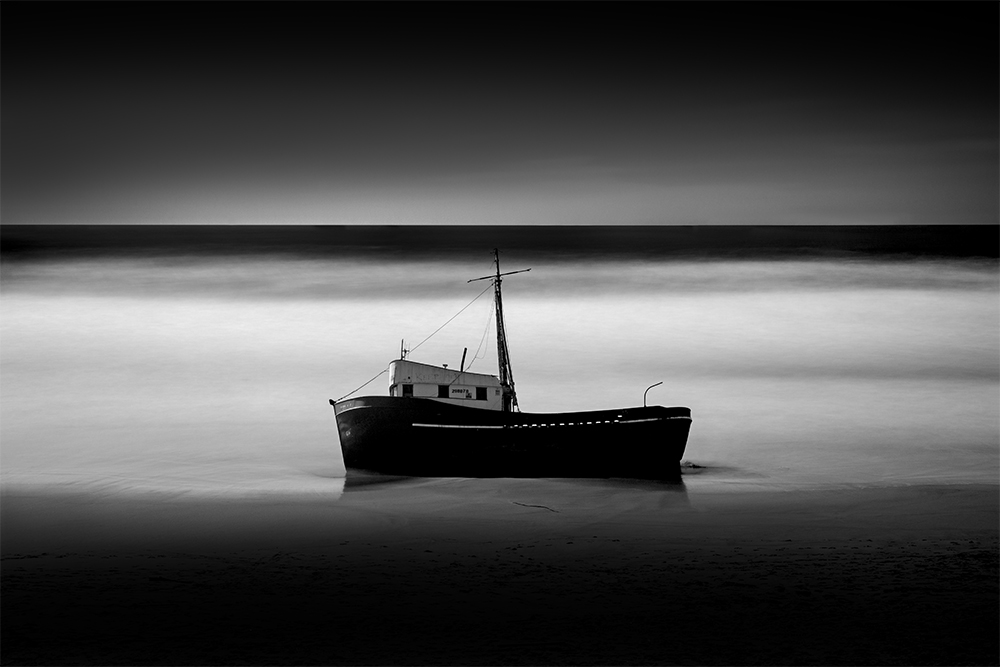
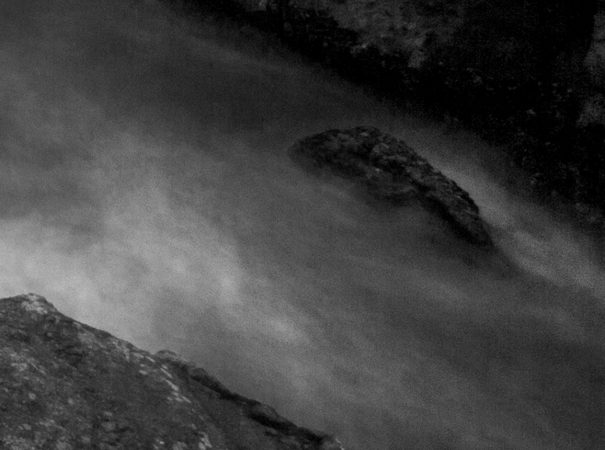
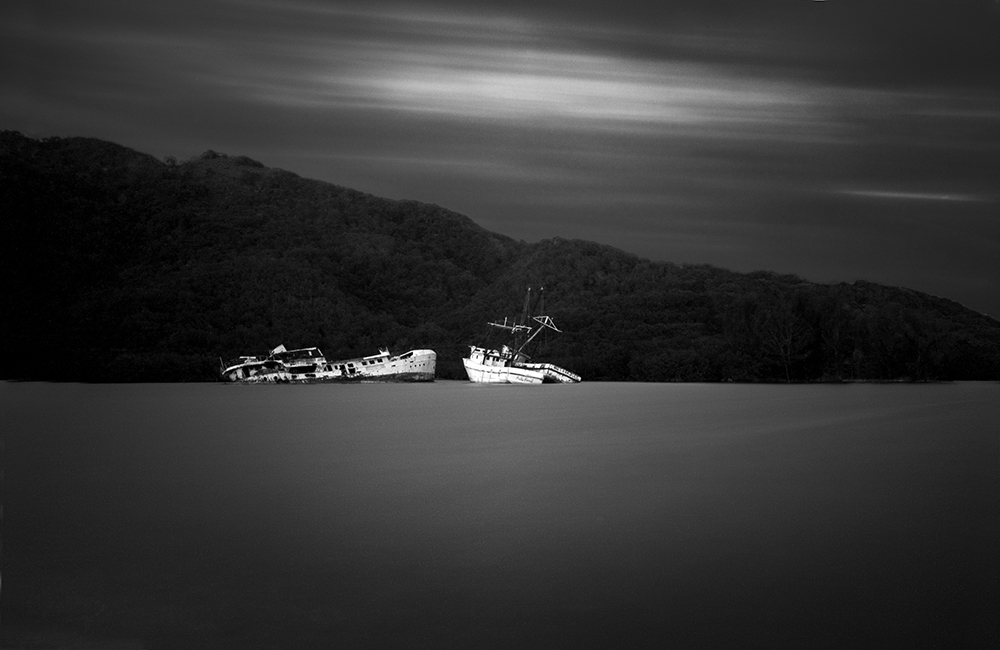
Run Aground – 2 minute exposure
I’ve just processed the first images from my Canon 5D Mark IV and wanted to report back on what I’ve found. To recap my previous post regarding the Mark IV: I love the new features and increased resolution, but my litmus test is how much noise there is on images with long exposures of 2 minutes and longer, and particularly those images that have been underexposed (which is how I shoot).
I’m happy to report that the Mark IV does much better than what I experienced with the 5DSr. Exposures up to 2 minutes are very clean. The image above was a 2 minute exposure and I was very happy with the quality and noise levels.
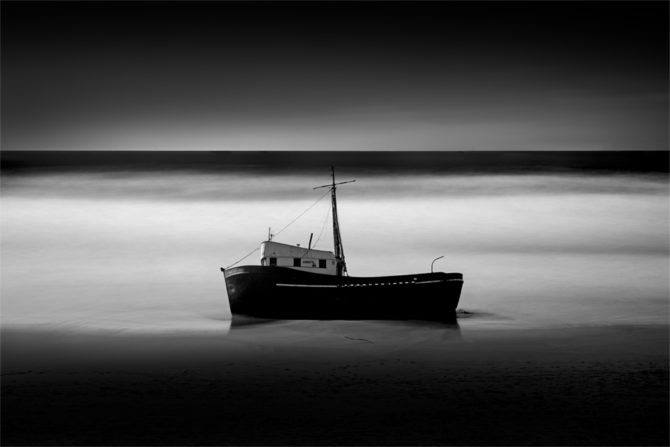
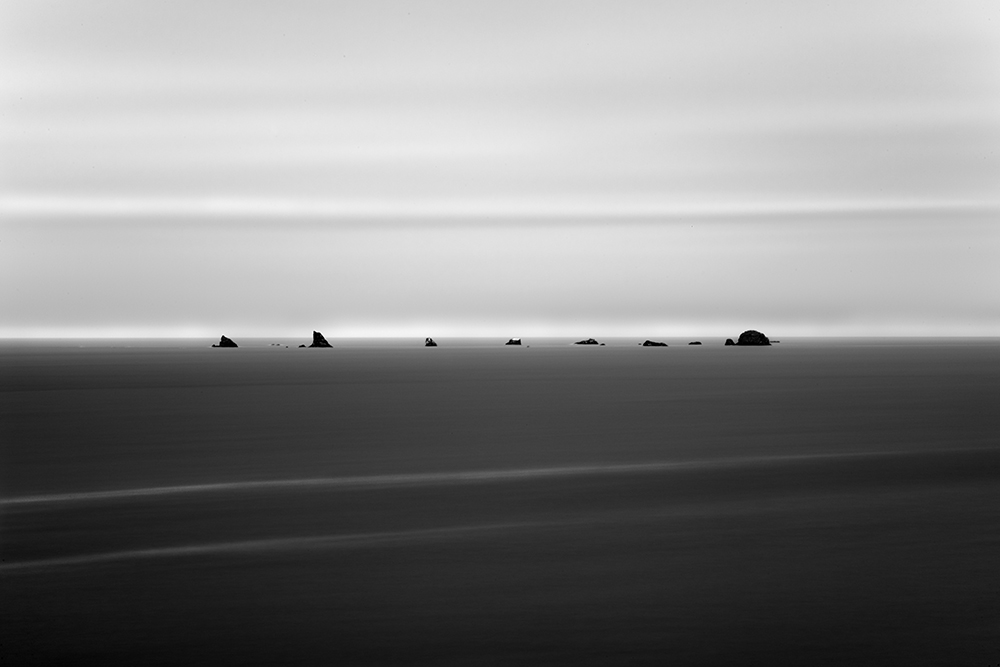
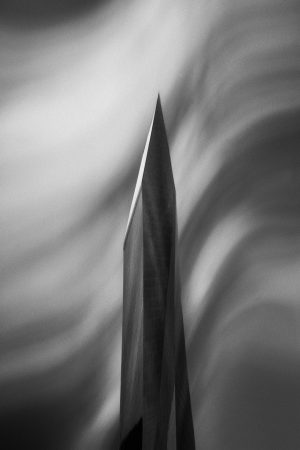
But what about images that are over 2 minutes? Here’s a 6 minute exposure:
Monolith No. 97 – 6 minutes
This image was shot at sunset and was greatly underexposed (perhaps by 3 stops) due to the sun going down during the exposure. I found it had much more noise than a 2 minute exposure, but I was still able to work with it and salvage the image. So I was pretty happy about that.
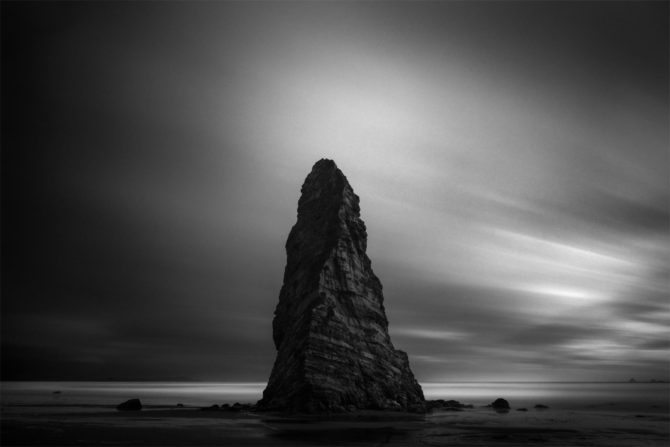
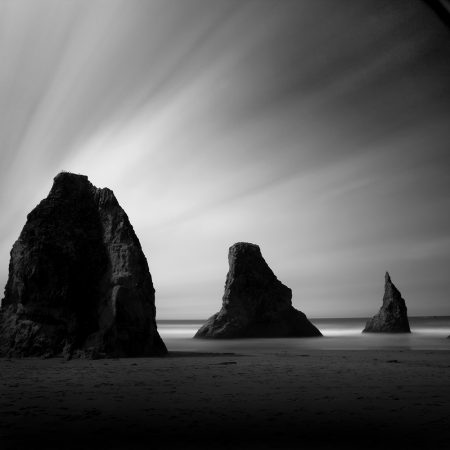
Here is the same scene with a 2 minute exposure:
Monolith No. 98 – 2 minutes
There is no doubt that this image is cleaner and has less noise. But as I said, with a little extra work the 6 minute exposure was usable.
Patterning. I don’t really know what to call this phenomenon I’ve seen with the Mark III sensor, but I call it “patterning.” It’s a pixel pattern that shows dark streaking vertical lines in areas that have been heavily dodged and burned.
This is an example of light patterning from a Mark III image. Sometimes I have to back off my dodging and burning in these areas or I’ll break up the lines with dozens of healing brush taps.
Fortunately I have not yet seen this patterning appear with the Mark IV images, which is very encouraging. But again I’ve only shot and processed a few images.
Conclusion: I am very optimistic that the Mark IV images are going to serve me well with my style of long exposure and underexposed shooting.
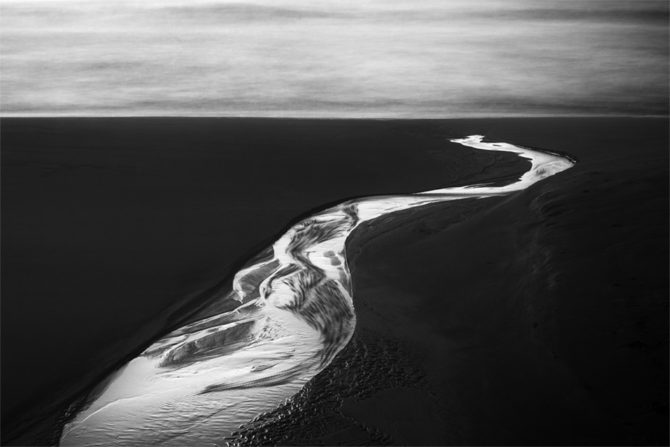
Separation No. 2 – 30 seconds
July 31, 2015

Searching
The solution? I returned the camera.
The 5DSr is not the right camera for my long exposure work.
Cole
July 24, 2015

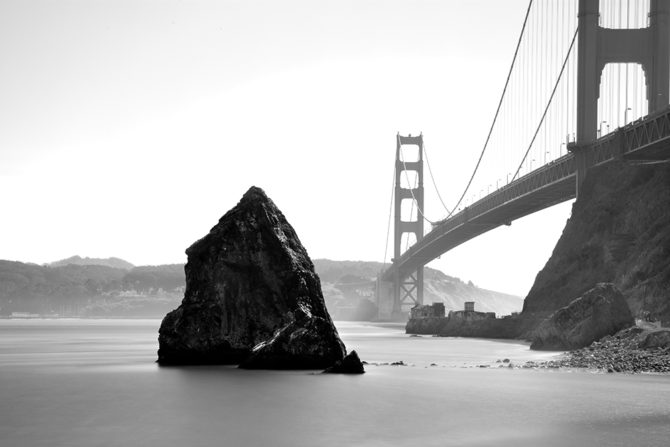
Overshadowed
I’ve returned from my first outing with my new Canon 5DSr and wanted to report back on what I thought of my first images.
The image above was shot at 1/80 of a second and I was impressed with the quality. I was able to blow it up much larger than images from the 5D Mk III and have it hold its detail. I am happy with the quality of this image.
The next image is from the Spiral Jetty on the Great Salt Lake, this image was shot at 240 seconds:

Spiral Jetty
The quality of this image was very disappointing. I opened the RAW file and it was so noisy that I didn’t think that I could salvage this image. By using the dust and scratch filter in Photoshop and by adding grain, I was able to make this image “acceptable.”
I suspected the noise came from the long exposure and I was in fact worried about this going in. The larger number of pixels packed into the same area means that the pixels are smaller and more prone to noise, especially during long exposures. But I didn’t expect this poor of a result.
I then found the same image that I had shot at 120 seconds and compared a blown up section of the two:
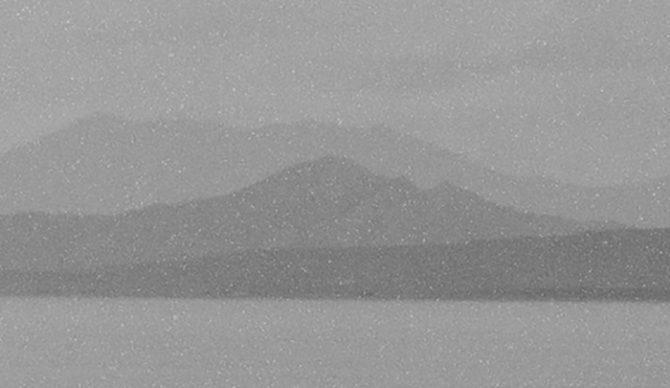
240 seconds
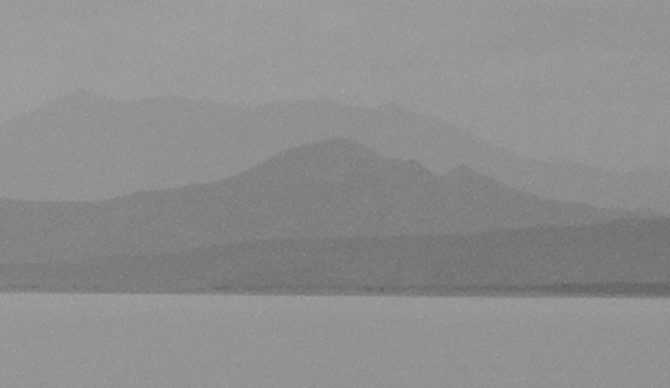
120 seconds
.
The noise at 120 seconds is reasonable while at 240 seconds the noise is completely unacceptable. I only have a few shots to judge this by, but all of my longer exposures have this noise and so I’m sorry to report that my first results with the 5DSr are disappointing from a long exposure perspective.
I will do some formal testing to see how exposure times affects noise levels. As I learn more, I’ll let you know what I find. And if you know something about this issue, please share it with everyone.
Cole
July 10, 2015

(Monolith No. 50 – NOT created with the Canon 5DSr!)
I’m on the road in Utah and Nevada with my 5DSr and I wanted to report in with some first impressions. Unfortunately I cannot post any images until I return home.
The new camera looks, feels and handles like the 5D Mk III and so I was able to get up to speed relatively quickly. That was nice. However to take full advantage of the many new features, I will have to spend some time going through the menus. As always, the number of features is overwhelming.
There are two new features that immediately caught my eye and got me excited for long exposure work, they are:
Delay After Mirror Lockup: You can set the shutter to trigger after the mirror has flipped up and settled down, making sure the vibrations are gone before the shutter opens. I have mine set to 1/2 second.
This means that mirror lockup can now be a one button press just like a regular shutter! I cannot tell you the number of times I had forgotten to turn off the old two-button mirror lockup and then pressed the shutter once thinking I was taking a picture, when I was not. This new feature will help avoid that mistake.
Bulb Timer: You can now set the length of your bulb exposure in the camera! No more using your watch (and forgetting where you started) and I can now ditch the digital kitchen timer that was always going off in my camera bag just as I was going through security.
Now let me combine these two features and show you why I think this is so great for long exposures. I can now press the shutter button once and the following occurs:
- The mirror flips up and settles down
- A half second later the shutter opens
- The shutter stays open for as long as I’ve programmed it for
- The shutter closes by itself
I can still choose to shoot with a cable release, but now if I forget to bring one, lose or break it, I can still shoot long exposures. I had this problem on Easter Island when both of my cable releases went bad and I was really in a pickle.
These new features means that I no longer “need” a remote shutter release (although I still choose to use one for convenience) but the important thing is that I’ll never be stranded like that again.
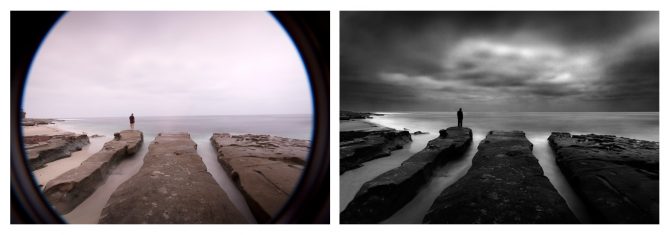
One issue Canon did not address is the light entering into the camera through the eyepiece which caused internal reflections on the left and right sides of the 5D Mk III images. I had suggested to Canon that they put a small shutter on the viewfinder that automatically triggered during long exposures…but they didn’t.
To address this I had been using a hat to cover the camera during exposure, but in wind this didn’t work too well. So I build a “flap” that mounted to the hot shoe:
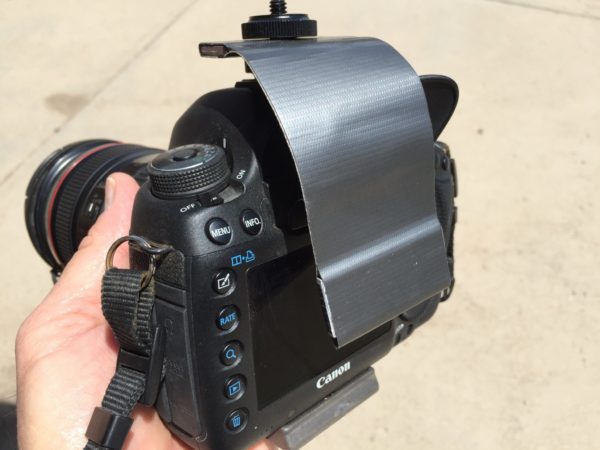
Unfortunately the flap doesn’t seal well enough around my Hoodman HoodEYE eyecup and so I ended up using the hat trick again. I’ll need to work on this contraption some more.
Note: Many people point out to me that Canon provides a small viewfinder block that you can slip into the eyepiece. Unfortunately this block does not work with the Hoodman HoodEYE installed and the eyecup is required to get an accurate long exposure meter reading.
Summary: I purchased the 5DSr so that I could print my images larger and so it was an unexpected treat to find some new features that makes long exposure work easier. I like these new features very much!
I’ll not know what the images look like until I get home. I’m curious how the new 50mp sensor does with noise during long exposures since I found the Mk III to be noisier than the Mk II.
Cole
August 3, 2014
 Monolith No. 27
Here are two new short video tutorials that have been released by my friend Greg McKean over at Master Photo Workshops. These are a part of a larger comprehensive DVD tutorial we are putting together on how to shoot long exposures.
Shooting a 30 Second Exposure with the Singh-Ray Vari-ND and Mor-Slo 5 Stop ND Filter:
https://www.youtube.com/watch?v=rbepMMhVc7w
Fixed Vs. Variable Filters
https://www.youtube.com/watch?v=BQE2kxONJds
The other DVD we were working on, which is about how I create in black and white on location in Death Valley, is nearing completion.
Cole
July 9, 2013
Tech Report: Cole Thompson explains how to determine correct exposures for long exposure images
An acknowledged master of long-exposure photography, Cole Thompson shares his techniques for finding his “correct” exposure, and extrapolating that to dramatically longer exposure times.

| Balance – Split, Croatia – 2013 (2 minute exposure) |
Getting the correct exposure when using one or more neutral density filters can be challenging. I use up to 18 stops of ND with exposures ranging from 30 seconds to 8 minutes. At first finding the correct exposure was very frustrating and my images were often underexposed and I’d have to resort to guessing at the correct exposure, which often meant I missed the shot.

| Miss Danielle – Guanaja, Honduras – 2010 (4 minute exposure) |
It took a while to figure everything out, but now I have a very simple system for setting the correct exposure and it usually works right the first time. Most of it is straightforward, but there are a couple of “secrets” that could make your long exposures a bit easier.

| Lake Erie – Cleveland, Ohio – 2013 (1 minute exposure) |
I use a Canon 5D digital camera for most of my work. While I could use a film camera, getting the right exposure would take much longer because film doesn’t have the immediate feedback that’s provided by a digital camera. I mention that I use Canon because one of my “secrets” applies only to Canon cameras.
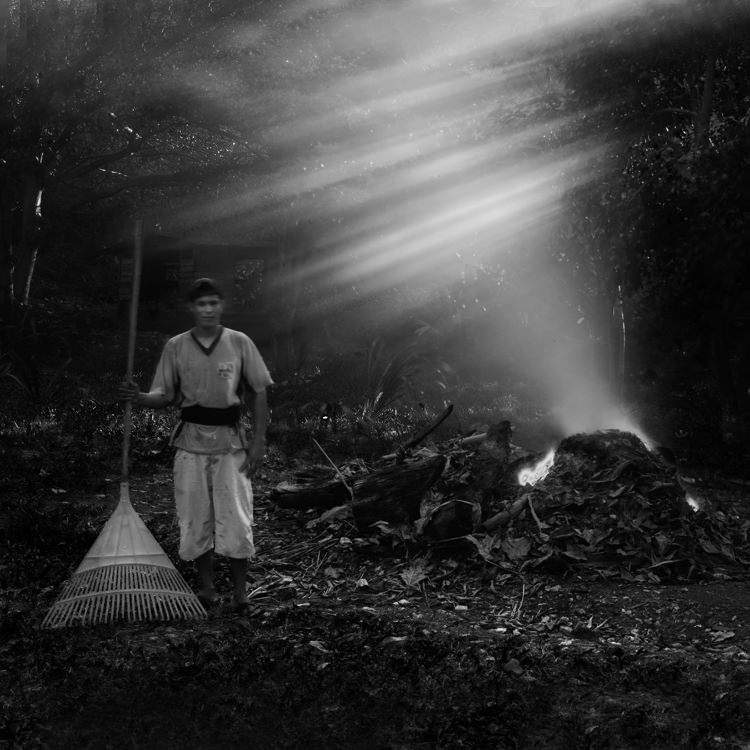
| Honduran with Plastic Rake – Guanaja, Honduras – 2010 (30 second exposure) |
Let me give you an idea of how much 18 stops of neutral density is. If my correct exposure for a scene on a sunny day is 1/500 at f8, then using 18 stops of ND would allow me to shoot a 4 minute exposure with that same sunny scene! That is a lot of light reduction and that means only a tiny fraction of the light is making it through the filters and onto the sensor.
But even with this small amount of light, the camera’s meter is up to the task! I have never needed to use a handheld light meter or long-exposure calculator.
To start off I set my ISO to 50 (typically the lowest ISO available on a digital camera) and set my shutter speed to 30 seconds (typically the longest exposure setting on a digital camera) and then take a meter reading of the scene.
And now for my first and most important secret:
 Secret number 1: To get a correct exposure reading at these low light levels I must completely seal off the viewfinder so that no light enters the camera from the rear.
At these low light levels even the smallest amount of light entering the camera from the viewfinder will give an incorrect exposure reading. How do I seal off the eyepiece? I use an eyecup, such as this one offered by the Hoodman Corporation (see photo).
When using the eyecup I take extreme care to seal my eye completely so that no light enters the viewfinder, otherwise my image will be underexposed.
Once the eyecup is sealed, I simply match my exposure needles for a “correct” exposure and I’m all set for a perfect 30 second exposure.
Now what if I want to use a longer exposure, say 1 minute? How can I calculate my exposure for 1 minute when my camera will only meter to 30 seconds? Simple!
I do everything the same as I did for the 30 second exposure, but now I set the exposure needles to under-expose by 1 f-stop so that my meter looks like this:

Now I switch my camera to Bulb mode and I expose for 60 seconds.
What did I just do here? By using the exposure compensation scale, I underexposed by 1 stop when I metered and then I made up for it by doubling my exposure time.
What is Bulb mode? In Bulb mode the shutter stays open as long as you hold down the shutter. It’s not practical for me to hold the shutter button for one minute because it would shake the camera, so I use a remote switch that allows me to lock the shutter button down for the duration of my exposure. You can use your camera’s official “branded” shutter lock, but there are “off brand” ones available at a fraction of the cost that do the job just fine.

| Monolith No. 27 – Oregon Coast – 2010 (5 minute exposure) |
Now for secret number 2 for Canon users: When I first used this approach, the images would sometimes turn out okay and sometimes they’d be very dark. I couldn’t figure out what was causing my calculation to be so far off. Was it some sort of reciprocity failure, a phenomenon we experienced in the old days of film that required extra exposure time beyond what the meter said? Or was it something else?
My research found nothing on reciprocity failure for digital cameras. And then one day I accidentally discovered why my longer exposures were not working out the way they were supposed to. This is due to a quirky feature of Canon cameras.
When I metered and set my aperture to f8 in Manual mode, I expected the aperture to still be at f8 when I switched to Bulb mode. It was not. It was set at f22 and that explained why my images were grossly underexposed. The aperture setting does not carry over from Manual mode into Bulb mode; you must manually set it each time.
So secret #2 is to be sure that I reset my aperture once I switch to Bulb mode, every time!
So how do I determine the correct exposure for a 2 minute exposure? I do everything the same again, except I set my meter to underexpose by two stops. My meter now looks like this:

I then switch to Bulb, re-set my aperture and expose for 2 minutes.
And for a 4 minute exposure I set my meter to underexpose by 3 stops so that my meter now looks like this:

I switch to Bulb mode, change my aperture and expose for 4 minutes.
What I am doing with this approach is to underexpose when metering, and then I compensate by increasing my exposure time. For every 1 stop I underexpose, I double my exposure time.
Here are the settings to remember:
| Meter for a 30 second exposure, and then adjust as follows: | |
| Meter for correct exposure | 30 second exposure |
| -1 stop underexposed | 1 minute exposure |
| -2 stop underexposed | 2 minute exposure |
| -3 stop underexposed | 4 minute exposure |
At first this system seemed complex, but once I used it a few times it was very easy to remember.

| Ancient Stones No. 2 – Joshua Tree, CA – 2012 (5.5 minute exposure) |
When I’m going to use a very long exposure (over 30 seconds) I’ll start off by first exposing at 30 seconds to check the exposure and composition. If everything looks good, then I’ll expose at the longer exposure time. This saves a lot of wasted time when I’m doing a four minute exposure and then I discover that something wasn’t right!

| Wedding Day – La Jolla, CA – 2013 (20 second exposure) |
When I’m using a 30-second exposure, the camera times the exposure for me. But my camera doesn’t time for over 30 seconds and I must time these exposures myself. At first I used my wristwatch, but I frequently forgot where I started from and I wasted the exposure. So now I use my iPhone timer because I always have it with me, and because I cannot ignore that obnoxious Marimba alarm! There are also various smartphone apps that can help time your exposure, some are free, others cost a couple dollars.

| Stonehenge – England – 2009 (90 second exposure) |
To create my long exposures images I use a Singh-Ray Vari-ND filter and stack a second 5-stop or 10-stop Mor-Slo fixed ND filter on top of that. There are two reasons why I use the Vari-ND.
First, I can open up the Vari-ND filter for easier composing. At 18 stops it’s almost impossible to see anything even after my eyes have adjusted. With the Vari-ND I can allow more light to enter the viewfinder so that I can compose the image, and then I stop down for the exposure.
The second Vari-ND advantage is that I can use the variable feature of the filter to adjust my exposure instead of using the aperture. This allows me to set my aperture to where I want it, to control my depth of field.
Both of these advantages are significant and I always use a Vari-ND when shooting long exposures.

| Little Corona – Corona del Mar, CA – 2010 (3 minute exposure) |
Conclusion: Setting the correct exposure for long exposure photography is pretty easy, it’s all based on accurately metering at 30 seconds and extrapolating from there. Using an eyecup is a must to seal out any extraneous light and the Vari-ND makes composing easy and offers me more control over the scene.
Use the links below to check out Cole’s website, blog, and social media for more information and news updates.
April 23, 2013
Cole Thompson shares some of his latest long-exposure images from recent trips

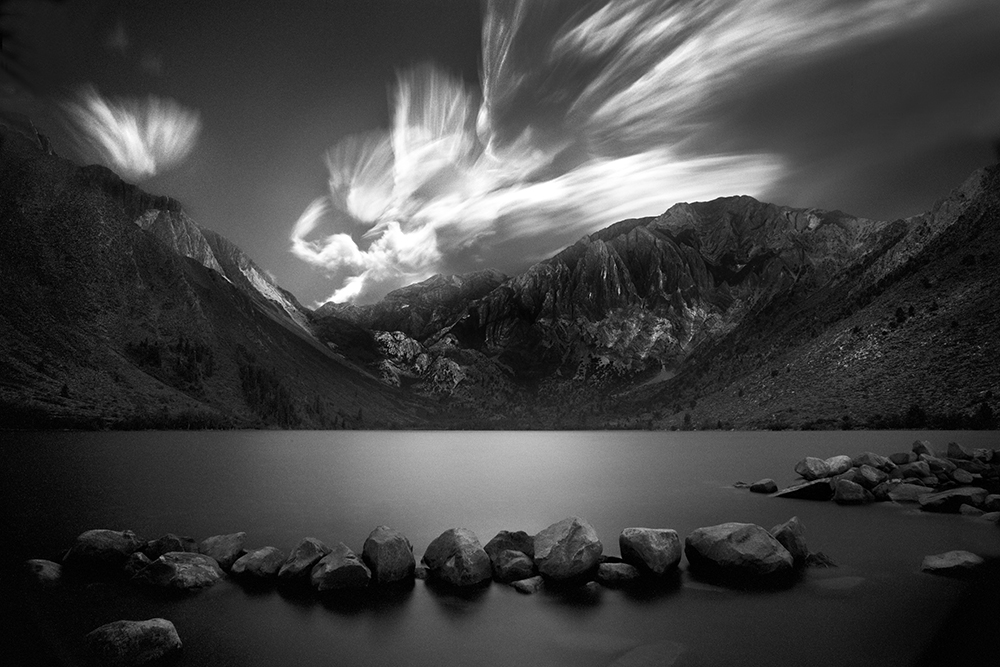
John Holland Memorial – Convict Lake, California
“I was in the Sierras to attend the memorial of an old friend and mentor when I created this image.
“John was on my mind as I spent several days reminiscing about our times together and missing him. He loved the Sierras and this is where he wanted his earthly ashes to spend eternity. I loved him and wanted to create an image to honor him and to remind me of him for the rest of my life. This is that image.
“When I create an image, I do not plan it, but rather ‘see’ it in my mind through my vision, and from there my challenge is to recreate that vision on paper. I envisioned this scene as very dark with movement in the skies.
“There are certain things I cannot control when creating an image, and clouds are one of them. I took a number of exposures here because the clouds just didn’t look right at exposures of 30 and 60 seconds. Because the clouds were moving so slowly, I needed a 4-minute exposure to create the feel I wanted. And to obtain such a long exposure in bright sunlight, I used a Vari-ND and ten stops of fixed ND filters.
“While creating this image, two girls played in the water in front of the rocks. But because the exposure was so long, their appearance never registered and it was as though they were never there.

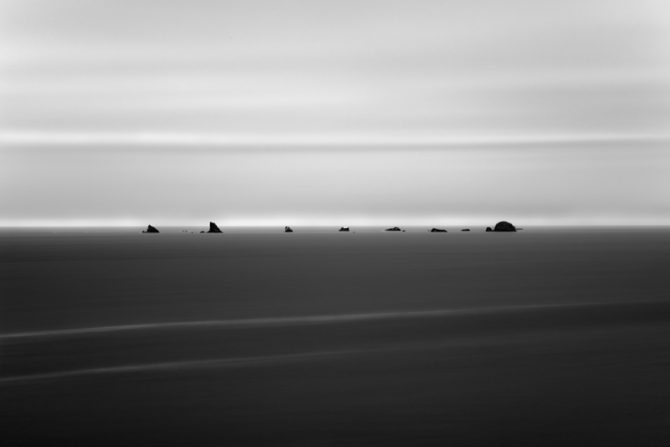
Monolith No. 52 – Bandon, Oregon
“Each autumn I photograph the ‘Monoliths’ at Bandon Beach on the Oregon coast. I’ve been working on this series for several years now and have photographed these Monoliths in every season, weather, light, angle and time of day, and yet I always come home with something new.
“That’s the beauty of the creative process, there is always something new, even at a location I’ve photographed many times. There are so many variables, and I never know how one will change and trigger a new vision of a familiar subject.
“I used a 30-second exposure to highlight and isolate this Monolith, and it also simplified the image by smoothing out the details in the water and sky. In this image the effect of the long exposure is very subtle. In the majority of the situations I encounter, a 30-second exposure is sufficient to provide the look I’m after.

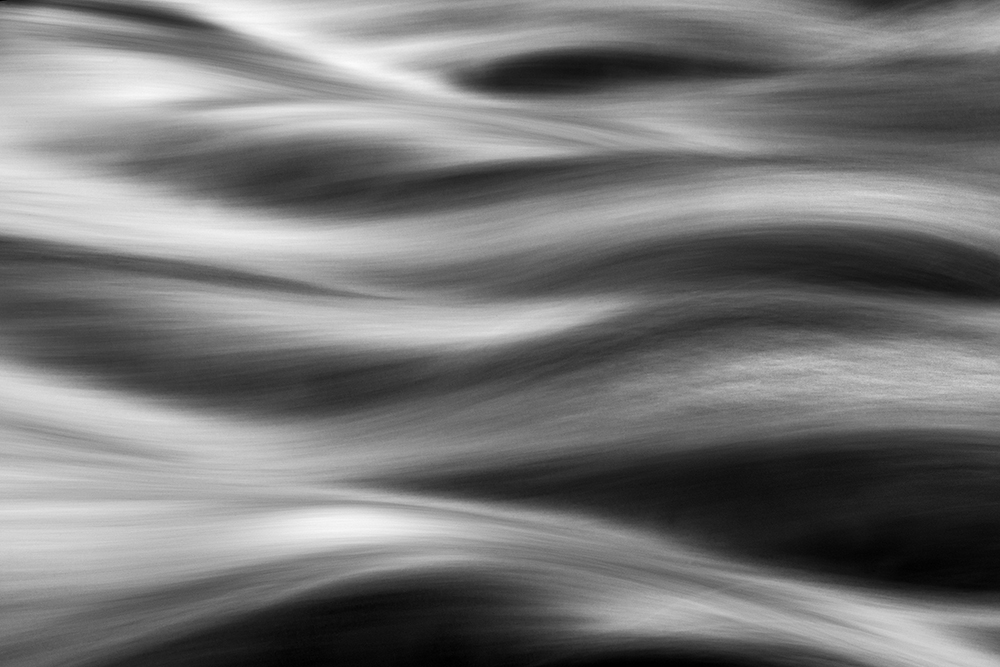
“Sometimes the effect of the long exposure is not even noticeable as in this image. A fast exposure captured the ripples in the water and I found this distracting. I fixed this by using an 8-second exposure which smoothed out the water and simplified the image.
“The photographer does not always need to create an obvious long exposure look in order to improve and strengthen the image.

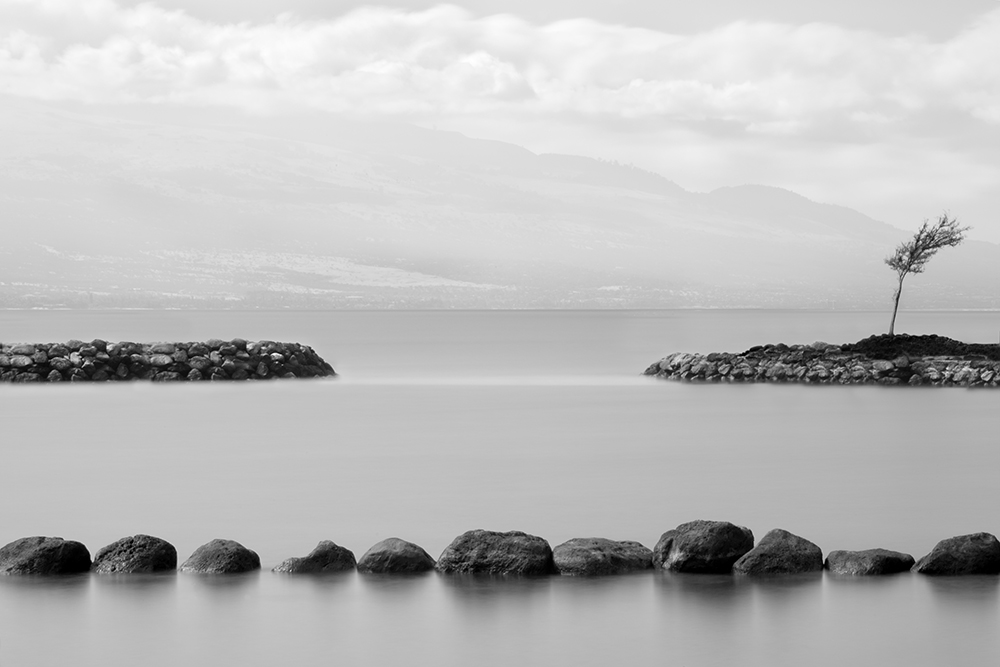
Pigeon Point Light House – California Coast
“When I came across this light house I almost dismissed it because it was such a very traditional black and white scene that had probably been photographed by every photographer who had ever passed this way. But it was such a beautiful scene that I wanted to try to put my touch on it and make it just a little unique.
“The wispy clouds in the sky were what caught my attention. I envisioned the final image with the water and sky tied together by a similar look. I tried dozens of different exposures from a few seconds to several minutes, with each exposure creating a very different look. Because the water and sky were constantly changing, I could sometimes get the sky just right but not the water, and vise versa.
“Finally I got the look I was after with this 100-second exposure.

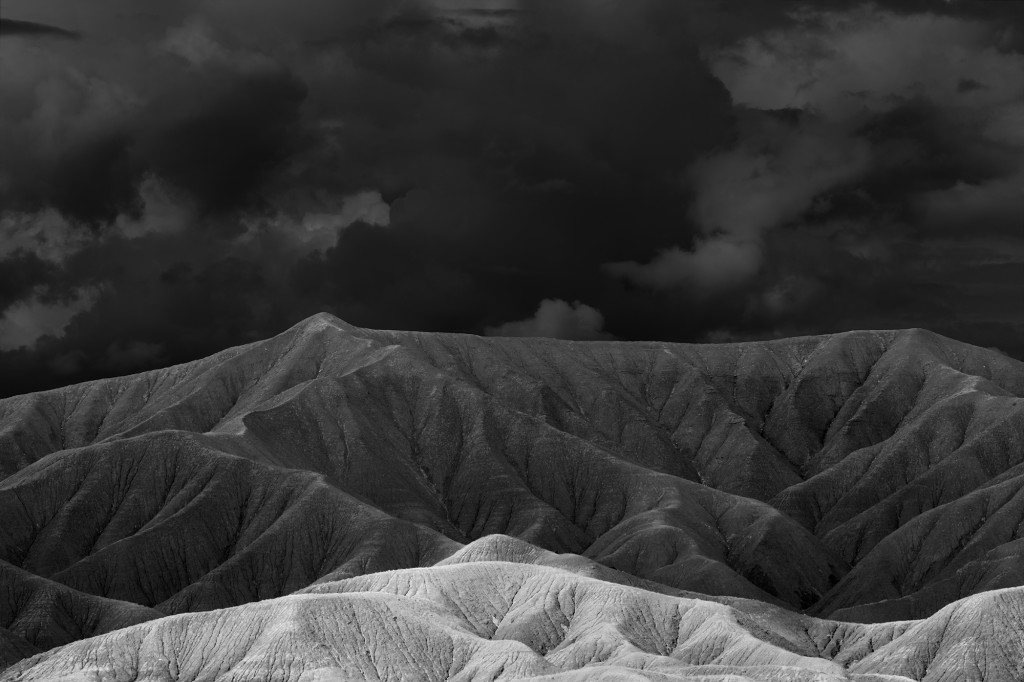
Dunes of Nude No. 58 – Death Valley, CA
“This image is from my series ‘The Dunes of Nude’ which is my interpretation of sand dunes. Normally I get very close to the dunes and photograph them in a very intimate and almost abstract way, but in this image I took a much wider view. Like the Pigeon Point image above, I wanted to tie the sky to the foreground by making the clouds look like sand dunes in the sky.

Ancient Stones No. 12 – Joshua Tree, California
“This new addition to my ‘Ancient Stones’ portfolio was created in Joshua Tree. I want to emphasize the permanence of these stones and the movement in the clouds is a subtle way of doing that.
“A key to my work is being able to move quickly; to be able to compose quickly and to adjust my exposures quickly. If I cannot do that, conditions change and I miss the shot.
“That is the primary advantage of the Vari-ND filter over fixed filters. I can open up the filter to quickly change my composition and can quickly adjust from a 30-second to a 120-second exposure. The Vari-ND is one of my most important tools.”
In May, Cole will be presenting an exhibition of his ‘The Ghosts of Auschwitz-Birkenau‘ portfolio in Split, Croatia at FotoKlub Split. You can check his website, blog, and social media for more news and information.
December 20, 2012
December 18th 2012 by Andrew S Gibson
This article is part of a series of interviews with long exposure photographers to celebrate the release of my ebook Slow. You can keep track of the interviews by clicking on the Long Exposure Photography Interviews link under Categories in the right-hand sidebar.
Cole Thompson is a fine art photographer based in Colorado in the United States. As part of the interview I asked him how, in a world where it seems that many photographers are producing similar work, it is possible to create original photography? His answer is worth reading, as it brings up one of Cole’s most interesting concepts, ‘photographic celibacy’.
Interview
How would you describe your photographic vision? What kind of look do you try and create in your photos?
I cannot describe my vision because I believe vision is intangible and indescribable. I view vision as the sum total of my life experiences. It is what makes me see the world a bit differently than another, because my experiences have been different.
I do not try to create a look or pursue a certain style in my images, I simply follow my vision. If you pursue a look, style or technique without vision, then those things are mere gimmicks and your images will lack power and conviction. I have been creating images since 1968 and so my skills would allow me to pursue many different styles or looks, but I’m only interested following my vision.
What I’ve learned is that vision must always come first and then techniques and style must flow from it. I’ve also learned that I must only create images that I love, that’s where my passion is and where my best work will come from.
Name three photographers you like and why.
Edward Weston is my photographic hero, not because of his images (although I do love them) but because of his attitudes. In my opinion Weston was a true artist and not a photographer (I draw a distinction between the two). He was independent in thought and did not care what others thought of his work. He created for himself and he had no obligation to explain his work to others.
One of my favourite stories is told by Ansel Adams on his first meeting Weston:
“After dinner, Albert (Bender) asked Edward to show his prints. They were the first work of such serious quality I had ever seen, but surprisingly I did not immediately understand or even like them; I thought them hard and mannered. Edward never gave the impression that he expected anyone to like his work. His prints were what they were. He gave no explanations; in creating them his obligation to the viewer was completed.”
In so many ways Weston has been my mentor. I re-read his Day Books every year and often read them just before I go out to create new images. His independence and obligation to self has inspired me.
Wynn Bullock. As a 14 year old boy I taught myself photography and part of what I did was to sit for hours looking at the work of photographers. Wynn Bullock was one whose work I admired and it wasn’t until years later I realised how much he and I saw alike, with both of us gravitating towards dark and contrasty images.
Ansel Adams. For many years I dreamed of being the next Ansel Adams (like millions of other young photographers). And for years I tried to imitate his look and even specific images. But then something happened to me that changed my attitude and led me on my quest to find my own vision. I was at a portfolio review and a gallery owner quickly looked at my work, brusquely pushed it back towards me and said “It looks like you’re trying to copy Ansel Adams.” I proudly told him that I was because I loved his work! He then said something that really made me mad at the time, but later opened my eyes, he said:
“Ansel has already done Ansel and you’re not going to do him better. What can you create that demonstrates your vision?”
That was the beginning of the search for my vision. I still love Ansel Adam’s work, but I no longer want to be known as the “best Ansel Adams imitator in the world.” In fact, now if someone says to me “your work reminds me of Ansel Adams” I know that I have failed to distinguish myself with my own vision.

Long exposure photography – what’s the attraction and why do you do it?
The long exposure is not something I set out to pursue nor is it a marketing strategy I chose to become known as “the guy who uses long exposures.” But rather it’s the outcome from following my vision: it’s what I love, it’s how I feel and it’s how I see the world.
About 90% of my recent work was created using long exposures. I initially started off with water, then moved to clouds and now have been creating images of people with it as well. I suspect I’ll find other areas in which to use it as well.
Why black and white – what is the appeal for you?
That is a very difficult question to answer and perhaps my artist statement says it best:
I am often asked, “Why black and white?”
I think it’s because I grew up in a black-and-white world.
Television, movies and the news were all in black and white.
My childhood heroes were in black and white and even the nation was segregated into black and white.
Perhaps my images are an extension of the world in which I grew up.
I really don’t worry too much about the “why” behind things, I simply accept them as they are. I love black and white and always have. I’ve tried dabbling in colour and I’ve seen a few colour images that I’m drawn to, but in the end I really am just a black and white guy and I’m okay with that.
I can see from your portfolio that you are widely travelled, especially within the United States. How important is the contribution of travel to developing your portfolio from an artistic point of view? How has travel helped you develop as a person?
Travel is not critical for me in terms of subject matter, I can create similar images anywhere. But in terms of concentration and freeing my mind of my daily responsibilities, it is very important to get away. I have a full time job, a large family and many professional responsibilities, and I find that it’s difficult for me to concentrate when I’m on my home turf. However when I get away I’m able to leave all those things behind me. The best thing about being away is that I’m able to focus on just one thing: creating.
So travel has become very important for me. Many of these trips are to visit my children who have been stationed around the world. We visited my Marine Corp son who was stationed in Japan, my Peace Corp son in Ukraine and Poland and next year I’ll visit a son in Russia and Croatia. I am very fortunate to have family in these places because I probably wouldn’t have been brave enough to venture there without them. However next year will be a first for me as I visit Iceland by myself.
I do also travel within the United States. I go to Death Valley every January, the Oregon coast every September and I’m looking to add a third location, probably Hawaii. I like going back to the same spot each year because I can continue working on an idea, but once I’ve lost interest in that idea, I find a new location.

There are so many photographers working with long exposure photography techniques in black and white that sometimes it is hard to be original. Yet your work is very original. Can you give our readers any tips for finding an original approach to long exposure photography?
One of the side effects of the internet is that everyone quickly knows what everyone else is doing. When someone creates a new look, it seems as if overnight everyone is copying that look. I did that for many years, imitate others look, until I realised that I wanted to be more than an imitator or copycat. I want to create my own unique work and that is what I focus on, ignoring what others are doing.
I have a friend who thinks the key to success is to photograph something that nobody else has photographed before. He once told me that he had discovered something unique: frozen chickens. He said that he would always have a frozen chicken in his images (to this day I’m not certain if he was kidding or not!). In my opinion success is not about finding a subject that’s not been photographed before (I doubt there are many such things) but rather creating something unique, from your own vision.
I never focus what others are doing, I simply go down my own path. I am unaware what others are creating because I practice something that I call Photographic Celibacy. It’s the practice of not looking at or studying the work of other photographers. I do this to reduce the number of images floating about in my head and to reduce their influence on my own work. I find that when I see a great image, my first thought is “how can I do that?” Then I catch myself and remember that I do not want to imitate, but create. I’ve practicing Photographic Celibacy for five years now and it has been very helpful, but I still have some iconic images floating around in my head and when I go to the grocery store I have to admit that I still look at the bell peppers! But I’m doing better at not imitating others.
Most people who hear about this practice think I’m crazy, they believe that imitation is how we build our skills and grow creatively. I disagree, I believe imitation is harmful because it retards the development of our own vision.

Can you tell us a little about The Lone Man series? What inspired it? What are you trying to express with these images?
Like most of my series, the Lone Man was an idea that I just stumbled upon and spontaneously created. Whenever I get an idea for a new project, I write it down on a long list. However the truth is that I’ve never once used one of those ideas, all of the ideas for my portfolios have been spontaneous and just took off like a wildfire.
That’s what happened with the Lone Man series. I was in North Laguna at one of my favourite dive spots, creating long exposures of the water. It was a pretty crowded day at the beach and so people were out on the rocks looking for creatures in the tide pools. A group of people were in my shot and I was impatiently waiting for them to leave. While waiting I decided to do a test exposure so that I’d be all ready as soon as they left. After the 30 second test exposure, I noticed that one of the people had stood still for the entire 30 seconds and I recognised his body language. It was pensive, thoughtful and you could tell the man was thinking about things larger than himself.
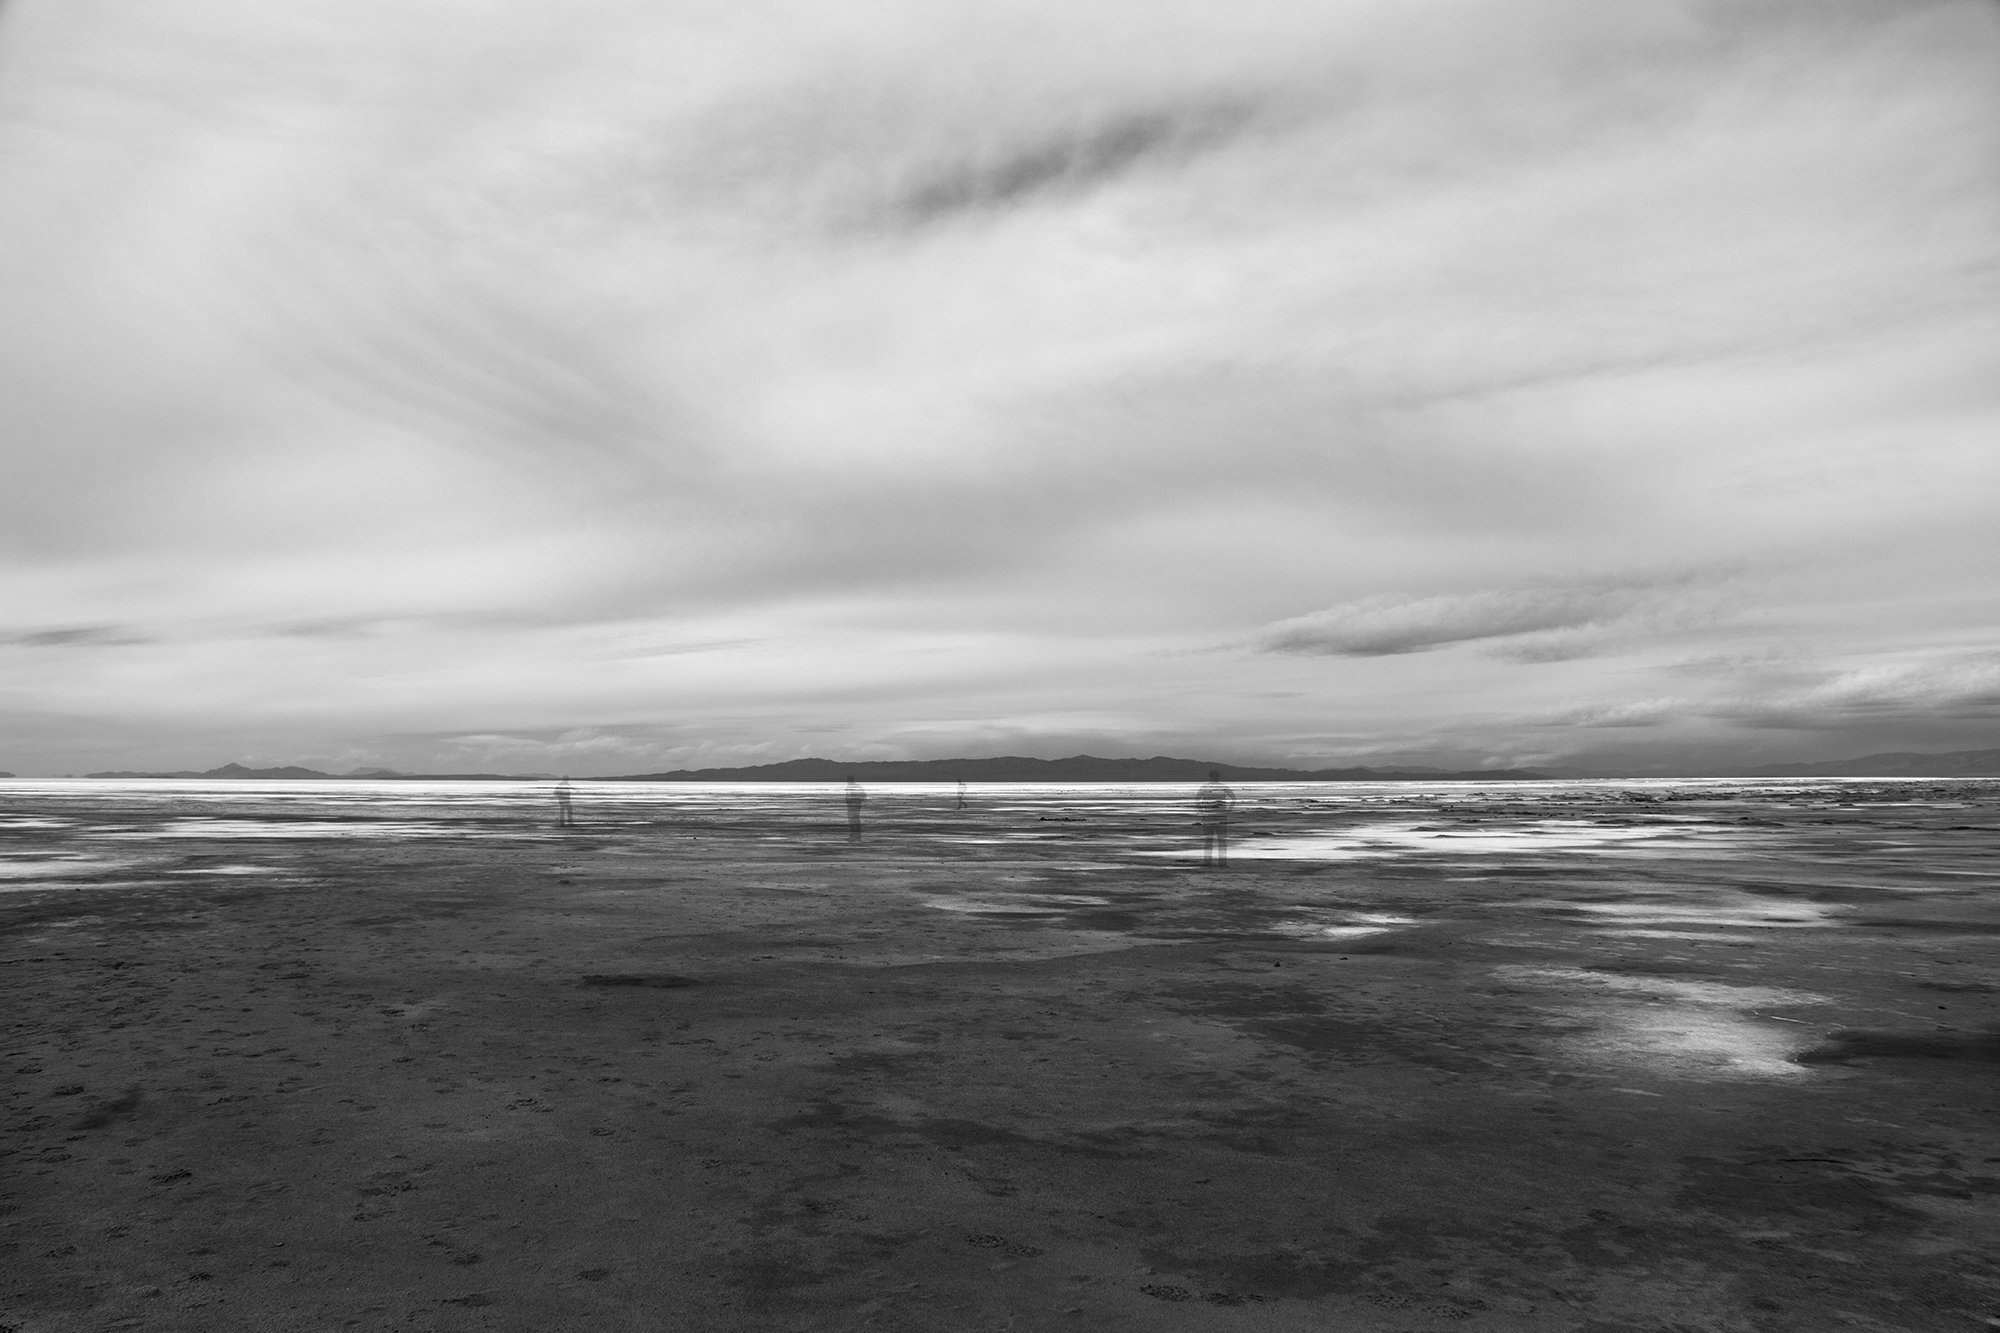
Soon I started noticing this effect in a lot of people, they would come to the edge of the world and just stare off into the distance. I began photographing these people and the Lone Man series was born. Here is the artist statement for this series:
Something unusual happens when a person stands on the edge of the world and stares outward. They become very still and you can almost see their thoughts as they ponder things much greater than themselves:
Where did I come from?
What is my purpose?
What does it all mean?
What is beyond, the beyond?
Do I make a difference?
Is there more?
At that moment they are The Lone Man, alone with their questions and thoughts about life, the universe and beyond. People are affected by this time of meditation and they often vow to make changes in their lives. But this moment is short lived as these weighty thoughts are replaced with more immediate concerns:
Should I eat at McDonalds or Burger King and should I try that new green milkshake?

Normally I do not comment on what my images mean, sometimes because they are just beautiful images and don’t have any deeper meaning, and often because I think it’s the viewer’s job to decide what they mean. But in the case of The Lone Man, I have revealed a bit of what I’m thinking about in my artist statement. When I was creating these images I was impressed at how standing at the edge of the world causes people to ponder their smallness and their purpose in life.
So many people have asked me “how did you get those people to stand still for 30 seconds” and “did you ask them to stand still?” I didn’t have to ask people to stand still because this is just what people do! You could see them deep in thought as they stood there, often for several minutes, and pondering the “bigger questions” of life.
The last part of my artist statement is a little dig, at how little time we spend thinking about those bigger issues and how easily we are brought back to our own petty concerns; my burger wasn’t cooked right, I don’t get a good cell signal at my house, the guy in front of me is driving so slow etc. So much of what we concern ourselves with is so unimportant in the larger scheme of things.

Another series I like is Monoliths. What draws you to photographing seascapes? What’s the appeal of the giant rocks that appear in these photos?
I grew up in Southern California and spend my youth at the Huntington Beach pier, bodysurfing at lifeguard tower number 1. I spent countless hours diving Laguna, La Jolla and Catalina. The ocean was a large part of my life until I moved to Colorado in 1993. Truthfully the ocean is the only thing I miss about California and whenever I visit, I am drawn back to it.
Photographing the movement of the ocean with long exposure is just a part of my vision, it’s how I see the ocean. To photograph it with a static image, seems to me a sin!
I have always had a “thing” about Monoliths, first when I was a young boy and read Thor Heyerdahl’s “Aku-Aku, the Secret of Easter Island.” Those stone giants really captured my imagination and I wondered who created them, how and why?
Next I was fascinated with the Monolith in “2001: A Space Odyssey.” And so when I first saw the beaches of Bandon, Oregon with their statuesque “monoliths” (sea stacks to the locals) all of my past fascinations flooded back and I knew that I would photograph them. I am certain they have been photographed a million times before, but since I don’t look at others work, I am ignorant of how others have portrayed them. Even if I were to find out that I had unknowingly created images similar to others, it would not concern me, as my images are honest creations borne from my vision.

Perhaps related is your series Ancient Stones. What is the story behind these photos? What is significant about these stones, and where did you get the idea of photographing them?
The Ancient Stones series is related to the Monoliths in sense. I was wandering about in Joshua Tree, waiting for inspiration to hit me, and nothing was happening. In response to those “dry spells” I’ll usually find a nice spot to sit for a while, clearing my mind of clutter and trying to see more clearly. As I sat there looking at those large rocks, I had some thoughts that were similar to what I was thinking when looking at the monoliths in Bandon. How long have these rocks been here, millions of years? How many men have they seen scurrying about, going here and there, building this and that, full of self importance? I wonder if “they” find all of this amusing?
That made me want to photograph “them” in a way that showed their permanence and timelessness. I hoped the long exposure helped do that, contrasting the still stones against the movement in the sky. I’ve only just started this project and so I’m not sure where it will go from here.

I believe you earn a living, or at least a part-time living, as a fine art photographer. Do you have any advice for our readers on how they can work towards achieving the same goal? What can they do from an artistic viewpoint to improve their work and a practical viewpoint to selling their work?
I have a full time job and do not earn my living from my art. Many years ago I purposely chose not to pursue photography for my living because I feared it would take the fun out of it, and I’ve never regretted that decision. I create only for the pure love of it and am proud to be an “amateur” in the truest sense: I am self taught, I create for myself and I do not earn my living from my work.
What I dislike about earning a living from your art is that it invariably involves compromises and I never want to create for others. I want to create whatever and however I want, not caring if a single person likes my work. Ironically it is that independence that brings out your best work and may bring about success. I once posted on my blog that the fastest way to earn money from your photography is to sell your equipment. There is truth in that!
Links
Cole Thompson’s website
Cole Thompson’s blog
You can contact Cole by email at Cole@ColeThompsonPhotography.com
Photo Gallery
Here are some more of Cole’s long exposure photos:


May 24, 2012


Last year I wrote an article entitled “Ten Tips from Cole Thompson for Long Exposure Photography” which you can read below. However I recently discovered there’s a very important “11th Tip” that applies to long exposures over 30 seconds.
When I was shooting with very long exposures (1, 2, 4 and 8 minutes) I kept getting odd exposure results that I just couldn’t explain. Sometimes my exposure would be right on, but more often the image was drastically under or over exposed. I knew from Long Exposure Tip #3 that I needed to use an eye cup to stop stray light from entering the the eyepiece and affecting the metering, and I was very careful to do that. I’d also check and recheck my long exposure calculations, but they were correct. Nothing seemed to explain this odd behavior.
And then I accidently figured out what was going on. It turns out that my camera does something odd, something I didn’t expect it to do that was causing the problem, and so here is Tip #11.
Tip #11. When Shooting in Bulb Mode, Always Check Your Aperture
When I am shooting long exposures that go beyond 30 seconds, I meter in manual mode, extrapolate the settings for the longer time and then I switch to Bulb mode for the shot. Because I had set my aperture in manual mode and then switched to Bulb mode, I assumed that the aperture stayed the same…but that was a wrong assumption!
It turns out that the aperture setting does not transfer over from Manual to Bulb mode. Bulb mode holds the last aperture setting you were using when you last used Bulb mode.
So, after you meter in Manual mode and then switch to Bulb mode, always check your aperture!
Ten Tips from Cole Thompson for Lo-o-o-o-ong Exposure Photography
I have been doing long-exposure work for a number of years now, and I’ve explored many different techniques and methods. Here are 10 of my fundamental tips to make your long exposure experience easier and better:

(Auschwitz No. 14 – Photographed in Bright Daylight)
1. For extremely long exposures, have at least 13 stops of neutral density available.
I have been using the Singh-Ray Vari-ND Variable Density Filter for a number of years now, and it revolutionized the way I work by allowing me to rotate the filter to minimum density for composition and focus, then immediately dial in maximum density so I don’t miss the shot. However, if you want to obtain exposures of 30 seconds and longer in bright daylight, you may need more than the 8 stops of density offered by the Vari-ND. I stack a Singh-Ray Mor-Slo 5-stop ND filter onto my Vari-ND which gives me a range of 8 to 13 stops of added density. By the way, 13 stops of density transmits only about 0.01% of light — that’s one percent of one percent. This is generally enough to allow a 30-second exposure in bright daylight.
The shot above of “ghosts” at Auschwitz was made in bright daylight — having sufficient additional density allowed me to simulate nighttime, as well as blur and obscure the movement of the visitors for the ethereal effect I was shooting for.
Lone Man No. 20 – Created with 3 Stacked Filters
2. Purchase the largest size filter you can afford.
I use the 82mm Vari-ND (the largest offered by Singh-Ray) which allows me to avoid vignetting when stacking filters and using very wide angle lenses. The 77mm will work in many situations, but will vignette in others. Use step-up rings on your lenses so that you can use the 77mm or 82mm filters on all of them.
The Lone Man image above was made with 3 stacked filters, and using larger filters helped prevent corner obstruction and vignetting. In situations where you are seeing some obstruction or vignetting on wide-angle shots, consider adjusting your composition to allow for cropping — square or panorama, or see if you can take a step or two back and use a slightly longer focal length.
3. Use an eye cup for your camera’s viewfinder.
To meter your long exposure you’ll be in manual mode and using the camera’s internal meter, but it can give a false reading because stray light leaks into the camera from the eye piece. This can cause your images to be underexposed. You can eliminate this problem by using an eye cup, which helps seal out stray light. Eliminating the light leaks will also help your eye adjust to the darkened image in the viewfinder when using the Vari-ND — even at minimum density, it’s blocking over 80% of the light entering the lens.
4. Use a sturdy tripod.
A good tripod is a must for serious landscape photography, but it’s even more important when doing long-exposure work. The enemies of a long exposure are vibration and camera movement, and so you’ll want to use the sturdiest tripod that you can find (or at least the sturdiest one you are willing to carry), as well as a tripod head that locks down for rock solid support. I find that the carbon fiber tripods soak up vibrations better than the metal ones. And of course, find the most solid footing possible when positioning your tripod so it doesn’t sink into the sand or wet ground or wobble during the exposure. Some tripods have a hook on the bottom of the center post to allow you to hang “ballast” such as your camera bag or weights for added stability.
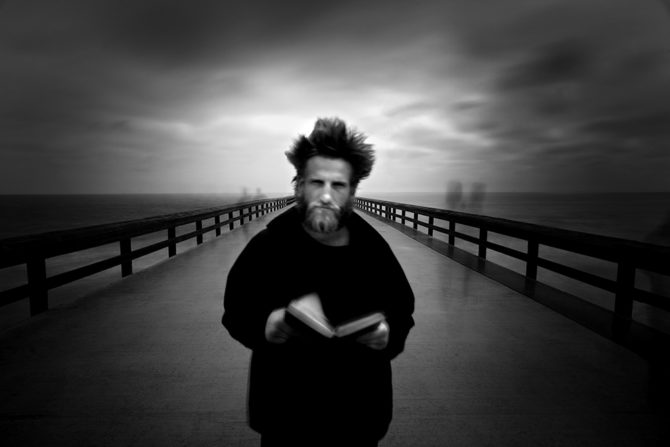
(The Angel Gabriel – Photographed with hundreds of people walking by)
5. Turn OFF your image stabilizer!
When shooting from a tripod, leaving your image stabilizer turned on can often work against you, especially if there is motion in the scene, such as moving water or wind in the leaves. The image stabilizer attempts to stabilize these movements, which results in blurring the overall image. I cannot tell you how many images I’ve ruined because I’ve forgotten to turn off the image stabilizer! Canon has just announced improvements to their image stabilizing, including a “tripod mode” that may help alleviate this problem, but that’s still a ways (and an upgrade) down the road.
My photo of “The Angel Gabriel” is filled with movement — the many tourists wandering by (most disappearing entirely), the clouds, the water, the pages of the book, and some slight blurring of the subject despite his effort to stay perfectly still. However, the railing and planks of the pier are tack sharp, which adds to the impact of the image, as the rails lead the viewer’s eye directly to the subject’s face. If I’d left image stabilizing ON for this shot, all the movement in the frame would have “confused” the IS and it would have blurred the parts of the image that I wanted to be sharp.
This image brings up one other side note: another benefit of long exposures is that it can make unwanted “intruders” disappear from your shot, as long as they keep moving. For instance, in one of my segments in the new Singh-Ray video, there are kayakers paddling through my shot of some rocks on the shore — a long exposure effectively eliminated them without requiring retouching.
(Isolated No. 7 – Photographed at 30 seconds in bright sunlight)
6. Place your finger over the eyepiece to help the autofocus.
In very low light situations (eg: using a lot of ND filters) the autofocus may “hunt” and not let the camera fire. You can manually focus or you can simply place your finger over the eye piece, which stops stray light from entering the rear and allows the camera to find focus. You don’t need to hold your finger over the eyepiece for the entire exposure, just for a very brief moment to allow your autofocus to focus.
The open eyepiece can also allow light leaks in through the viewfinder, especially during a long exposure with the sun behind you. This isn’t a problem normally, because your head (and your eye cup) blocks stray light. But often when doing long exposures, you step back to avoid vibrating the camera, allowing light to enter. If you’re seeing odd glare or reflections in a shot done in this manner, try blocking the viewfinder for the next one, or use the viewfinder shutter if your camera has one.
7. Use a hood loupe and carefully check every image!
A hood loupe allows you to more closely inspect your images and avoid costly mistakes. It shields the LCD from light and glare, plus it magnifies the image, allowing you to be sure that your details are sharp and that you remembered to turn off the image stabilizer! There is nothing worse than coming home from a big trip only to find that your images were not right. Closely check each image and you can make corrections right on the spot. It’s much better to get the shot right in the field than it is to attempt to fix it back at your computer.
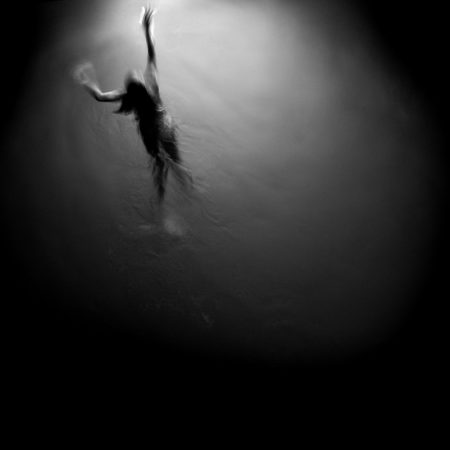
(Swimming Towards the Light – photographed with a one quarter second exposure)
8. Try different exposure times when photographing water.
For long exposures, the only rule on exposure times is that there is no rule on exposure times. When shooting water you’ll be amazed at how different a half second exposure can look compared to 2 seconds, and how completely differently 5, 15 or 30 seconds will look. So try different exposures until you find the one that you like for a given scene. With practice you’ll get a feel for what shutter speed would be a good place to start, but I still suggest experimenting while you’re at it.
The shot of the swimmer was made at a relatively fast shutter speed (for me) of 1/4 second, which allowed me to capture details in the surface of the water and have parts of the subject appear sharp, while still getting the motion blur of her arms and legs. Of the various exposure times I tried, I felt this was the best result in this situation.
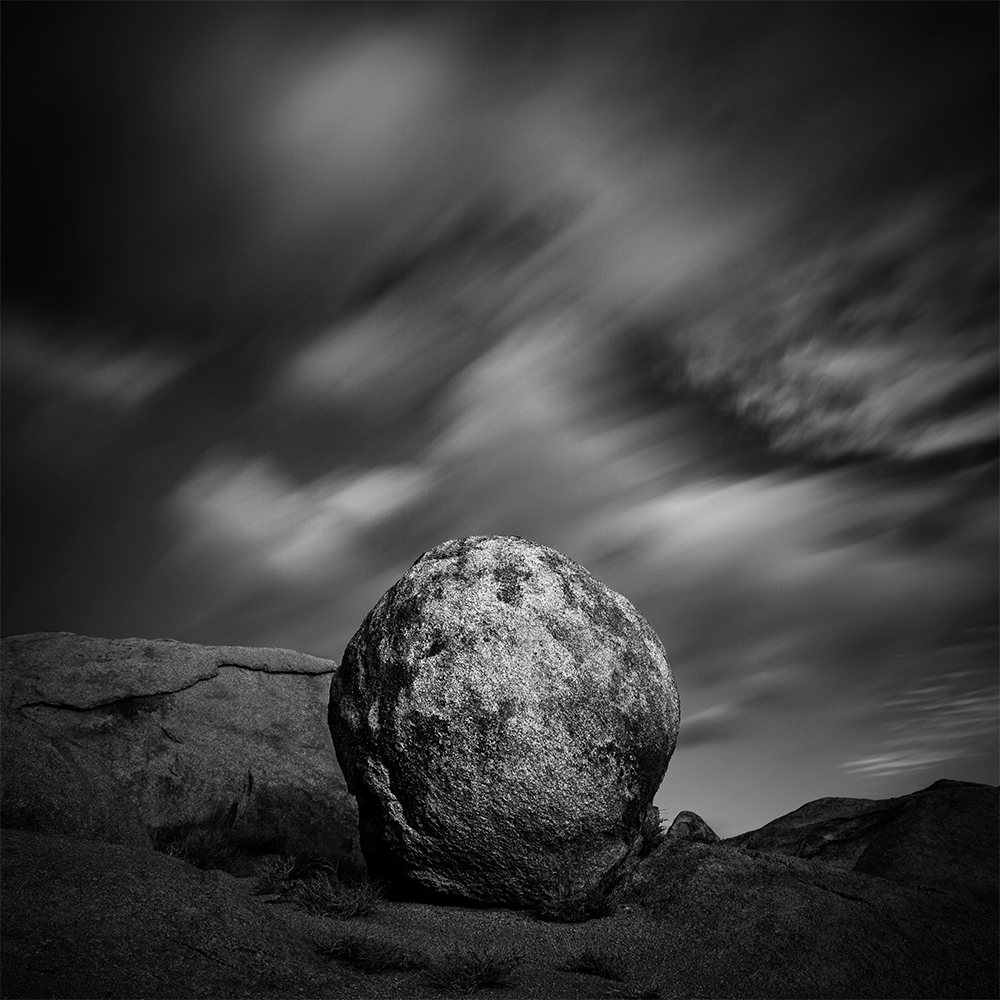
Monolith No. 10 – 120 Seconds
9. Skies often require a much longer exposure.
If you’re looking to create those long streaking clouds, start at 30 seconds and then try 60 and 120. Since most cameras will only meter to 30 seconds, you’ll have to do a little extrapolating to figure the correct exposure for 60 or 120. To do this, set your meter to one f-stop underexposed and then shoot for 60 seconds. For a 120 second exposure (as used on the image above), set your meter to two f-stops underexposed and expose for 120 seconds. Remember that for each f-stop you underexpose, you double your exposure time.
Once you’ve set your camera’s meter to underexpose the image, put it into “bulb” mode and use your watch to time your 60 or 120 second exposure. Bulb mode requires the shutter button to be held down for the entire exposure, so you’ll need a remote shutter release that can be locked “open” for the exposure.
(The Fountainhead No. 93 – 30 second exposure in high winds)
10. There are no rules — experiment and try different things!
To create the image above from my “Fountainhead” series, I photographed the building reflected from a flexible ferrotype plate — a chrome-plated steel sheet with a near-perfect mirror surface. By just gently twisting and bending the plate, I achieved these otherworldly distortions, and I also feel they have an “organic” quality to them that would be difficult to achieve in Photoshop without hugely compromising the image quality. With this technique, I was able to achieve the effect in camera, so the pixel data doesn’t need to be unduly “stretched” or compromised.
And, once again, I was able to view the images in the field to see the effect and make sure I was getting what I wanted, rather than taking standard photos of buildings and hoping to find a creative way to manipulate them back at my computer. I suppose that would be another tip that always applies — take a little time to make the best possible image in camera on the scene, and you’ll always know you got the shot.
You can see other examples and read more about the Fountainhead series in my prior blog story.
So, there really are no “rules” for long exposure photography, and while long exposures are most often applied to water and skies, they can be used in many different and imaginative ways. So experiment, try new things, and get creative!
March 15, 2012


I recently spent time in Joshua Tree National Park in California, it was the first time I had visited there since 1987 when my wife I went camping. Coincidently our trip occurred right after U2 had introduced their new album “Joshua Tree” and I remember listening to it non-stop as we sunned ourselves on the large round boulders at the park. The music and that location were positively and indelibly embedded in my memory and each time I hear those songs I am transported back in time. So it was with great nostalgia and anticipation that I returned, hoping to find inspiration at this wonderful place.
As I headed to Joshua Tree I had no idea of how others had portrayed it, nor did I care, I only hoped that I could portray it through my vision. As many of you know, I practice something that I call “Photographic Celibacy.” What this means is that I do not study the work of other photographers in an effort to see as originally and freshly as possible.
I arrived and spent some time wandering and taking it all in. One of the first things you notice about Joshua Tree are the Joshua Trees themselves; a very large and treelike species of yucca. But what eventually caught my attention were those large round boulders, the same ones that I had sunned myself on 25 years earlier. They struck me in the same way the monoliths of the Oregon coast stuck me; ancient, unmovable and eternal. I imagined them sitting there, quietly observing the puny undertakings of man as he scurried about, full of self-importance. Perhaps these ancient stones were amused or perhaps they didn’t care at all.
I decided to create these images with long exposures; using from 30 seconds and up to 6 minute exposures. I wanted to give a sense of motion that would contrast with the stones and emphasize their permanence.
To achieve these long exposures, I used my Singh-Ray Vari-ND filter and my Singh-Ray Mor-Slo 5-stop ND filter, giving me 13 stops of ND but only allowing a 30 second exposure. Because the clouds were moving slowly that day, I needed longer exposure times to create the streaking effect that I wanted. To get longer exposure times I stacked a third 10 stop ND filter which gave me a total of 23 stops of Neutral Density.
To put this into perspective, if your correct exposure was 1/2000 of a second then 23 stops of ND would allow an exposure time of 32 minutes. For these images I was using a maximum of about 21 stops of ND to achieve 6 minute exposure times.
So why did I use a variable ND filter in this situation? First let me explain what a variable ND filter is, it operates much like a polarizer allowing you to adjust how much light enters the camera; turn it one way and you get more light and turn it the other way for less light.
The advantages of the Vari-ND in this situation are twofold: first I can “open up” the filter making it brighter and easier to compose through the viewfinder (at 23 stops it’s almost impossible to see anything). Secondly, it makes setting the correct exposure easier because I can simply turn the Vari-ND filter to get the right exposure.
While stacking three filters together allows long exposure times, it also presents some interesting challenges. Three filters give you a tremendous amount of vignetting at the corners, especially with shorter focal lengths. You can overcome this either by using a longer focal length or by going with a square format and simply discarding the corners. Because I was in close quarters when photographing many of these rocks, I could not go with a longer focal length, but the square format was perfect for this series. I think the square format is very elegant and find myself using it more and more.
When I photographed these stones I had a vision of what the final image would look like, but as is often the case, inspiration can also strike later in the creative process. While processing these images I chose to darken the images down, giving them an almost night time feel, and I also blurred most of the image except where I wanted the eye to focus on. It gives the images an almost tilt-shift look.
I enjoyed finding and creating these images. My trip to Joshua Tree was both a nostalgic and creative success.
View all of the “Ancient Stones” images.