Category: Technical
December 27, 2013

Lone Man No. 20
When I show people my “before and after” images, their reaction tends to be: Wow, how did you do that?
This also tends to be my first reaction when I see an image that I love. Recently a friend showed me his latest creation that was both beautiful and unique, and I wanted to ask him: Benoit, how did you do that?
But I didn’t ask him.
Why not?
Because the miracle of the image was not the technique he used, but the imagination that created the image. Anyone can learn a technique, but not everyone will learn to find and follow their vision.
If I had asked and he had told me his technique…then what? Copy what he had already imagined and created? There is no joy in copying and yet I see technique after technique become the fad of the season and be copied to death.
I also see many who operate under the false belief that technique must be mastered before Vision can be executed. I emphatically reject that theory!
I believe that a great image starts with Vision and then you work hard to develop the required technique. Remember the old saying “necessity is the mother of invention?” It’s true! Once you have a vision of what you want, then you’ll be energized and driven, and you’ll learn whatever is needed to create the image.
However when I see people focusing on technique first, I find they usually never get around to putting that same energy into finding their Vision, and as a result their work is technically perfect and masterfully imitative. Technique alone misses the mark.
So instead of focusing on Photoshop and its hundreds of features or following the latest fad technique, put most of your time and energy into your Vision. I promise you that this approach will yield better images and much more satisfying results.
Technique is not the key to a great image. Vision is.
Cole
February 15, 2013

Ancient Stones No. 12 – Accidentally shot as a 8 bit JPEG
Thanks to all who have written to commiserate with me about my disaster last week, and to share your own stories of mistakes made. I should compile them into a book and call it “The Ghosts of Photo-Mistake’s Past.”
And thanks to those who offered technical advice on how to salvage my JPEG’s, because of this advice I was able to save more of my files than I thought possible. I thought I’d share what I found worked best.
To bring everyone up to speed, I accidentally photographed Death Valley with no RAW and only JPEG files. Because I was shooting in Monochrome Mode, the JPEG’s were in black and white and not in color like the RAW files would have been. The reason for this is that when you are shooting in RAW, all of the settings you make to the camera such as the mode, saturation, sharpness and etc, are ignored by the RAW file. However the JPEG file is affected by all of those settings. So because I had JPEG’s files, I was unable to convert them to black and white myself.
Why does this matter? Because much of “my look” comes from this conversion process as I adjust the color channels.
The JPEG files are also more grainy and the grain seems to clump together more than the RAW file. Lastly, the JPEG file is an 8 bit file while the RAW is a 16 bit file. This matters because I do a lot of dodging and burning and an 8 bit file will not produce smooth gradients, it’s subject to banding and posterization.
There is nothing I can do about not having a color file to work with, that ship has sailed. But, there was something I could do about the 8 bit files, I thought I’d simply go into PhotoShop and converted the file to 16 bit. However my friend (and master printer and great photographer) Adrian Davis pointed out that this approach is not ideal and offered a better way.
His suggestion was to use HDR to create a true 16 bit file as opposed to taking a 8 bit JPEG and simply converting it to 16 bits. You do this by making a copy of the original file and then using Photoshop’s HDR to merge together the two identical files which resulted in a file with 16 bits of data. Note: it does not produce that “HDR” look in this process.
Now this did not solve all of my JPEG problems, but at least by having a 16 bit file, I was able to do my dodging and burning on a 16 bit file which provided me with smooth gradients. I compared the JPEG image to the converted 16 bit image and it looks better in a three ways. First there is no banding, second the grain looks smoother and third the edges on high contrast transitions are smoother.
The improvement was enough that with a little extra work, I’ll be able to salvage 10-15 of those “lost” Death Valley images. I’m very happy about this!
So my thanks to all for your support and suggestions, and I hope that my mistake and this technical tip will be beneficial to you.
Cole
P.S. Please take a look at Aline Smithson’s L E N S S C R A T C H entry for 2/14/2013. She invited people from all over the world to submit their self-portraits and there are some amazingly creative images here! But there’s a twist, she tells the story about how I got to know someone who wrote me and how it led to a friendship and an exhibition. She then invites all of the self-portrait artists to contact the person who comes before and after them in the exhibit. Aline’s a pretty clever woman.
January 5, 2013
I use a very simple workflow and for years I hid it from others because I thought it was unsophisticated and backwards. As I listened to other photographers discuss their process, I was embarrassed to let them see my crude procedures. What if they asked me about layers? I didn’t understand or use them!
Fortunately with time I came to the realization that it’s not about the process, it’s about the image. Nothing else matters.
There are many ways to use Photoshop and I doubt many photographers use more than a small percentage of its many tools. There is no right way or wrong way to use it and not one workflow will be right for everyone. My procedure works for me and I’d like to share it to illustrate a point: that you don’t need to know a lot about Photoshop or have a complicated workflow to produce beautiful images.
Here are the six tools that I use to process most of my images:
1. RAW Converter – I use Photoshop’s RAW converter to set my image to a 16 bit, 360 ppi, 10X15 TIFF file.
2. B&W Conversion tool – I like Photoshop’s b&w conversion tool and play with each color channel to see how it affects the different parts of my image.
3. Levels – One of the most basic secrets to a great b&w image is to have a good black and white. I use Levels to set the initial black and white point and I use the histogram to judge this, never my eyes. Throughout my processing I keep my eye on that histogram to maintain a true black and white. Something else I do while in Levels is to adjust the midtones, which can radically change the look of my image and tends to set the direction I will take it.
4. Dodging and Burning – This is where I do most of my processing and where I have the most fun! I feel most at home with dodging and burning because that’s how I did things in the darkroom. However the primary difference today is that I can take my time and exercise minute control over every part of the image. I use a Wacom tablet to dodge and burn because you CANNOT do a good job with a mouse.
5. Contrast Adjustment – After I have the image looking great on screen, experience teaches me that it will print flat, and so I add some contrast. A monitor uses transmitted light and a print uses reflective light, so that means it will take a lot more work to get your print to look as snappy as it does on the monitor. Contrast helps.
6 Clone Tool – I use the clone tool to spot my images. Cloning is so much better than the old days when you had to spot every single print and your mouth tasted like Spottone all day!
My point isn’t that you should imitate my workflow, but that a workflow need not be complicated. Did you notice that I didn’t make mention of special b&w conversion programs, plug-ins, curves or layers? I also don’t use monitor calibrators, profiles, RIP’s or special inksets.
I use Photoshop and six tools. Ofttimes there’s beauty in simplicity!
October 20, 2012


Many people assume that I’m working in film and others are surprised to learn that I photograph in color. Let me explain.
All of the work you see on my website (with the exception of the 1970’s portfolio) was created digitally. I switched to digital in 2004 after working 35 years in the darkroom. And I’ll be honest, while I have fond memories of those darkroom days, I do not miss them and I would not go back.
Why? Because my work is better since I began using digital.
I’ve often heard the assumption that digital is suitable for color but not for black and white. That has not been my experience. I’ll use whatever tools give me the results I’m looking for and I have absolutely no allegiance to the process; film is not sacred, digital is not sacred, old processes are not sacred…the only thing that is sacred to me is the image.
Perhaps more surprising to some is that I shoot all of my images in color. I’ve written that I shoot in B&W mode and so you might wonder how can that be? Shooting in B&W mode allows me to see the camera’s preview image in black and white, but I save my files in RAW which means they are really in color.
Confusing? When you shoot in RAW all of those settings such as B&W mode, sharpness, saturation, toning, color balance…are not recorded in the image. RAW means just that, it’s a raw capture without any of those tweaks and the image is recorded in color.
This is a wonderful thing! This combination of B&W mode and RAW allows me to preview the image in black and white but process from the color image. Why do that? Because I don’t want my camera or software to decide how my images should look in black and white, the black and white processing is what makes my images “mine!”
Sometimes I’ll show people the “before” color photograph to illustrate how my vision and processing has changed the image.
My vision drives my processing and I’ll happily use whatever tools and processes best helps me do that.
Cole
June 14, 2012

As many of you know, I live northwest of Fort Collins where a fire’s been raging for a week now. Sunday evening the fire got close to our home and we packed up a trailer and were ready to evacuate in a moment’s notice. Fortunately, we were not asked to leave and our home is now quite safe.
However this exercise taught me a valuable lesson: don’t wait until you have a fire to decide what you should take with you. I ended up taking my camera gear, my hard drives and my Ansel Adams’ print. I figured everything else could be replaced.
This near miss led to some valuable discussions with concerned friends about how to best backup our digital work. These days even film guys convert their images to a digital file for printing, so this topic might be of interest all. Let me simplify this sometimes complex topic and suggest five simple things you should do to protect your images.
And let me point out the obvious; backing up your work is not just in case of a fire or other catastrophic disaster, it also protects you from hard drive failure, power spikes, home flooding and a host of other big and little disasters. I know too many people who have lost everything because they didn’t have a backup.
Here are the five basic steps for backing up your work.

First, you should use a backup program that automatically runs each day. You do not want to rely on a backup plan that relies on your memory! My images are backed up automatically and I don’t do a thing. Simple, reliable and invisible.

Second, back up your primary drive to another hard drive in your office. This is the most basic protection from a hard drive failure, which is the most likely disaster you will encounter.

Third, use bare hard drives in external drive docks. This is a simple and inexpensive system that allows you to grab a drive and run in an emergency. I have about 20 drives in dual docks and I mark my essential drives with a red label so that in an emergency I can easily spot and grab them.


Fourth, you should also backup to the cloud. I have two cloud backups that continually run, ensuring that a copy of my images are safe even if a fire destroys my home.

Fifth, have an additional drive that backs up only once a month. This protects you against an accidental change to one of your images because it allows you to retrieve a file for up to a month. For example if I unknowingly make a change to my original file, within a day my backup has overwritten the good file with the bad one. By having one drive backup only once a month, I can retrieve that file once I discover the error. This gives you a 30 day protection against accidental errors that you do not immediately discover.
We have all heard the backup warnings over and over again, yet I am amazed at how many do not heed the warning. I guess it’s because our computers are so reliable and disasters so infrequently occur that we are lulled into a false sense of security. We just don’t believe that it will happen to us. But remember the old computer saying: it’s not “if” your hard drive will fail, but “when.”
Personally I just cannot take that risk, my life’s work is on my computer and if I were to lose it, I would be devastated. I refuse to allow that to happen.
Please do not put off properly backing up your work. If you cannot do everything all at once, then start with item 1 and work your way down the list, it is prioritized.
Cole
P.S. Here is specific information on the backup equipment I use:
Drives: Any brand of 10-12tb, 7200 rpm hard drive.
External drive bays: Dual docks by NexStar (available in USB and eSata)
Software: SyncBack SE by 2BrightSparks.com
Cloud Backup: Carbonite
P.P.S. Here is some additional information in answer to the great questions asked:
Carbonite: I use the cheap $59 a year plan that does not back up external hard drives. What I have done is install a large second internal hard drive and have all of my final images (TIFF’s) on that drive. I only back up these final files to the cloud, not my RAW or working files.
Slow Internet: I doubt anyone has slower internet that I do, I’m on microwave and I’m outside of the useful range of the transmitter. This means that my upload speeds are about 100k in good conditions and more usually 50k. My initial backup took more than a month and updates new files in its own sweet time. But that’s okay, I’m backed up and protected, speed is not an issue!
Cloud Security: Some people are concerned with the security of the cloud, I am not. It’s not like I’m Ansel Adams and people are motivated to hack into my cloud and steal my work! Actually if they want it that badly, they can simply go to my website and download the free wallpaper images. http://www.colethompsonphotography.com/Backgrounds.htm
Why 20 Drives? I have a lot of drives because I have a lot of images. I save all of my RAW files (I never delete any of them), all of my working files and all versions of my final files. All of these are backed up a number of times in different ways, for example one drive backs up three times a day. Another drive backs up once a day, another every week and another every month. Then I do all of that for my family pictures and also for my business files and documents. I have a lot to backup and I back everything up several times.
May 24, 2012


Last year I wrote an article entitled “Ten Tips from Cole Thompson for Long Exposure Photography” which you can read below. However I recently discovered there’s a very important “11th Tip” that applies to long exposures over 30 seconds.
When I was shooting with very long exposures (1, 2, 4 and 8 minutes) I kept getting odd exposure results that I just couldn’t explain. Sometimes my exposure would be right on, but more often the image was drastically under or over exposed. I knew from Long Exposure Tip #3 that I needed to use an eye cup to stop stray light from entering the the eyepiece and affecting the metering, and I was very careful to do that. I’d also check and recheck my long exposure calculations, but they were correct. Nothing seemed to explain this odd behavior.
And then I accidently figured out what was going on. It turns out that my camera does something odd, something I didn’t expect it to do that was causing the problem, and so here is Tip #11.
Tip #11. When Shooting in Bulb Mode, Always Check Your Aperture
When I am shooting long exposures that go beyond 30 seconds, I meter in manual mode, extrapolate the settings for the longer time and then I switch to Bulb mode for the shot. Because I had set my aperture in manual mode and then switched to Bulb mode, I assumed that the aperture stayed the same…but that was a wrong assumption!
It turns out that the aperture setting does not transfer over from Manual to Bulb mode. Bulb mode holds the last aperture setting you were using when you last used Bulb mode.
So, after you meter in Manual mode and then switch to Bulb mode, always check your aperture!
Ten Tips from Cole Thompson for Lo-o-o-o-ong Exposure Photography
I have been doing long-exposure work for a number of years now, and I’ve explored many different techniques and methods. Here are 10 of my fundamental tips to make your long exposure experience easier and better:

(Auschwitz No. 14 – Photographed in Bright Daylight)
1. For extremely long exposures, have at least 13 stops of neutral density available.
I have been using the Singh-Ray Vari-ND Variable Density Filter for a number of years now, and it revolutionized the way I work by allowing me to rotate the filter to minimum density for composition and focus, then immediately dial in maximum density so I don’t miss the shot. However, if you want to obtain exposures of 30 seconds and longer in bright daylight, you may need more than the 8 stops of density offered by the Vari-ND. I stack a Singh-Ray Mor-Slo 5-stop ND filter onto my Vari-ND which gives me a range of 8 to 13 stops of added density. By the way, 13 stops of density transmits only about 0.01% of light — that’s one percent of one percent. This is generally enough to allow a 30-second exposure in bright daylight.
The shot above of “ghosts” at Auschwitz was made in bright daylight — having sufficient additional density allowed me to simulate nighttime, as well as blur and obscure the movement of the visitors for the ethereal effect I was shooting for.
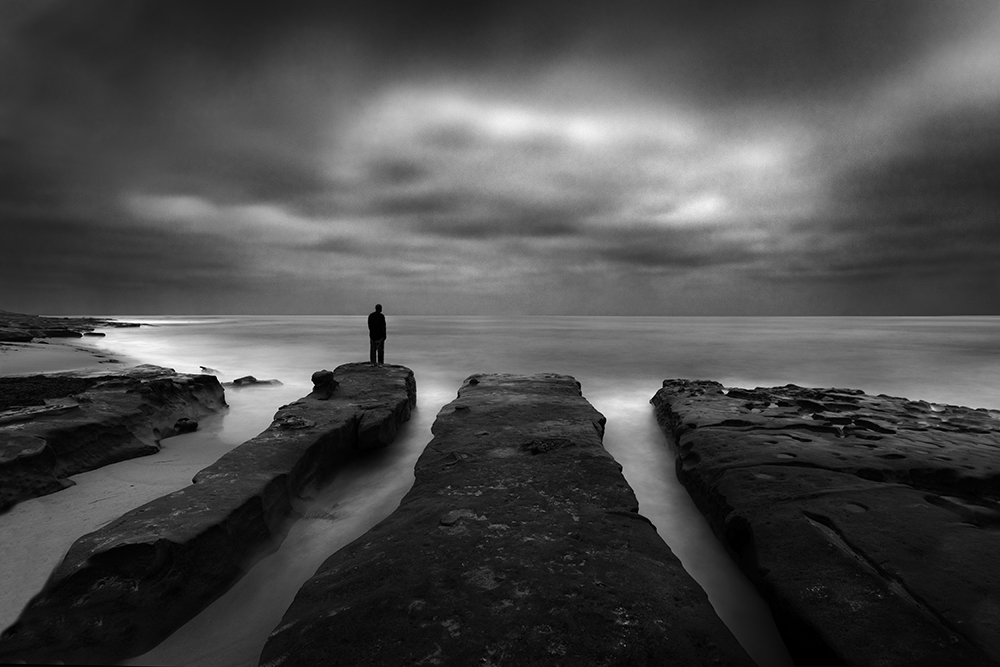
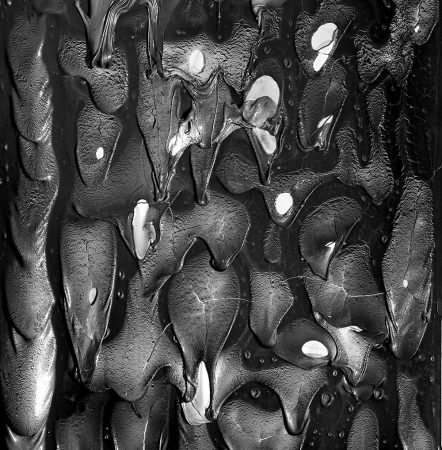
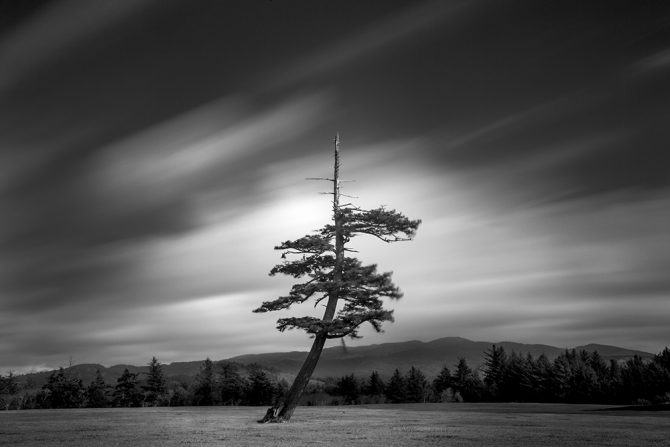
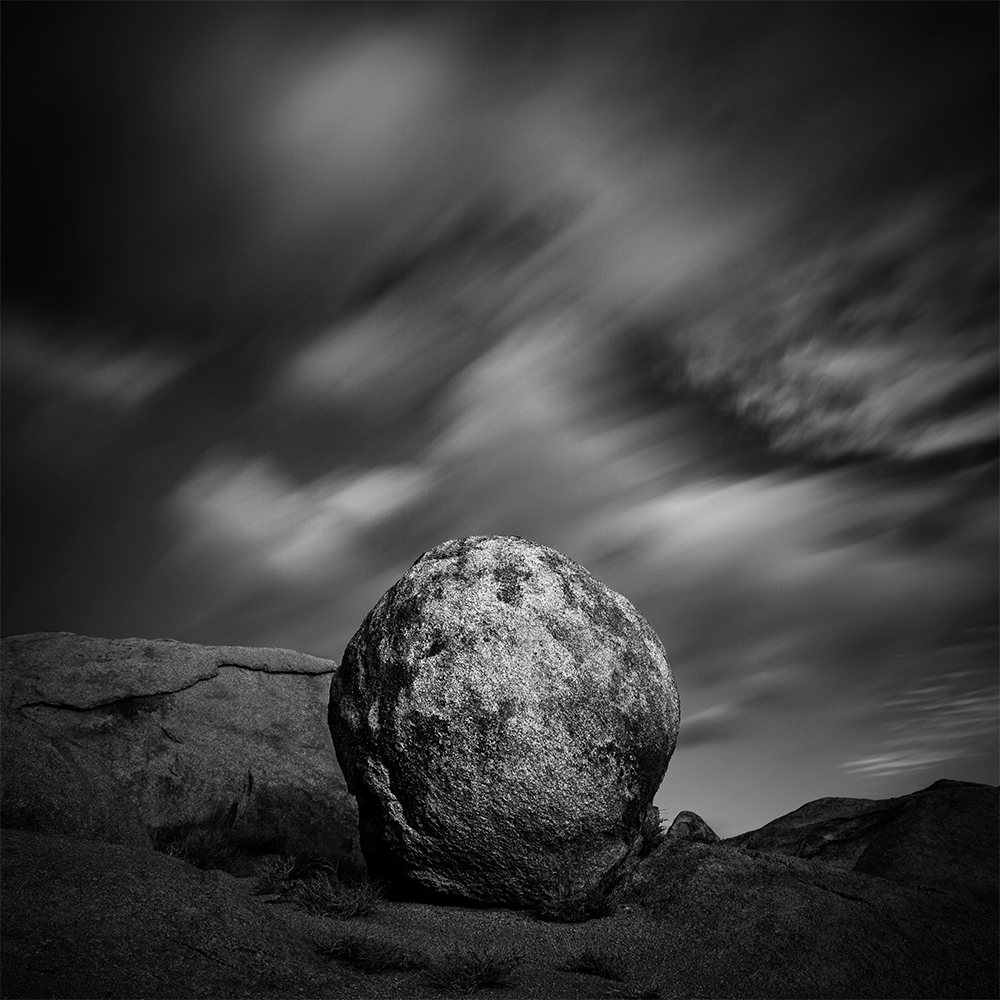
Lone Man No. 20 – Created with 3 Stacked Filters
2. Purchase the largest size filter you can afford.
I use the 82mm Vari-ND (the largest offered by Singh-Ray) which allows me to avoid vignetting when stacking filters and using very wide angle lenses. The 77mm will work in many situations, but will vignette in others. Use step-up rings on your lenses so that you can use the 77mm or 82mm filters on all of them.
The Lone Man image above was made with 3 stacked filters, and using larger filters helped prevent corner obstruction and vignetting. In situations where you are seeing some obstruction or vignetting on wide-angle shots, consider adjusting your composition to allow for cropping — square or panorama, or see if you can take a step or two back and use a slightly longer focal length.
3. Use an eye cup for your camera’s viewfinder.
To meter your long exposure you’ll be in manual mode and using the camera’s internal meter, but it can give a false reading because stray light leaks into the camera from the eye piece. This can cause your images to be underexposed. You can eliminate this problem by using an eye cup, which helps seal out stray light. Eliminating the light leaks will also help your eye adjust to the darkened image in the viewfinder when using the Vari-ND — even at minimum density, it’s blocking over 80% of the light entering the lens.
4. Use a sturdy tripod.
A good tripod is a must for serious landscape photography, but it’s even more important when doing long-exposure work. The enemies of a long exposure are vibration and camera movement, and so you’ll want to use the sturdiest tripod that you can find (or at least the sturdiest one you are willing to carry), as well as a tripod head that locks down for rock solid support. I find that the carbon fiber tripods soak up vibrations better than the metal ones. And of course, find the most solid footing possible when positioning your tripod so it doesn’t sink into the sand or wet ground or wobble during the exposure. Some tripods have a hook on the bottom of the center post to allow you to hang “ballast” such as your camera bag or weights for added stability.
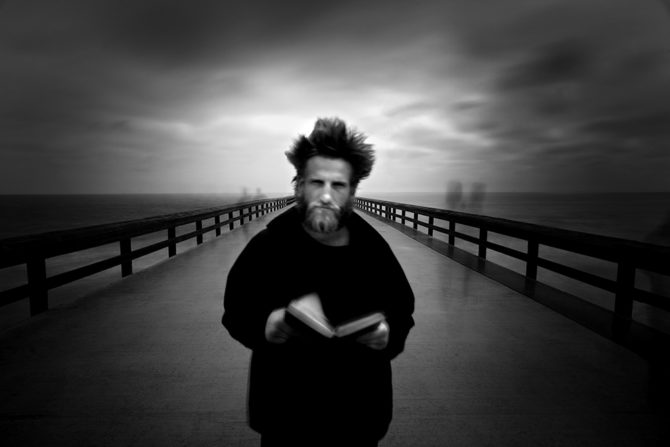
(The Angel Gabriel – Photographed with hundreds of people walking by)
5. Turn OFF your image stabilizer!
When shooting from a tripod, leaving your image stabilizer turned on can often work against you, especially if there is motion in the scene, such as moving water or wind in the leaves. The image stabilizer attempts to stabilize these movements, which results in blurring the overall image. I cannot tell you how many images I’ve ruined because I’ve forgotten to turn off the image stabilizer! Canon has just announced improvements to their image stabilizing, including a “tripod mode” that may help alleviate this problem, but that’s still a ways (and an upgrade) down the road.
My photo of “The Angel Gabriel” is filled with movement — the many tourists wandering by (most disappearing entirely), the clouds, the water, the pages of the book, and some slight blurring of the subject despite his effort to stay perfectly still. However, the railing and planks of the pier are tack sharp, which adds to the impact of the image, as the rails lead the viewer’s eye directly to the subject’s face. If I’d left image stabilizing ON for this shot, all the movement in the frame would have “confused” the IS and it would have blurred the parts of the image that I wanted to be sharp.
This image brings up one other side note: another benefit of long exposures is that it can make unwanted “intruders” disappear from your shot, as long as they keep moving. For instance, in one of my segments in the new Singh-Ray video, there are kayakers paddling through my shot of some rocks on the shore — a long exposure effectively eliminated them without requiring retouching.
(Isolated No. 7 – Photographed at 30 seconds in bright sunlight)
6. Place your finger over the eyepiece to help the autofocus.
In very low light situations (eg: using a lot of ND filters) the autofocus may “hunt” and not let the camera fire. You can manually focus or you can simply place your finger over the eye piece, which stops stray light from entering the rear and allows the camera to find focus. You don’t need to hold your finger over the eyepiece for the entire exposure, just for a very brief moment to allow your autofocus to focus.
The open eyepiece can also allow light leaks in through the viewfinder, especially during a long exposure with the sun behind you. This isn’t a problem normally, because your head (and your eye cup) blocks stray light. But often when doing long exposures, you step back to avoid vibrating the camera, allowing light to enter. If you’re seeing odd glare or reflections in a shot done in this manner, try blocking the viewfinder for the next one, or use the viewfinder shutter if your camera has one.
7. Use a hood loupe and carefully check every image!
A hood loupe allows you to more closely inspect your images and avoid costly mistakes. It shields the LCD from light and glare, plus it magnifies the image, allowing you to be sure that your details are sharp and that you remembered to turn off the image stabilizer! There is nothing worse than coming home from a big trip only to find that your images were not right. Closely check each image and you can make corrections right on the spot. It’s much better to get the shot right in the field than it is to attempt to fix it back at your computer.
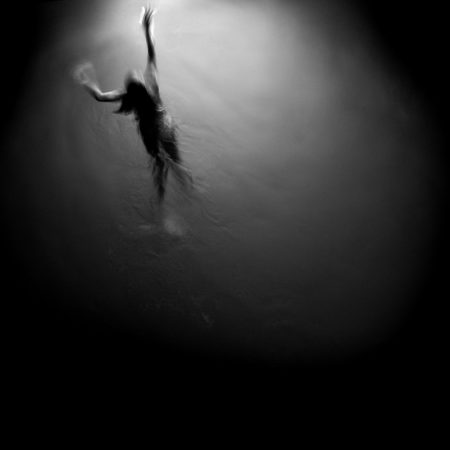
(Swimming Towards the Light – photographed with a one quarter second exposure)
8. Try different exposure times when photographing water.
For long exposures, the only rule on exposure times is that there is no rule on exposure times. When shooting water you’ll be amazed at how different a half second exposure can look compared to 2 seconds, and how completely differently 5, 15 or 30 seconds will look. So try different exposures until you find the one that you like for a given scene. With practice you’ll get a feel for what shutter speed would be a good place to start, but I still suggest experimenting while you’re at it.
The shot of the swimmer was made at a relatively fast shutter speed (for me) of 1/4 second, which allowed me to capture details in the surface of the water and have parts of the subject appear sharp, while still getting the motion blur of her arms and legs. Of the various exposure times I tried, I felt this was the best result in this situation.
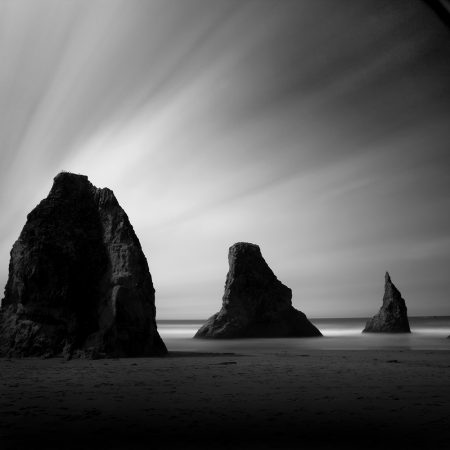
Monolith No. 10 – 120 Seconds
9. Skies often require a much longer exposure.
If you’re looking to create those long streaking clouds, start at 30 seconds and then try 60 and 120. Since most cameras will only meter to 30 seconds, you’ll have to do a little extrapolating to figure the correct exposure for 60 or 120. To do this, set your meter to one f-stop underexposed and then shoot for 60 seconds. For a 120 second exposure (as used on the image above), set your meter to two f-stops underexposed and expose for 120 seconds. Remember that for each f-stop you underexpose, you double your exposure time.
Once you’ve set your camera’s meter to underexpose the image, put it into “bulb” mode and use your watch to time your 60 or 120 second exposure. Bulb mode requires the shutter button to be held down for the entire exposure, so you’ll need a remote shutter release that can be locked “open” for the exposure.
(The Fountainhead No. 93 – 30 second exposure in high winds)
10. There are no rules — experiment and try different things!
To create the image above from my “Fountainhead” series, I photographed the building reflected from a flexible ferrotype plate — a chrome-plated steel sheet with a near-perfect mirror surface. By just gently twisting and bending the plate, I achieved these otherworldly distortions, and I also feel they have an “organic” quality to them that would be difficult to achieve in Photoshop without hugely compromising the image quality. With this technique, I was able to achieve the effect in camera, so the pixel data doesn’t need to be unduly “stretched” or compromised.
And, once again, I was able to view the images in the field to see the effect and make sure I was getting what I wanted, rather than taking standard photos of buildings and hoping to find a creative way to manipulate them back at my computer. I suppose that would be another tip that always applies — take a little time to make the best possible image in camera on the scene, and you’ll always know you got the shot.
You can see other examples and read more about the Fountainhead series in my prior blog story.
So, there really are no “rules” for long exposure photography, and while long exposures are most often applied to water and skies, they can be used in many different and imaginative ways. So experiment, try new things, and get creative!
March 15, 2012


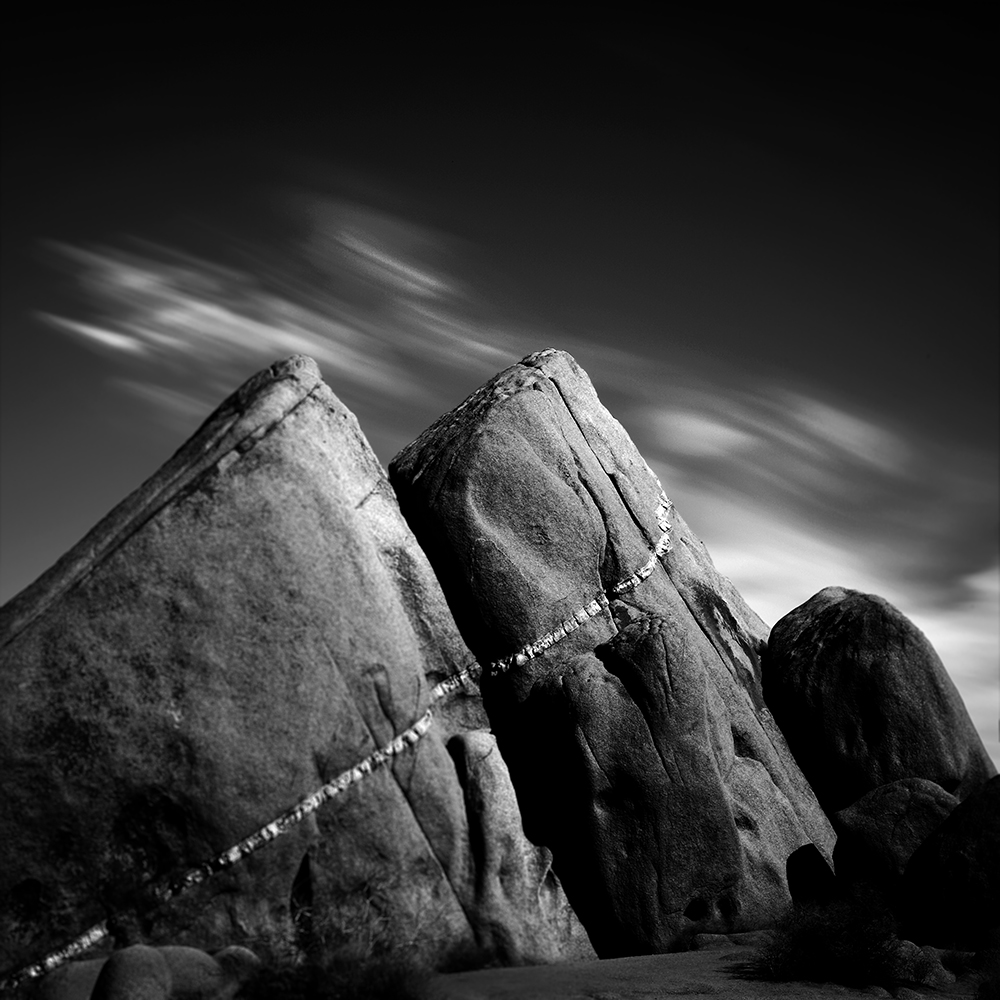
I recently spent time in Joshua Tree National Park in California, it was the first time I had visited there since 1987 when my wife I went camping. Coincidently our trip occurred right after U2 had introduced their new album “Joshua Tree” and I remember listening to it non-stop as we sunned ourselves on the large round boulders at the park. The music and that location were positively and indelibly embedded in my memory and each time I hear those songs I am transported back in time. So it was with great nostalgia and anticipation that I returned, hoping to find inspiration at this wonderful place.
As I headed to Joshua Tree I had no idea of how others had portrayed it, nor did I care, I only hoped that I could portray it through my vision. As many of you know, I practice something that I call “Photographic Celibacy.” What this means is that I do not study the work of other photographers in an effort to see as originally and freshly as possible.
I arrived and spent some time wandering and taking it all in. One of the first things you notice about Joshua Tree are the Joshua Trees themselves; a very large and treelike species of yucca. But what eventually caught my attention were those large round boulders, the same ones that I had sunned myself on 25 years earlier. They struck me in the same way the monoliths of the Oregon coast stuck me; ancient, unmovable and eternal. I imagined them sitting there, quietly observing the puny undertakings of man as he scurried about, full of self-importance. Perhaps these ancient stones were amused or perhaps they didn’t care at all.
I decided to create these images with long exposures; using from 30 seconds and up to 6 minute exposures. I wanted to give a sense of motion that would contrast with the stones and emphasize their permanence.
To achieve these long exposures, I used my Singh-Ray Vari-ND filter and my Singh-Ray Mor-Slo 5-stop ND filter, giving me 13 stops of ND but only allowing a 30 second exposure. Because the clouds were moving slowly that day, I needed longer exposure times to create the streaking effect that I wanted. To get longer exposure times I stacked a third 10 stop ND filter which gave me a total of 23 stops of Neutral Density.
To put this into perspective, if your correct exposure was 1/2000 of a second then 23 stops of ND would allow an exposure time of 32 minutes. For these images I was using a maximum of about 21 stops of ND to achieve 6 minute exposure times.
So why did I use a variable ND filter in this situation? First let me explain what a variable ND filter is, it operates much like a polarizer allowing you to adjust how much light enters the camera; turn it one way and you get more light and turn it the other way for less light.
The advantages of the Vari-ND in this situation are twofold: first I can “open up” the filter making it brighter and easier to compose through the viewfinder (at 23 stops it’s almost impossible to see anything). Secondly, it makes setting the correct exposure easier because I can simply turn the Vari-ND filter to get the right exposure.
While stacking three filters together allows long exposure times, it also presents some interesting challenges. Three filters give you a tremendous amount of vignetting at the corners, especially with shorter focal lengths. You can overcome this either by using a longer focal length or by going with a square format and simply discarding the corners. Because I was in close quarters when photographing many of these rocks, I could not go with a longer focal length, but the square format was perfect for this series. I think the square format is very elegant and find myself using it more and more.
When I photographed these stones I had a vision of what the final image would look like, but as is often the case, inspiration can also strike later in the creative process. While processing these images I chose to darken the images down, giving them an almost night time feel, and I also blurred most of the image except where I wanted the eye to focus on. It gives the images an almost tilt-shift look.
I enjoyed finding and creating these images. My trip to Joshua Tree was both a nostalgic and creative success.
View all of the “Ancient Stones” images.
February 17, 2012


This image is titled “Wrenches” and was created shortly after I returned to photography in 2004, I had been absent for a very long time as I raised a family and built a career. Upon my return I converted to digital and so I was learning both how to use this new tool as well searching for my own unique vision. It was a time of learning, exploration and self discovery.
I had been photographing in a local greenhouse for several weeks, it was a family business and they were kind enough to give me free access to the entire operation. One day I discovered this small workshop but I was unable to find the lights, and so I improvised. I had a penlight and by using a long exposure and outlining each wrench with the light, I was able to create this image. I also burned down the detail in the background so it would not compete with the wrenches for attention, and with dodging and burning increased the contrast and brightness on the wrenches.
This image showed my preference for dark images and high contrast, a style I still love and frequently use. But remember that a style or technique cannot replace vision, but once you’ve found your vision you can use it to drive your style and techniques.
Cole
August 4, 2011
Are people using your images without your permission? It’s quite possible, I’ve found mine in books, on blogs, in news articles and even being used commercially on business websites. It was usually quite by chance that I’d find this out, perhaps because a friend would see my image and tell me about it. With the advent of Google Alerts I could find a few more, but this searches for key words and so it was pretty ineffective for unattributed uses of images. What’s really needed is a search engine for images and just today I learned that Google has given us such a tool!
But before I talk about how to search for images, you should first decide if you care if others use your images without permission. For example, many people reproduce my images on their blog without my permission, but they do give me full credit and provide my web address. This serves to introduce new people to my work and I really appreciate it. But I’ve also had an online news organization use my images in several of their stories, without permission or attribution, and I was not okay with that! It’s good to think about what unauthorized uses, if any, you’re okay with.
I’m pretty tolerant when it comes to unauthorized use if I’m given credit and my web address is provided. I’m not okay with unauthorized use if I don’t receive credit or my images are used in a commercial way. However others feel differently and do not want their images used in any way without permission. They insist that if you don’t protect the use of your images, you actually lose your image rights over time. If you’re concerned about this, please do some research or seek some legal council.
Once you’ve decided where you stand on this issue, the next step is to find out who might be using your images. Here’s how you do it:
1. Go to Google.com and click on “images” at the top left of the page.
2. On the right hand side of the search box there is a camera icon, click on this to search by providing an “image” instead of a “search phrase.”
3. Select “Upload an Image” to supply the photo you want to search for and then hit the search button. You’ll then be given search results showing you where on the Internet that image has appeared. Very cool!
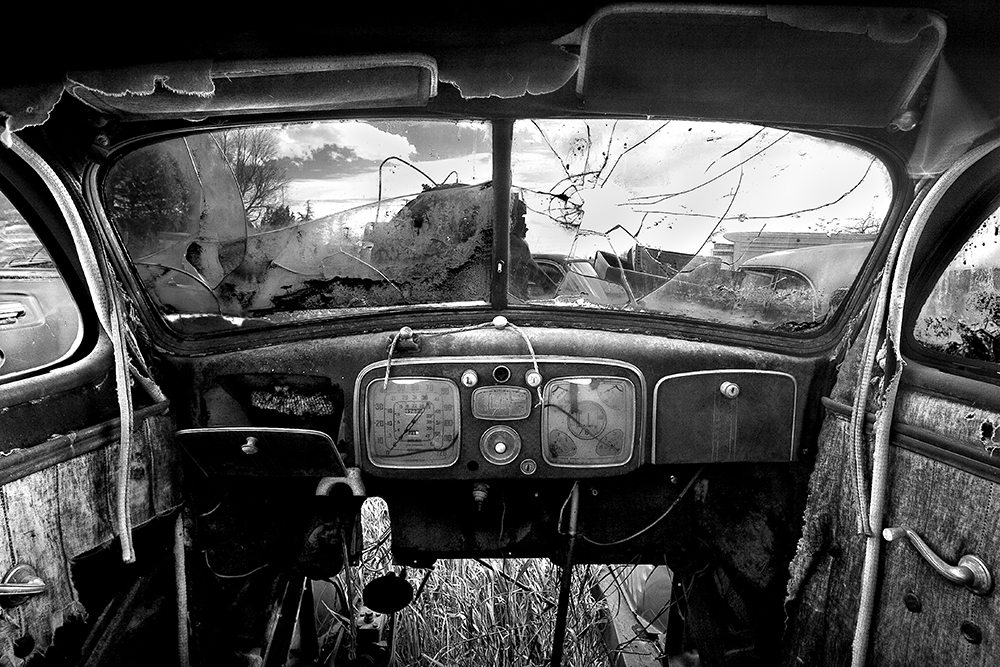
It’s fascinating to explore these links and see where you images have appeared. Today in just 10 minutes I discovered that I had won 2nd place in a Russian photo competition (that I hadn’t even entered) and found an auto parts company using my “Old Car Interior” image without permission or attribution!
Google has provided a great tool that is perfect for photographers and artists. But as important as knowing where your images are, is knowing what your policy will be for unauthorized use.
My thanks to Harold Ross for teaching me about this new tool via his blog; http://haroldrossfineart.wordpress.com/
Cole
P.S. My next blog will be a follow up on the Facebook issue. I’ll tell you what I’ve learned from all of the comments you’ve provided, and I’ve learned a lot!
April 9, 2011


I just hate it when I keep learning the same lesson over and over again; or in other words I keep making the same mistake over and over again!